In this video, you'll learn how to creatively crop and stylize a static image into a dynamic video for social media.
To start, we need to make this image in the full frame.
So to do that we need to scale it by just clicking a corner and dragging it out until it fills the full frame, like so.
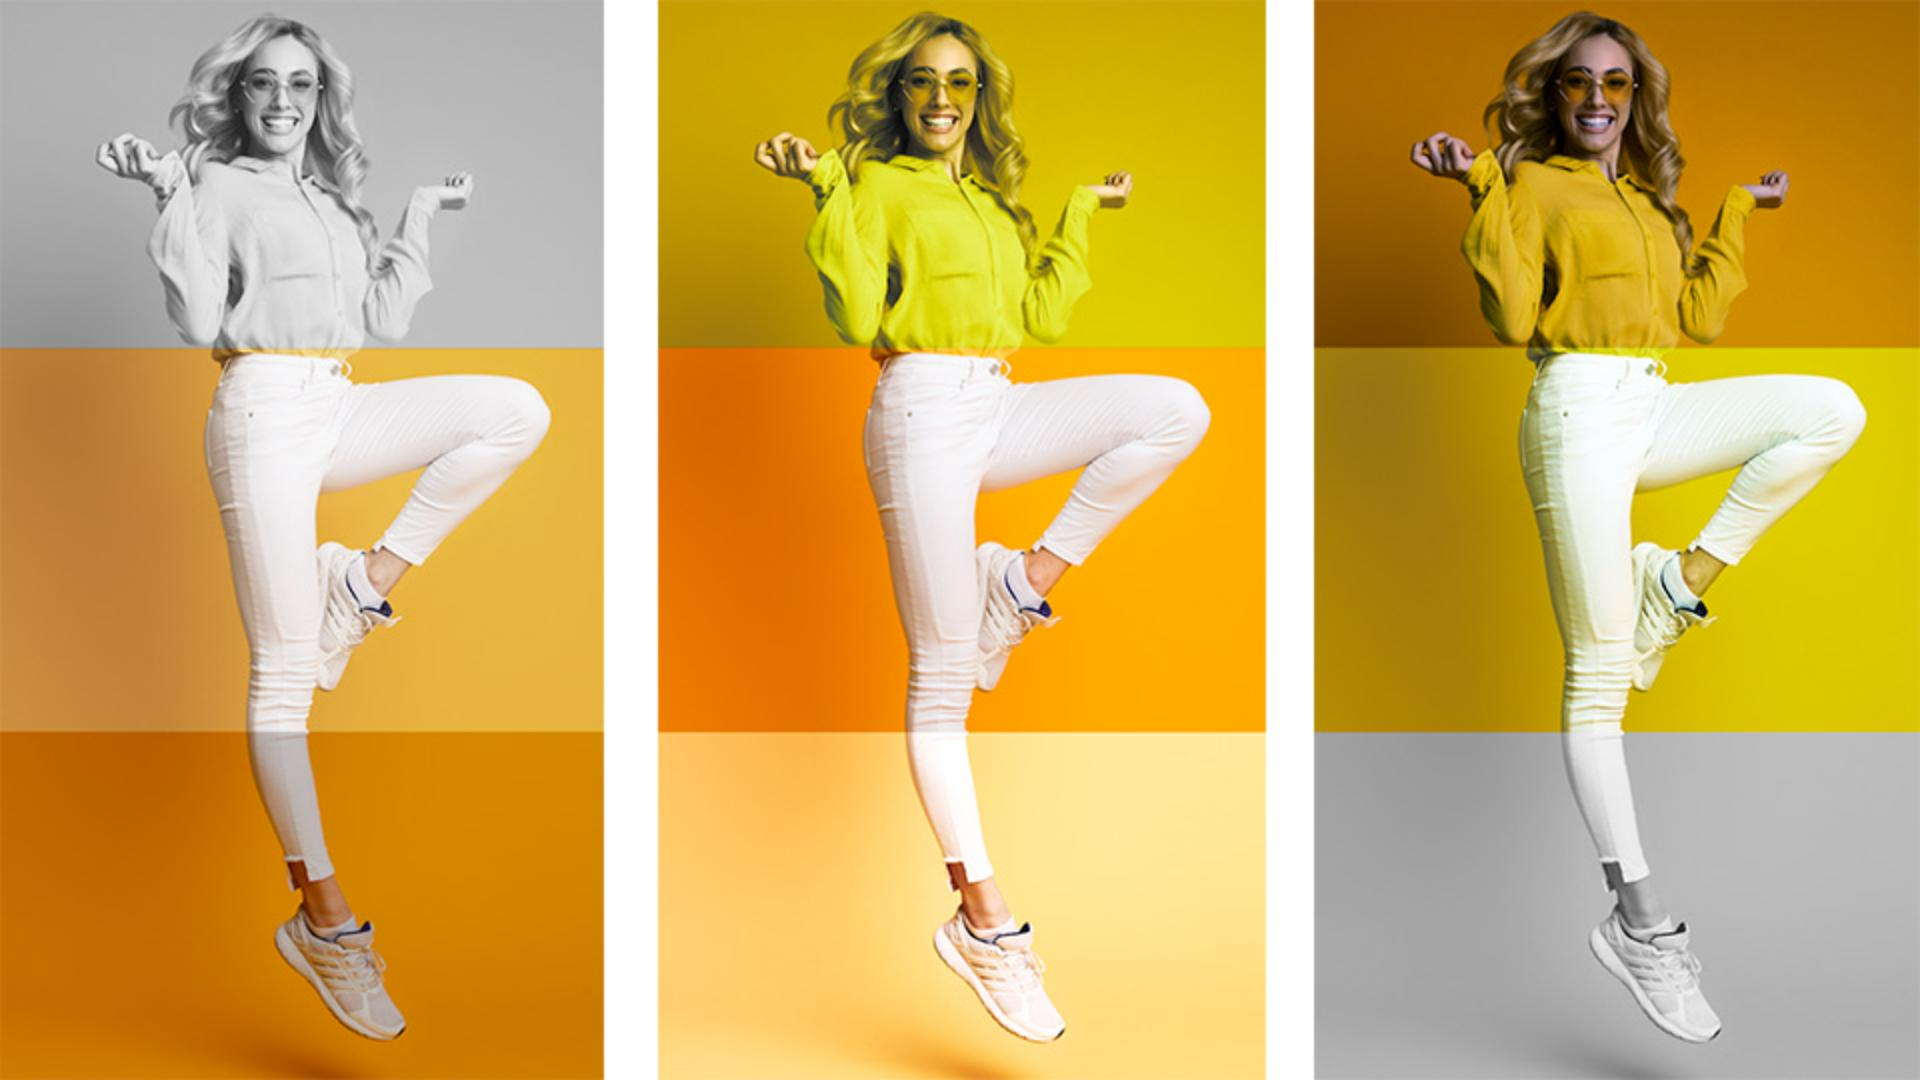
So that looks good, now we need to crop the image into thirds and make each third it's own separate layer.
So, we'll start with the first layer here.
Go over to the Crop and Rotate menu, and then you can see as we move the cropped bottom slider, we can crop just to the top portion, to make it a true third, let's change it to 67%.
Now let's duplicate the layer to make a layer that represents the third section of the body here, just select the Duplicate button, and then drag it to stack it on top of the first layer.
Now, from the Crop tools, we're gonna change the top to 33% and the bottom to 33%.
And now, we have our middle crop section, represented on video layer 2.
And let's duplicate it one more time to reveal the feet.
This time, we're going to make the top 67% cropped and the bottom zero.
So now we have the top, middle and the bottom of the image cropped.
Now it's time to add color presets to make it more dynamic.
So let's start with the very top portion and let's go to color presets, and let's choose Mono.
Then for the middle, let's also choose Mono, but let's just reduce the intensity slightly, just to have a little bit of color.
To animate the crops from top to bottom, we can play around with the timing.
So this is where we can just simply drag this video layer 2, to start at a later time, just by rolling it back.
We can do the same with video layer 3.
So now, when we play it back, it goes head, middle, feet.
To make it more dynamic, we can apply the default cross dissolves to the end of all the clips.
Now there's a keyboard shortcut for that, you can hit command A on a Mac, or control A on a PC to select all the clips.
Then hit command D on a Mac, or control D on a PC to apply the default transitions to all the end of the clips.
Now, let's go back to the beginning and let's play this back and you can see it just nicely fades in and out but we can make it a little bit more dynamic than this, we can make it longer and add some more cuts and color presets, so let's go ahead and drag out this top layer here, to be four seconds long, and then let's move the video layer 2, to meet the beginning of where the third layer transition begins.
And then the same to this bottom layer.
So now it's staggered out, it's a perfect looping video, you can see it animates into the feet.
And then fades out to the feet, just like that.
But now let's go ahead and split these layers to make new clips and more color transitions.
To do that, just simply move the play head where you wanna make a cut and split the clip.
So, right here on this video layer 3, let's hit the scissor icon to split the clip.
Then we can move the play head a little bit further down, and we can split here again.
Same with the video layer 2, let's go ahead and make a split right here, just by clicking the scissors and let's go ahead and make one more cut here on video layer 1, by hitting the scissors.
So now we have four more clips that we can apply more color transitions to.
So let's start here up at the top, which is the feet layer.
So for this new clip, let's change it to SL Bleach and then for the very end, let's change it to Mono, and this is completely random, you can chose any pre's that you like.
Then for the middle clip here, let's change it to None, to be the original color, and then for this new clip down here on video layer 1, let's change this to SL Matrix.
And to make all these different new splits more smooth, we can apply a cross dissolve transition to them.
So simply go to Transitions and click and drag Cross Dissolve at an edit point.
And then, we can actually copy this and paste it, at each edit point.
To do that hit command C on a Mac to copy, or control C on a PC to copy and then at the next edit point just click and then hit command V on a Mac, or control V on a PC to paste it.
Then we can do the same to the other edit points.
So now let's go ahead and roll the play head back to the beginning and be sure to select loop playback so you can see what the video looks like when it's looping.
So let's go ahead and hit Play and see how the final result looks.
So you can see just using some basic transitions, color presets and cropping, we were able to take this singular static image and turn it into a dynamic video.