Recording a performance in Adobe Character Animator is as easy as pressing the red record button, but this tutorial goes deeper with how to arm and disarm behaviors, blend multiple takes together, edit lip sync tracks, and create composites in Adobe Premiere Pro or Adobe After Effects.
Published
1 Basic recording and editing
Get familiar with the basics of recording in Character Animator.
Introduction
Adobe Character Animator CC allows you to create a character performance using your face, voice and other inputs like triggers, draggers, sliders and more.
When you click the red Record button,
Understanding recording, takes, and live inputs
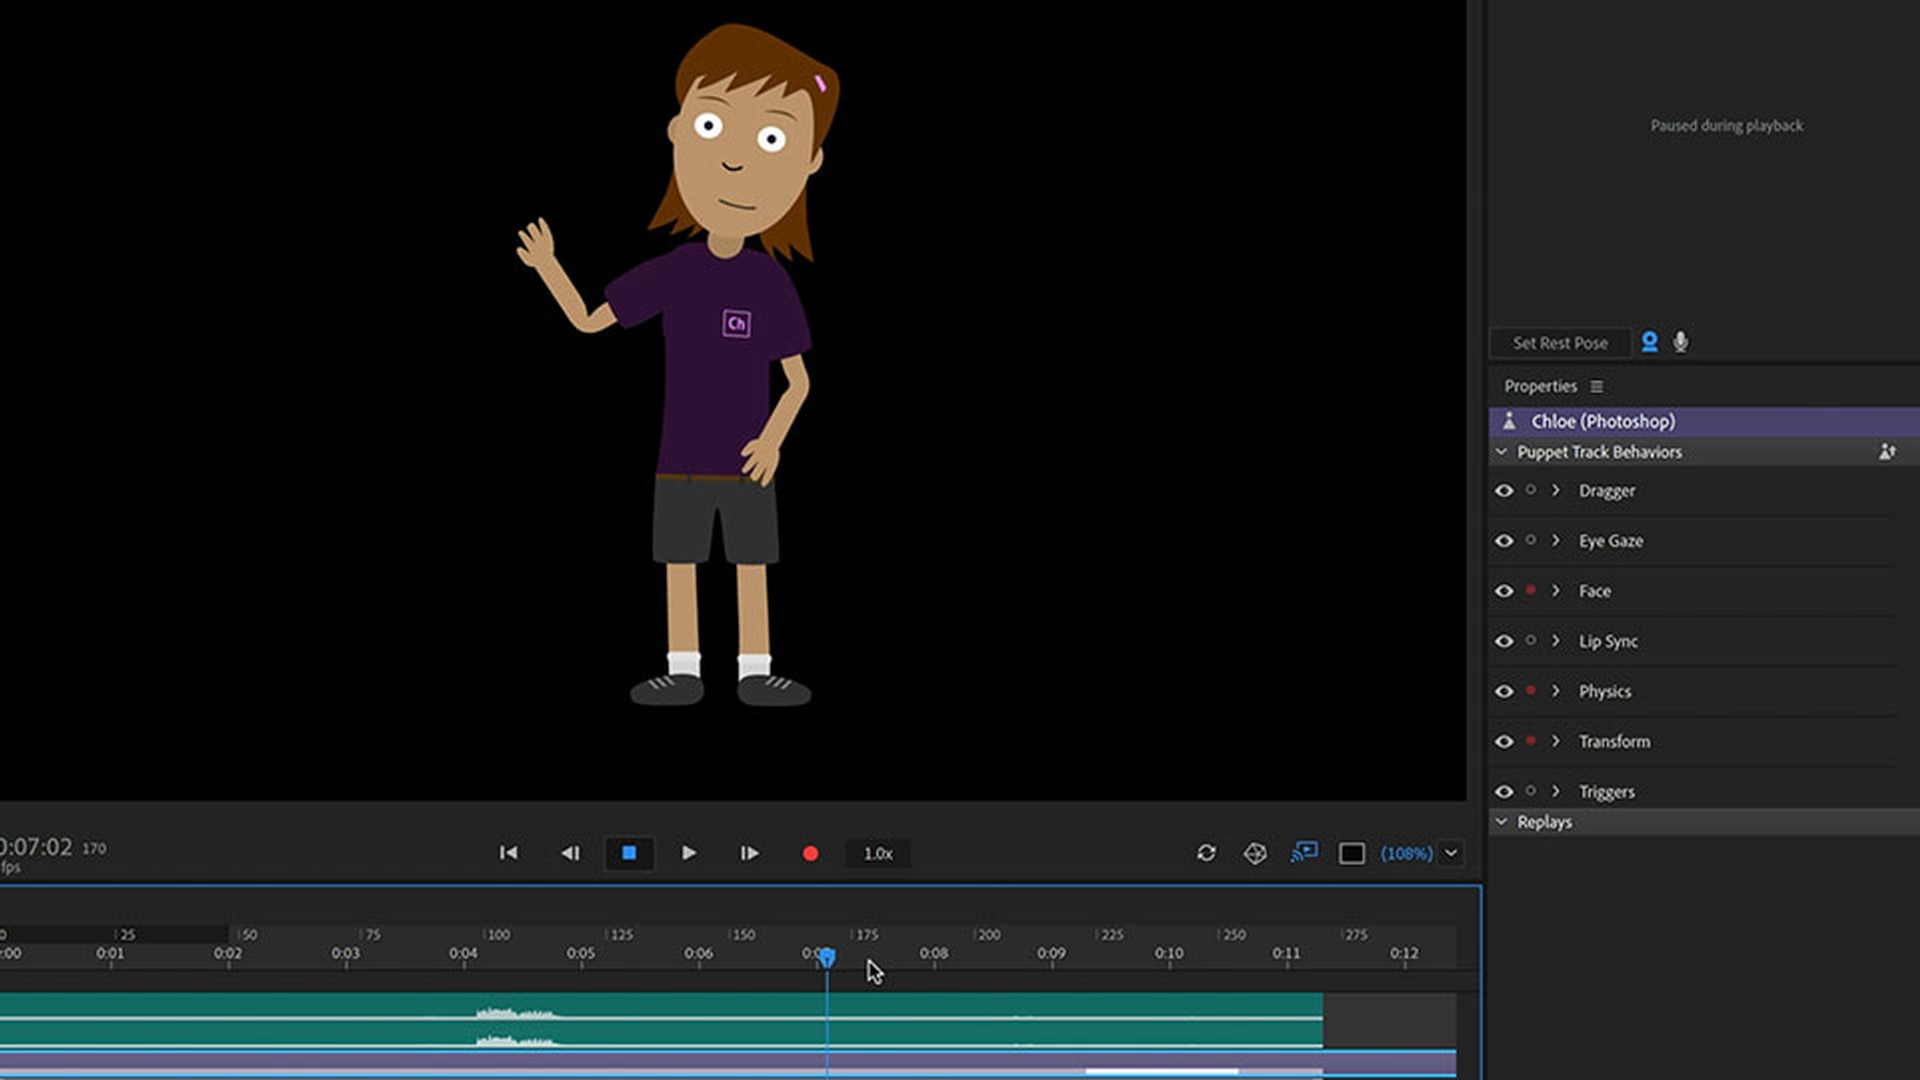
Character Animator CC records your performances, which show up in the Timeline as takes.
You can record as many takes as you want and then edit them from changing individual mouth shapes to blending multiple performances together.
In the Start workspace, let's get started by clicking the template puppet Chloe.
This will open up her original Photoshop CC file, but we won't be editing any artwork in this tutorial, so we can go ahead and Quit Photoshop CC.
Back to Character Animator CC, we should now be in the Record workspace and see Chloe moving and talking along with us in a new scene.
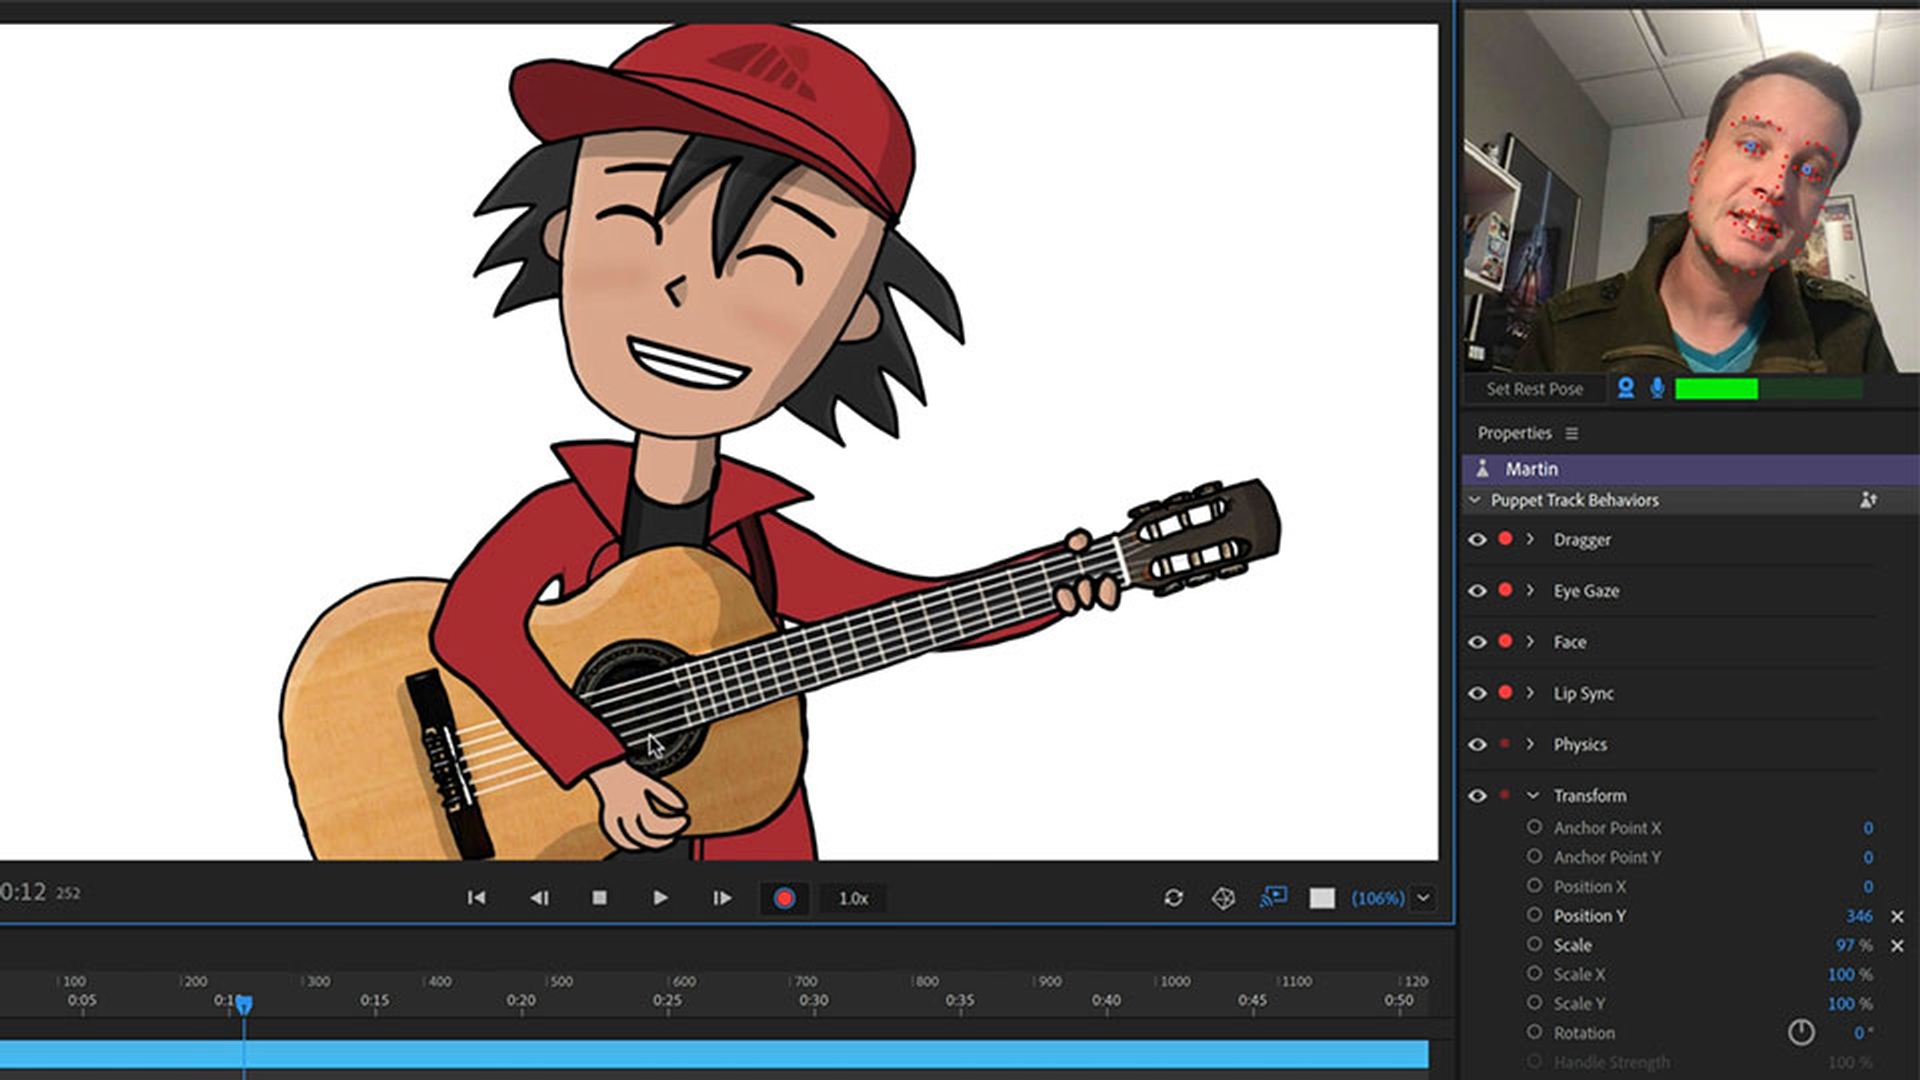
We're controlling Chloe because her track is selected in the Timeline and has a red dot next to her.
Anytime we see a red dot, it means something is armed, taken and live input and ready for recording.
The same is true of the behaviors we see in the Properties panel on the right.
Preparing and recording a character performance
We'll start with a simple recording of Chloe waving and saying hello.
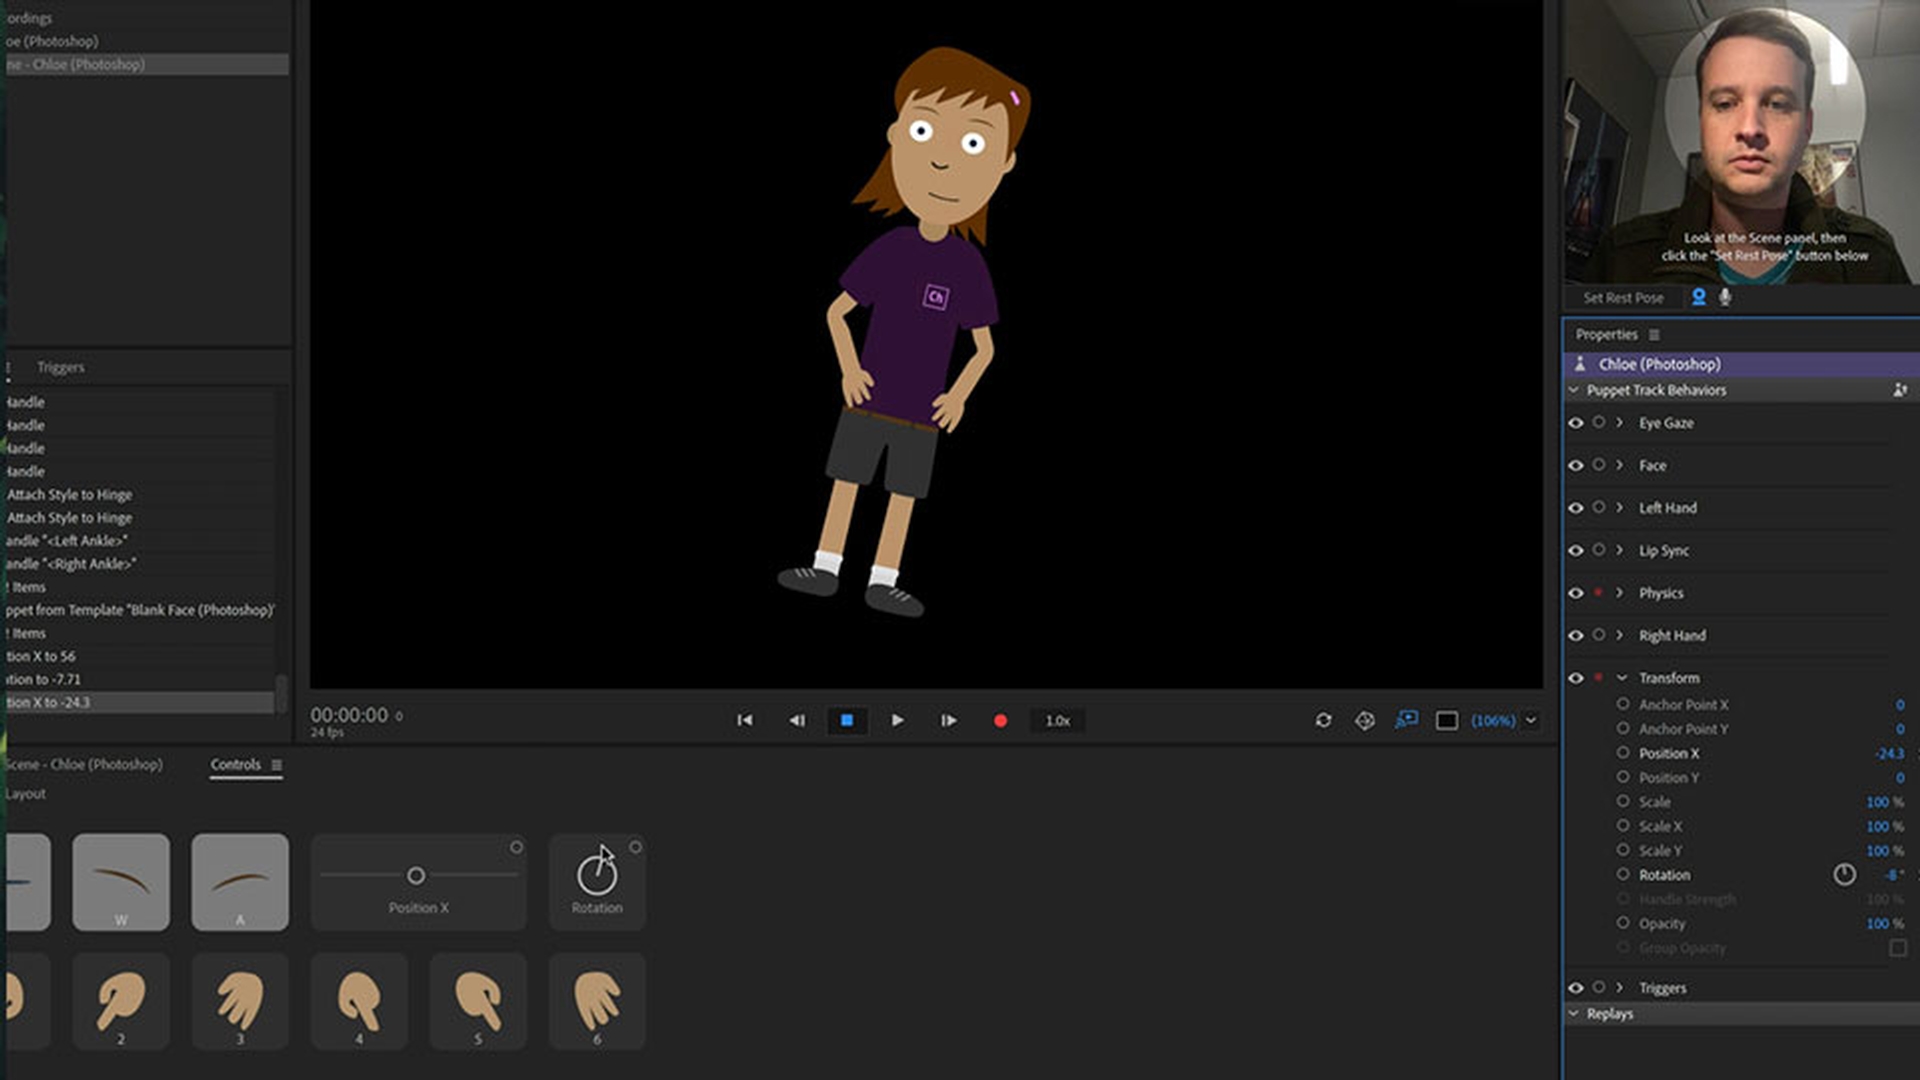
First, get in a comfortable position and click the Set Rest Post button to calibrate your character.
Then we'll post Chloe's arms on her hips by dragging them into place.
Finally, click the red Record button in the Scene panel.
We'll see a short countdown and then we can act.
We'll tilt her head to one side say, 'Hello world' and drag the right arm with the mouse to wave.
When we're done, we can click the Record button again to stop or at the Spacebar key as a shortcut.
Now we should see several things appear in our Timeline.
Reviewing recorded takes and layered behaviors
The audio track of our voice talking as well as several behavior takes kind of like how a song is made up of layered instruments like drums, guitar and vocals.
Character Animator CC performances are made up layering behaviors.
We can review our recording by clicking the Go To Start button and then clicking Play or the Spacebar key.
Navigating, scrubbing, and zooming the timeline
We can also scrub through our performance by dragging the blue Current Time Indicator around.
To get a closer view, we can also click the Zoom In and Out icons in the bottom right corner of the Timeline or drag the slider in the middle.
What you learned: Record a simple performance
Arm a character in the timeline (turn the red dot on) to control him/her.
Press the red Record button to record a performance.
Performances appear in the timeline as individual take bars.
2 Dealing with multiple takes
Record additional takes and blend performances together.
Introduction
Let's say we want to make a small adjustment and tilt the head the other way when Chloe finishes talking.
Instead of recording the whole performance again we can just focus on this one section and add a new shorter take for the head performance.
Isolating a section by arming and disarming behaviors
Let's scrub over to that part of the Timeline and then disarm the behaviors on the right that we don't want to bring in any new data for by clicking the red dots next to them.
In this case we can disarm Dragger, Eye Gaze, Lip Sync and Triggers.
We can also click to turn off the Microphone icon in the Camera and Microphone panel, so we won't record any additional audio.
So now, only the face behavior which includes head and eyebrow movement is looking for live data.
We can't drag the arms or move our pupils or see the lip sync working because those behaviors have been disarmed.
Arming and disarming behaviors is a common way to focus on one performance element at a time.
Now we can tilt our head to the side
Recording a short corrective take
press Record, and record the new head position for just a second or so.
Pressing Record again or Spacebar when we're done.
Layering takes and smoothing transitions with blending
In the Timeline, a new short face take 2 has appeared on top of the existing face take 1.
Whatever take is on top is what's visible and occluded takes get darkened below.
We're still bringing in live data so let's disarm Chloe by clicking the red dot next to her.
Now we won't be seeing anything live, just the prerecorded Timeline data.
If we play our Timeline however there are very abrupt transitions when the new take begins and ends.
We can smooth this out by using blend handles, dragging the little squares in the upper corners of the take.
Blending is a way to smoothly transition in and out of multiple takes.
Now if we play the Timeline, we should see a nicer transition between the different face takes.
We can also drag the middle of the take to show up earlier or later.
Or drag the edges to shorten or lengthen the performance.
If we drag the edge of the take beyond the length of the original recording, it will hold on the closest adjacent frame and slanted lines appear on the Take bar to indicate where a held frame is.
Managing overlapping performances with multiple dragger behaviors
If we arm Chloe's track again with the Dragger take and try to record another take dragging the arms, we might be surprised that the previous arm waving animation doesn't seem to show up.
This is because there's only one dragger behavior on the puppet and since it's armed, it's looking for new life Dragger takes, which trumps anything we've already recorded.
Anytime a behavior is armed, it's essentially ignoring anything in the Timeline and favoring the live performance.
A simple way around this is to go to Rig mode, select the top-level character and click the plus next to Behaviors to add a second Dragger behavior.
Now we can click the menu icon next to each behavior to rename them, calling the first one Right Hand and the new one Left Hand.
Now go back to Record mode and disarm the Right Hand.
The one we already recorded the hand wave with and instead, just arm the Left Hand.
Now if we press Record, we'll see the right hand animation wave while allowing us to record the left hand independently.
What you learned: Add and edit takes in the timeline
Arm and disarm behaviors to record one element at a time.
Use blend handles to blend one performance smoothly into another.
Add an extra Dragger behavior to see the right and left hands during recording.
3 Triggers and lip sync
Record and edit trigger and lip sync takes.
Introduction
There are a couple of ways to record triggers.
For this performance, let's have Chloe close her eyes when she says 'hello' and swap in a hand position with her palm facing the other way.
Recording triggers with the triggers and controls panels
If we click the Triggers panel on the left, we can see that the 3 key is set to Switch the palm around and the B Key will hold on the blink state.
Another way to visualize this is in the Controls panel which we can get to by clicking the Controls tab directly next to the Timeline.
We can disarm the Face behavior and only arm Triggers, then press Record to get started.
When the timing is right, we can either click the Controls Panel icons or the keyboard keys to activate these triggers.
Going back to the Timeline panel we can disarm Chloe, so we're just seeing recorded data
Editing, trimming, and swapping trigger takes
and see the trigger takes now appearing below as expected. we can trim or move the bars however we want to get the timing just right.
Because both of these are swap set triggers, we can also right click these triggers to change them to another state.
We can also right click any gaps to easily add a new trigger state instead of needing to record another performance.
Refining lip sync by editing visemes
The Visemes take shows the mouth shapes that Character Animator CC automatically detected to fit the audio.
We can drag the edges of Visemes to change the duration or right click the Visemes to swap in a different one.
Lip Sync editing is a critical part of a compelling performance so it's always worth it to spend a little time making sure the right mouths seem to be lining up with the right words.
Creating lip sync from prerecorded audio
If you want to use a prerecorded audio track as your character's voice just go to File, Import... and select an audio file.
Then drag the audio file into the Timeline to add it to your scene.
Finally, make sure your puppet track and the lip sync behavior are both armed and go to Timeline, Compute Lip Sync from Scene Audio.
This will analyze the audio track and match the words with the appropriate Visemes.
What you learned: Add and edit trigger and lip sync takes
Triggers can be recorded by pressing trigger keys or icons in the Control panel.
Right-click a swap set trigger to change it, or right-click a trigger take gap to insert a new trigger.
Lip sync visemes can be trimmed, moved, or swapped to match the audio track.
Use Timeline > Compute Lip Sync From Scene Audio to make a lip sync track from pre-recorded audio files.
4 More recording and editing tools
Use helpful tools like slo-mo recording and the work area bar.
Introduction
The Transform and Physics behaviors have smaller dots next to them.
This is because they're passive behaviors.
In most cases you don't have to worry about arming or disarming them.
They just work passively behind the scenes.
The same is true of the parameters inside each behavior.
So, if we adjust transforms Position X or Rotation, either in the Properties panel behaviors or Controls panel sliders, we usually don't have to arm anything because these are set values in the background, we don't need to change over time.
Recording transform changes as takes
However, if we wanted Chloe to move horizontally, we would arm Position X in the Properties or Controls panel.
Press Record and adjust the values during recording.
Then, Transform Position X will show up in the Timeline along with a Take bar representing the performance.
Using the work area and playback speed controls
Go into Timeline, Enable Work Area, will show you a Work Area bar that you can drag the middle of to reposition, or drag the edges to adjust the duration.
You can also disable or enable it by clicking the bar in the darkened area at the top of the Timeline.
When playing back, the play head will loop when it reaches the end, allowing you a way to isolate and focus on a particular section of the Timeline.
Playback and recording speed controls can be accessed by clicking the numbers next to the Record button.
Slower playback speeds can make it easier to review the timing of recorded sections.
Slower recording speeds can give you more time to react and perform, and often lead to smoother, faster motion when played back at full speed.
Sending recordings to after effects and premiere pro
Character Animator CC can also send your performance to Adobe After Effects CC or Premiere Pro CC for further editing and compositing through Dynamic Link.
In either After Effects CC or Premier Pro CC, go to File, Import and find your Character Animator CC project file or .chproj file.
Importing this will bring up a dialog box allowing you to select the scene you want to link.
By selecting the scene and clicking OK, that scene will now appear as a media asset in your project, complete with a transparent background making it easy to composite your character with other elements in a composition or sequence.
If you return to Character Animator CC and make further recordings or edits, those changes will automatically show up in the After Effects CC or Premiere Pro CC project.
Recording in Character Animator CC is a fun way to naturally move and talk to bring your creations to life.
And if you make a mistake or want to emphasize a particular emotion, you can always record and blend in additional takes to fine tune your performances.
So, try recording your animated stories and have fun.
What you learned: Refine performances with record & edit tools
Physics and Transform are passive behaviors that don’t normally need to be armed.
If a passive behavior changes, like a character changing his/her position, then you can arm and record a change for that parameter.
The work area bar is helpful for isolating parts of the timeline for playback looping and editing.
Speed controls can help with smoother recordings or easier playback editing.
Character Animator projects can be imported into Premiere Pro or After Effects through Dynamic Link.
You can control how Adobe websites use cookies and similar technologies by making choices below. But note that if you disable cookies and similar technologies entirely, Adobe websites may not function properly.
Cookies are small text files stored by your web browser when you use websites. There are also other technologies that can be used for similar purposes like HTML5 Local Storage and local shared objects, web beacons, and embedded scripts. These technologies help us do things like remembering you and your preferences when you return to our sites, measure how you use the website, conduct market research, and gather information about the ads you see and interact with.
You can make choices in the menu below about what cookies and other technologies you want us to use on Adobe sites when you visit them from this browser. You can always change those choices later by clicking on the Cookie Preferences link at the bottom of the page.
If enabled:
We can improve your experience by tailoring the site and the content to things we think might be of interest
We can better keep track of your preferences — like what language you prefer to use
We will better understand your likely interests so we can provide you more relevant Adobe ads and content on non-Adobe websites and in non-Adobe apps
It will help us improve the performance of our website and those of our partners who use the Adobe Experience Cloud
If disabled:
We won’t be able to remember you from session to session so the experience may not be tailored to your interests
You’ll still have access to the content of the site but certain features that depend on cookies may not function
You’ll still see ads, they just may not be as relevant to you
General information
You can control how Adobe websites use cookies and similar technologies by making choices below. But note that if you disable cookies and similar technologies entirely, Adobe websites may not function properly.
Cookies are small text files stored by your web browser when you use websites. There are also other technologies that can be used for similar purposes like HTML5 Local Storage, web beacons, and embedded scripts. These technologies help us do things like remembering you and your preferences when you return to our sites, measure how you use the website, conduct market research, and gather information about the ads you see and interact with.
You can make choices in the menu below about what cookies and other technologies you want us to use on Adobe sites when you visit them from this browser. You can always change those choices later by clicking on the Cookie Preferences link at the bottom of the page.
If enabled:
We can improve your experience by tailoring the site and the content to things we think might be of interest
We can better keep track of your preferences — like what language you prefer to use
We will better understand your likely interests so we can provide you more relevant Adobe ads and content on non-Adobe websites and in non-Adobe apps
It will help us improve the performance of our website and those of our partners who use the Adobe Experience Cloud
If disabled:
We won’t be able to remember you from session to session so the experience may not be tailored to your interests
We’ll still count your use of our site and services
You’ll still have access to the content of the site but certain features that depend on cookies may not function
You’ll still see ads, they just may not be as relevant to you
Operate the site and core servicesOperate site and measure engagement
Always active
These cookies are required, and they are used to enable the site and related services core functionality. Without them the site could not operate, so they cannot be disabled.
These cookies enable the site and related services’ core functionality and collect statistics about user engagement, such as counting active use to help us understand trends. These cookies cannot be disabled.
Measure performance
These cookies are used to analyze site usage to measure and improve performance. Without them Adobe cannot know what content is most valued and how often unique visitors return to the site, making it hard to improve information we offer to you.
These cookies are used to analyze site usage to measure and improve performance. Without them Adobe cannot know what content is most valued, making it hard to improve information we offer to you.
Extend functionality
These cookies are used to enhance the functionality of Adobe sites such as remembering your settings and preferences to deliver a personalized experience; for example, your username, your repeated visits, preferred language, your country, or any other saved preference.
Personalize advertising
These cookies are used to enable Adobe and our partners to serve ads more relevant to your interests. Without them you will still see ads, but they might not be as relevant to you.
Personalize advertising
These cookies are used to enable Adobe and our partners to serve ads more relevant to your interests. Without them you will still see ads, but they might not be as relevant to you.