Dust removal in Lightroom makes it possible to quickly identify and remove spots from your pictures that were created by dust on your camera sensor.
Hi, I'm Glyn Dewis, and in this tutorial I'm going to show you how to use the Dust Removal feature in Lightroom to automatically detect and remove spots in your photographs that are actually dust on your camera sensor and save you a ton of time.
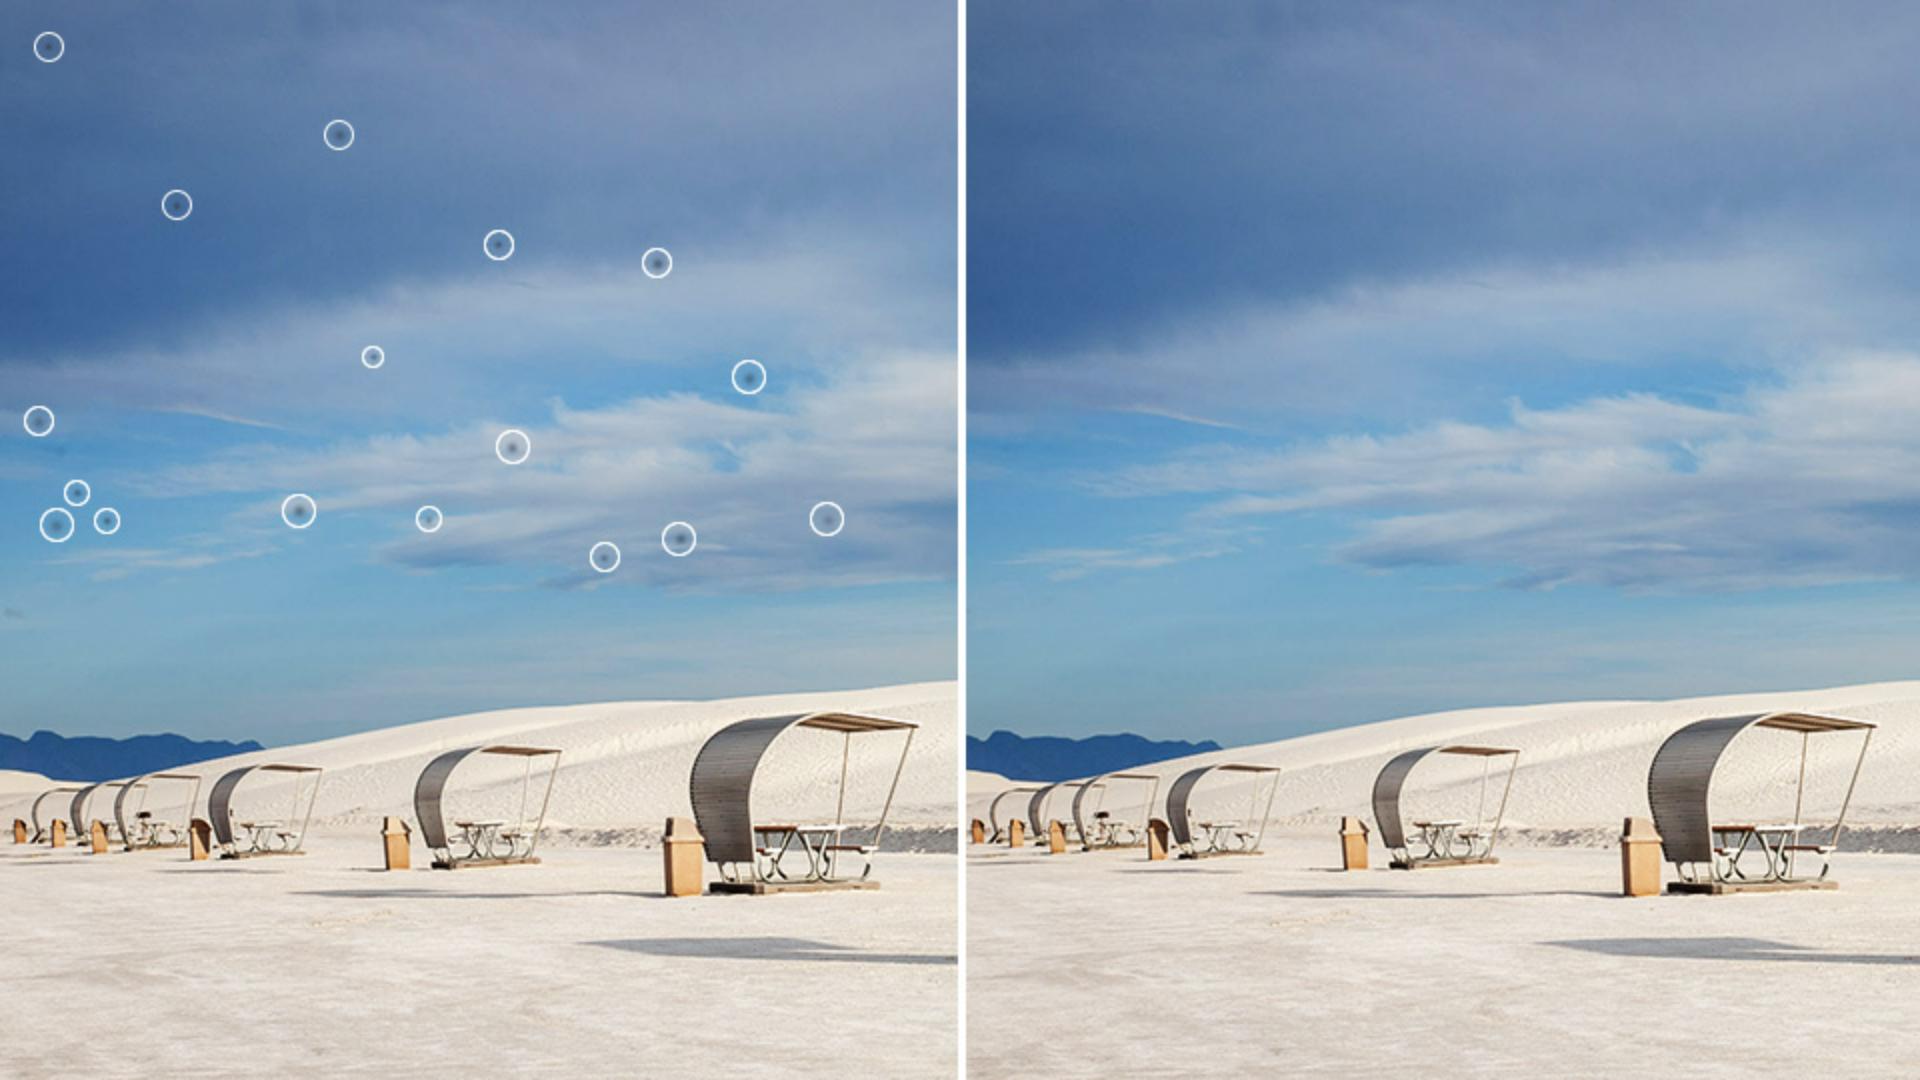
I'm going to show you this incredible feature on this image here, which as you can see when I zoom in, does have a few visible dust spots.
Before this Dust Removal feature was added into both Lightroom and Lightroom Classic, the way we would remove spots like this would be to go to the Remove section by clicking on the icon on the right-hand side of the screen, then click in the Visualize spots checkbox to turn on this black and white preview.
Then we would use the Remove Tool and brush over each dust spot individually to remove it, but depending on how many spots and marks there were, could mean this process would take considerable time.
Remove dust spots automatically with Distraction Removal
However, in the Distraction Removal section we now have Dust.
And this uses AI to identify and remove spots automatically.
I'll reset what I've just done.
Now take a look at how quick and easy it is to remove the dust spots using the AI in the Distraction Removal technology.
All we need to do is click in the Apply checkbox to turn it on, and then just a few seconds later, it's done.
All of the spots are gone.
Of course, if a spot was missed, we can still quickly manually brush over with the Remove Tool.
Customize the dust removal results
The AI Distraction Removal could potentially mistake a part of the image as a spot, when in fact it isn't.
It might be a distant flying bird, for example.
To cancel out a particular removal, all we need to do is select it, and then click on the Trash Can or press the Delete key.
Also, if one of the removals wasn't exactly to your liking, you could simply click on it and then press the Refresh icon here once or several times until you get the desired result.
Copy dust removal settings
An even bigger timesaver is that you can also copy and apply Dust Distraction Removal onto multiple images.
And that's because the technology uses AI and it will remove the dust spots particular to each image.
I'll press the letter G on my keyboard to go to the Grid view, so that I can see each of the images that I have, that I want to remove dust spots from.
And if I click on each, you can clearly see the dust spots.
I'll go back to the image that I've already used the Dust Distraction Removal on and click on it so that we can see it has this border now going around the thumbnail.
Then at the bottom of the screen we see the option to Copy Edit Settings.
However, because I only want to copy the Dust Distraction Removal, I click on the Gear icon to the right-hand side, and this is where I can choose which settings to copy.
As there are a number already selected, I'll click on Select here at the top and choose None so that no settings are chosen.
Then I'll come down to the Remove section and click in the Checkbox to select it.
I'll then open the menu and from inside, untick or deselect the other options so that Dust is the only one selected.
And then I'll press Copy.
Apply dust removal to multiple photos
To then remove the dust spots of all of the other images, I'll click on one to select it, then hold down the Shift key and click on the last one, which is the one here on the far right.
And doing so, we can see that each of the four images has the border around the thumbnail, meaning they are selected as well.
Then at the very bottom of the screen, I'll simply click on Paste Edit Settings, and just a few seconds later it's finished.
You can see now, as I show each of these other images how the dust spots have all gone.
Amazing.
That's the AI Dust Removal built into Lightroom and Lightroom Classic, which as you can see, works incredibly well, and like so many of the other features, can help save you a ton of time.
When to apply dust removal in your editing workflow
It's also worth mentioning that the best time to use this feature in your workflow is before you do any kind of masking, as this will prevent having to re-render any AI-generated masks.
But go take a look at some of your own images.
And here's something I thought I'd never say: Enjoy automatically removing any spots that you find.
Note: Stock assets provided are for practice purposes only. See terms.
What you’ll learn
Remove dust spots automatically
In the Remove panel, enable the checkbox for Visualize Spots to see a view of the image that makes the dust spots easier to see and adjust the Threshold slider to customize this display. Open Distraction Removal, choose Dust, then click the Apply checkbox to begin the AI-powered dust removal.
Customize the dust removal results
Adjust the size of the brush and click on any spots that the dust removal may have missed. If you see any dust removal spots you want to remove, select them and either click the trashcan icon in the Dust removal panel, or simply tap the Delete key. You can also refresh the results for a selected spot by clicking the refresh icon.
Copy dust removal settings
In the photo grid view (G), select a photo to which you’ve applied dust removal and click the gear icon next to the Copy Edit Settings button. Open the Select menu at the top of the Copy Settings window and choose None. Then open the Remove section and select Dust. When the settings are copied, this will ensure that only the dust removal settings are copied. Then click Copy.
Apply dust removal to multiple photos
In the photo grid view (G), select the first image to which you want to apply the dust removal settings, then Shift-click on the last photo to select all the photos between the two clicks. Now click the Paste Edit Settings button below the thumbnail grid to apply dust removal to the selected photos. The AI in Lightroom will intelligently remove the dust spots that are specific to each image.
When to apply dust removal in your editing workflow
The best time to apply Distraction Removal in your editing workflow is before you do any masking for specific areas in the image. When dust removal is applied after the creation of masks, Lightroom may have to update any AI-generated masks that you have applied.
You can control how Adobe websites use cookies and similar technologies by making choices below. But note that if you disable cookies and similar technologies entirely, Adobe websites may not function properly.
Cookies are small text files stored by your web browser when you use websites. There are also other technologies that can be used for similar purposes like HTML5 Local Storage and local shared objects, web beacons, and embedded scripts. These technologies help us do things like remembering you and your preferences when you return to our sites, measure how you use the website, conduct market research, and gather information about the ads you see and interact with.
You can make choices in the menu below about what cookies and other technologies you want us to use on Adobe sites when you visit them from this browser. You can always change those choices later by clicking on the Cookie Preferences link at the bottom of the page.
If enabled:
We can improve your experience by tailoring the site and the content to things we think might be of interest
We can better keep track of your preferences — like what language you prefer to use
We will better understand your likely interests so we can provide you more relevant Adobe ads and content on non-Adobe websites and in non-Adobe apps
It will help us improve the performance of our website and those of our partners who use the Adobe Experience Cloud
If disabled:
We won’t be able to remember you from session to session so the experience may not be tailored to your interests
You’ll still have access to the content of the site but certain features that depend on cookies may not function
You’ll still see ads, they just may not be as relevant to you
General information
You can control how Adobe websites use cookies and similar technologies by making choices below. But note that if you disable cookies and similar technologies entirely, Adobe websites may not function properly.
Cookies are small text files stored by your web browser when you use websites. There are also other technologies that can be used for similar purposes like HTML5 Local Storage, web beacons, and embedded scripts. These technologies help us do things like remembering you and your preferences when you return to our sites, measure how you use the website, conduct market research, and gather information about the ads you see and interact with.
You can make choices in the menu below about what cookies and other technologies you want us to use on Adobe sites when you visit them from this browser. You can always change those choices later by clicking on the Cookie Preferences link at the bottom of the page.
If enabled:
We can improve your experience by tailoring the site and the content to things we think might be of interest
We can better keep track of your preferences — like what language you prefer to use
We will better understand your likely interests so we can provide you more relevant Adobe ads and content on non-Adobe websites and in non-Adobe apps
It will help us improve the performance of our website and those of our partners who use the Adobe Experience Cloud
If disabled:
We won’t be able to remember you from session to session so the experience may not be tailored to your interests
We’ll still count your use of our site and services
You’ll still have access to the content of the site but certain features that depend on cookies may not function
You’ll still see ads, they just may not be as relevant to you
Operate the site and core servicesOperate site and measure engagement
Always active
These cookies are required, and they are used to enable the site and related services core functionality. Without them the site could not operate, so they cannot be disabled.
These cookies enable the site and related services’ core functionality and collect statistics about user engagement, such as counting active use to help us understand trends. These cookies cannot be disabled.
Measure performance
These cookies are used to analyze site usage to measure and improve performance. Without them Adobe cannot know what content is most valued and how often unique visitors return to the site, making it hard to improve information we offer to you.
These cookies are used to analyze site usage to measure and improve performance. Without them Adobe cannot know what content is most valued, making it hard to improve information we offer to you.
Extend functionality
These cookies are used to enhance the functionality of Adobe sites such as remembering your settings and preferences to deliver a personalized experience; for example, your username, your repeated visits, preferred language, your country, or any other saved preference.
Personalize advertising
These cookies are used to enable Adobe and our partners to serve ads more relevant to your interests. Without them you will still see ads, but they might not be as relevant to you.
Personalize advertising
These cookies are used to enable Adobe and our partners to serve ads more relevant to your interests. Without them you will still see ads, but they might not be as relevant to you.