Introduction
Masks in Lightroom on the web are a powerful but easy-to-use feature that make it possible to make adjustments in specific areas or objects within an image.
Hi, I'm Glyn Dewis, and in this tutorial, I'm going to show you how to use the Masking feature in Lightroom on the web so you can apply adjustments to exactly where you want them in your images.
Adjustments to the entire photo vs. adjustments to specific areas
When editing our images, there are so many different adjustments we can make.
For example, if I dive into the Edit section by clicking on the icon here on the right-hand side, I can adjust the Exposure of the image by dragging the marker here to the right, making it brighter, or to the left, making it darker.
However, these are what we call Global Adjustments, meaning that when we use them, the adjustments we make affect the entire image.
There is a way, though, that we can make adjustments to a specific area of an image without affecting anywhere else.
And this we can do with masking.
Masking is found over on the right-hand side of the screen by clicking on this icon.
And when we do, we are presented with a number of different types of masks that we can use.
Using AI-powered masks for the sky & objects
Some of the masking options here we would use manually, but there are also some that are AI-assisted.
I'm going to click on the Sky option here, which kind of speaks for itself.
And you can see that when I do, Lightroom starts to analyze the image to identify the sky.
And then when finished, it shows us this red overlay showing what area is now masked.
This means that adjustments I now make will only appear within the sky.
For example, if I now scroll down to the Effects section and add some Clarity by dragging the marker to the right, you can see as I move the slider left and right how only the sky is being adjusted.
I'm happy with the sky, but my eyes are being drawn to this rock here in the foreground, which looks way too bright.
So, I'd like to darken that down a little.
I go to the Masking section and as we already have a mask, I'll click on the + icon to create a new mask.
And I think I'll choose an Object mask.
I'll brush over the rocks.
And when I do, Lightroom understands that where I brushed over is what I want to make a mask of.
Now I can simply darken down the rock using Exposure without adjusting anywhere else within the image.
Refine masks with add & subtract
For even more control, we can actually Add to a mask or Subtract from a mask.
For example, the rocks in the foreground that I just darkened, I think this part here has darkened a bit too much.
I think I only really needed to darken this main area here, so I'll Subtract this area from the mask.
That way it will no longer be affected by the adjustment.
To do this, I click on Subtract underneath the mask in the Masking panel, and when I do, I can then choose any of the masking options available.
For this, I'll use an Object mask because I can then simply brush around the area to tell Lightroom what it should look to make an object mask out of.
It knows that I meant in that area of the rock, and that is subtracted from the mask.
That looks much better.
The exposure across all the rocks looks a lot more balanced.
We can also mask areas of an image based on their color using a Color Range mask, and also the luminance or brightness using a Luminance Range mask.
We can rename masks so that we keep everything nicely organized by simply clicking on the three dots to the right-hand side of the mask and clicking on Rename.
Also, to see how each mask's adjustments affect the image, we can click on the Eye icon alongside each mask to see before and after.
Let me show you this because this is really cool.
First of all, I'll remove all of the masks that have been created so far.
To do that, I go to the Masking panel and click on any of the three dots to open the menu options.
And in here I choose Delete All Masks.
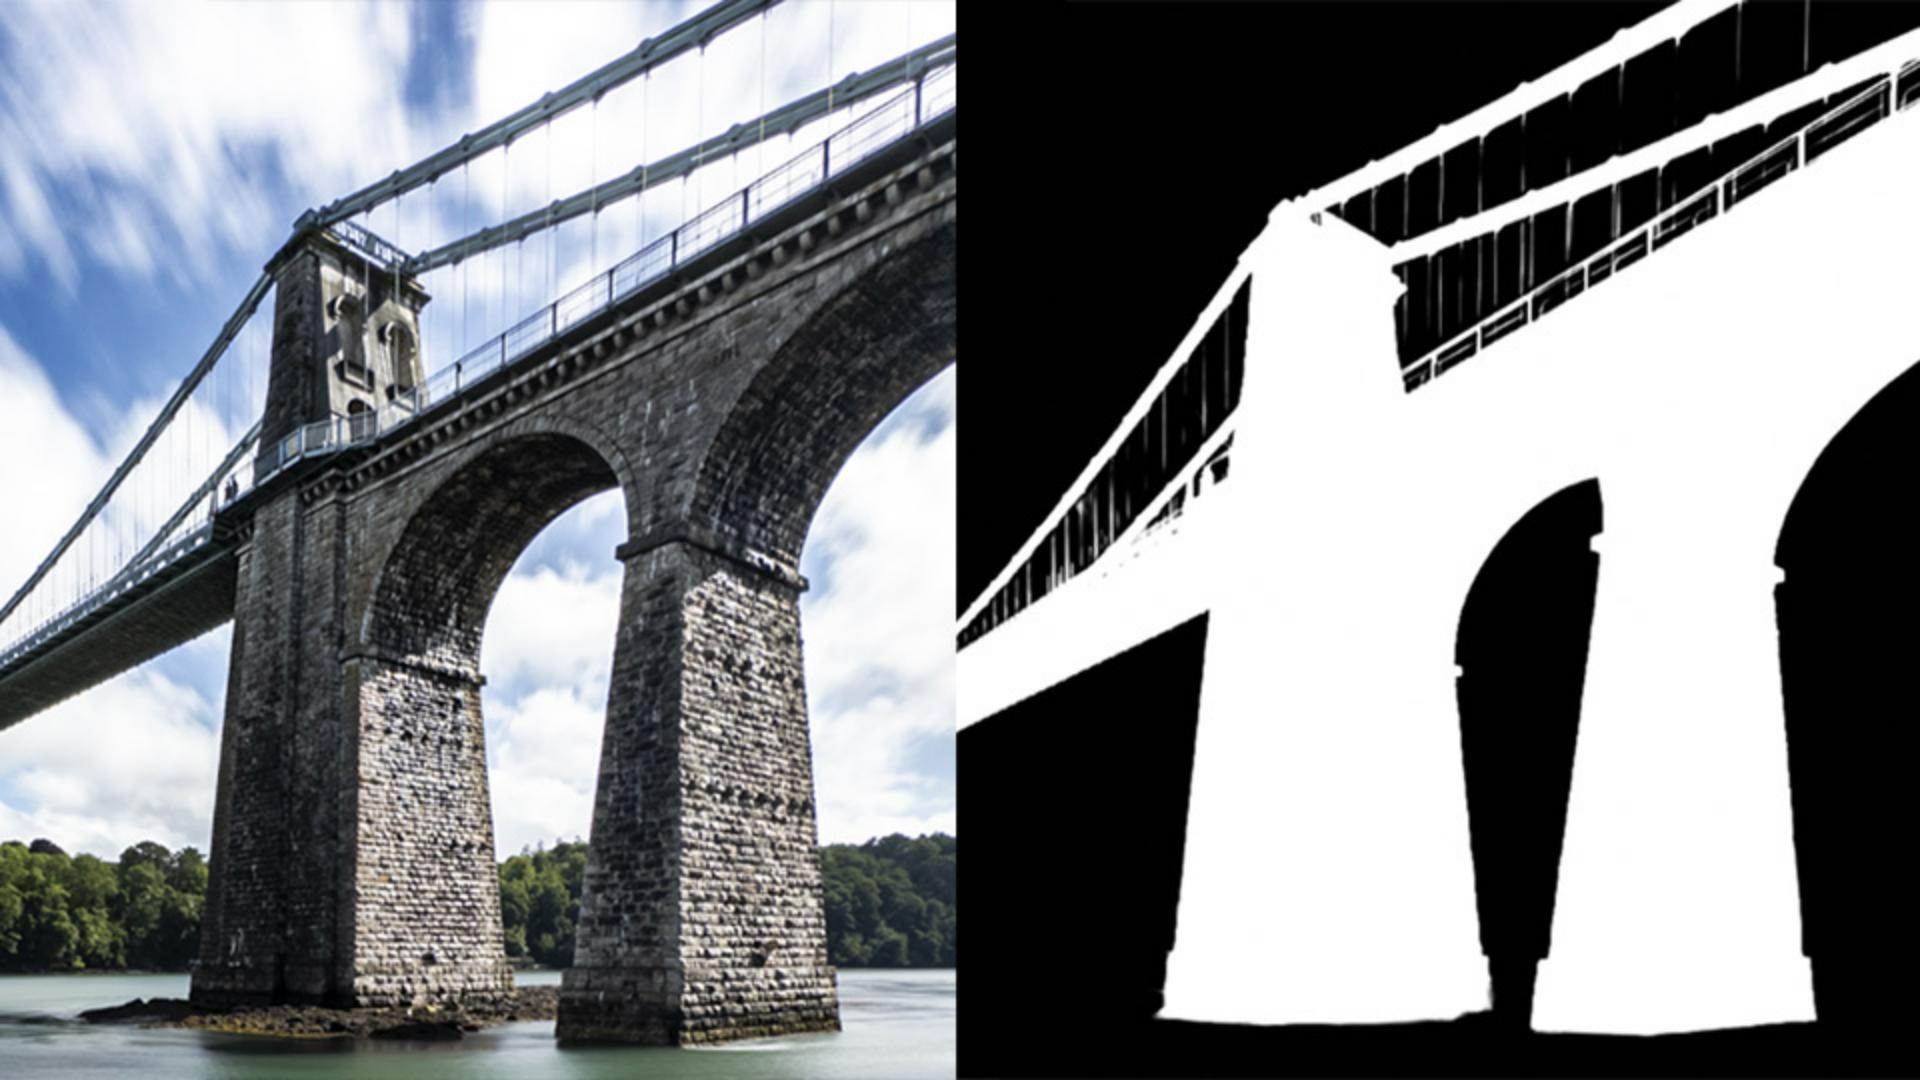
Create automatic masks for landscape areas
Now check this out - Landscape masking.
When I click on this, Lightroom then analyzes the image to see what areas it can identify, such as sky, water, architecture, and so on, as you can see here, as I hover my cursor over.
I can then take the ones I want to adjust.
I'll also tick the option to Create separate masks and then Create.
And when I do in the Masking section, each of these areas are now individual masks that I can adjust.
Oh, and all of this you could do in Lightroom mobile too.
So, you could make edits whilst out and about and then later finesse what you've done in Lightroom on the web, because all of the masking and edits that you've done syncs across.
Create masks to select people and backgrounds
This is also really useful when editing images containing people.
With this image open, when I go to the Masking section, we see the People option.
When I click on that, Lightroom detects people in the image and also detects individual parts, just like it did when using the Landscape masking.
I'll go with the mask of the Entire Person as he looks a little bit underexposed.
I click on Create, so I can now use Exposure to brighten the subject without adjusting anywhere else.
I think also the background could be darkened a little.
So, I click on the + icon to create a new mask and then use the Background mask option.
AI detects the background and then I can adjust it.
This is masking in Lightroom on the web, an incredibly powerful function that - as you can see - makes it super easy to apply edits to individual parts or areas of an image.
Have fun using them.
