Create a composite with blending modes
Learn how to use layer blending modes to combine images.
Published
Introduction
One of the cool things about creating composites in Photoshop is that there are so many great techniques you can use to combine photos.
The Blending modes in the Layers panel offer some of the most interesting ways to do this, for both practical purposes as well as amazing effects.
Hi, I'm Seán Duggan from the Adobe Learn team.
You know, for some types of composites, the Blending modes can accomplish quite a bit.
In this tutorial, we'll explore some essential concepts for understanding how certain Blend modes can work for compositing projects.
I've already created all the layers for this composite, so that we can explore how some of the Blending modes work and give you some ideas for how you might use them in your own compositing projects.
Let's start with the top two layers,
Exploring blend modes in a composite setup
Blue Ribbons on White and Blue Ribbons on Black.
I'm going to begin with the Blue Ribbons on White.
So I'll turn off the visibility for the other layer just to take it out of the equation.
I'll click to open the Blend mode menu at the top of the Layers panel to reveal all of the Blending modes.
If you move your cursor over the different Blend modes in the menu, it will preview the effect on your image, which is very useful for seeing how the different blend modes affect your photo.
Another thing to notice is that the modes are divided into specific groups.
This is important because two of the groups up near the top of the menu, the ones with Darken and Lighten as the first blend modes, will give you a clue as to how they'll affect the image.
Using darken blend modes to remove light backgrounds
The Darken Blend modes compare the color and tonal values of the active layer with the underlying layers and will emphasize whatever is darker on each layer.
These Blend modes also do not show anything that is white.
So, for instance, with the Multiply Blend mode that I've chosen here, you can see that the white areas on this layer are not visible at all, but the darker areas of the blue ribbons are visible because they are darker than the layer below.
The Darken Blend modes are very useful anytime you have dark subject matter on a white or light background that you want to easily blend into a photo.
The Lighten Blend modes will compare the tonal and color values
Using lighten blend modes to remove dark backgrounds
on the active layer with the underlying layers and will emphasize whatever is lighter on each layer.
For this layer that already has a white background, it's covering the scene below because of course it's much lighter than the portrait of the woman, so that's not really working.
I'm going to turn that layer off, and I'm going to click the Blue Ribbons on Black layer to make it active.
Now I'll set that layer to the Lighten Blend mode.
And now we're getting somewhere.
This actually looks pretty cool.
So this is the Lighten Blend mode, and we also have Screen, Color Dodge and a couple of others.
I'll set this back to Screen.
An important thing to know about the Lighten Blend mode is that they do not show anything that is black.
So all of the black areas on this layer are not visible in the composite.
The Lighten Blend modes are very useful anytime that you have light subject matter on a black or a dark background that you want to easily blend into a photo.
Combining blend modes with layer masks for composites
Now let's do some exploring with the rest of the layers.
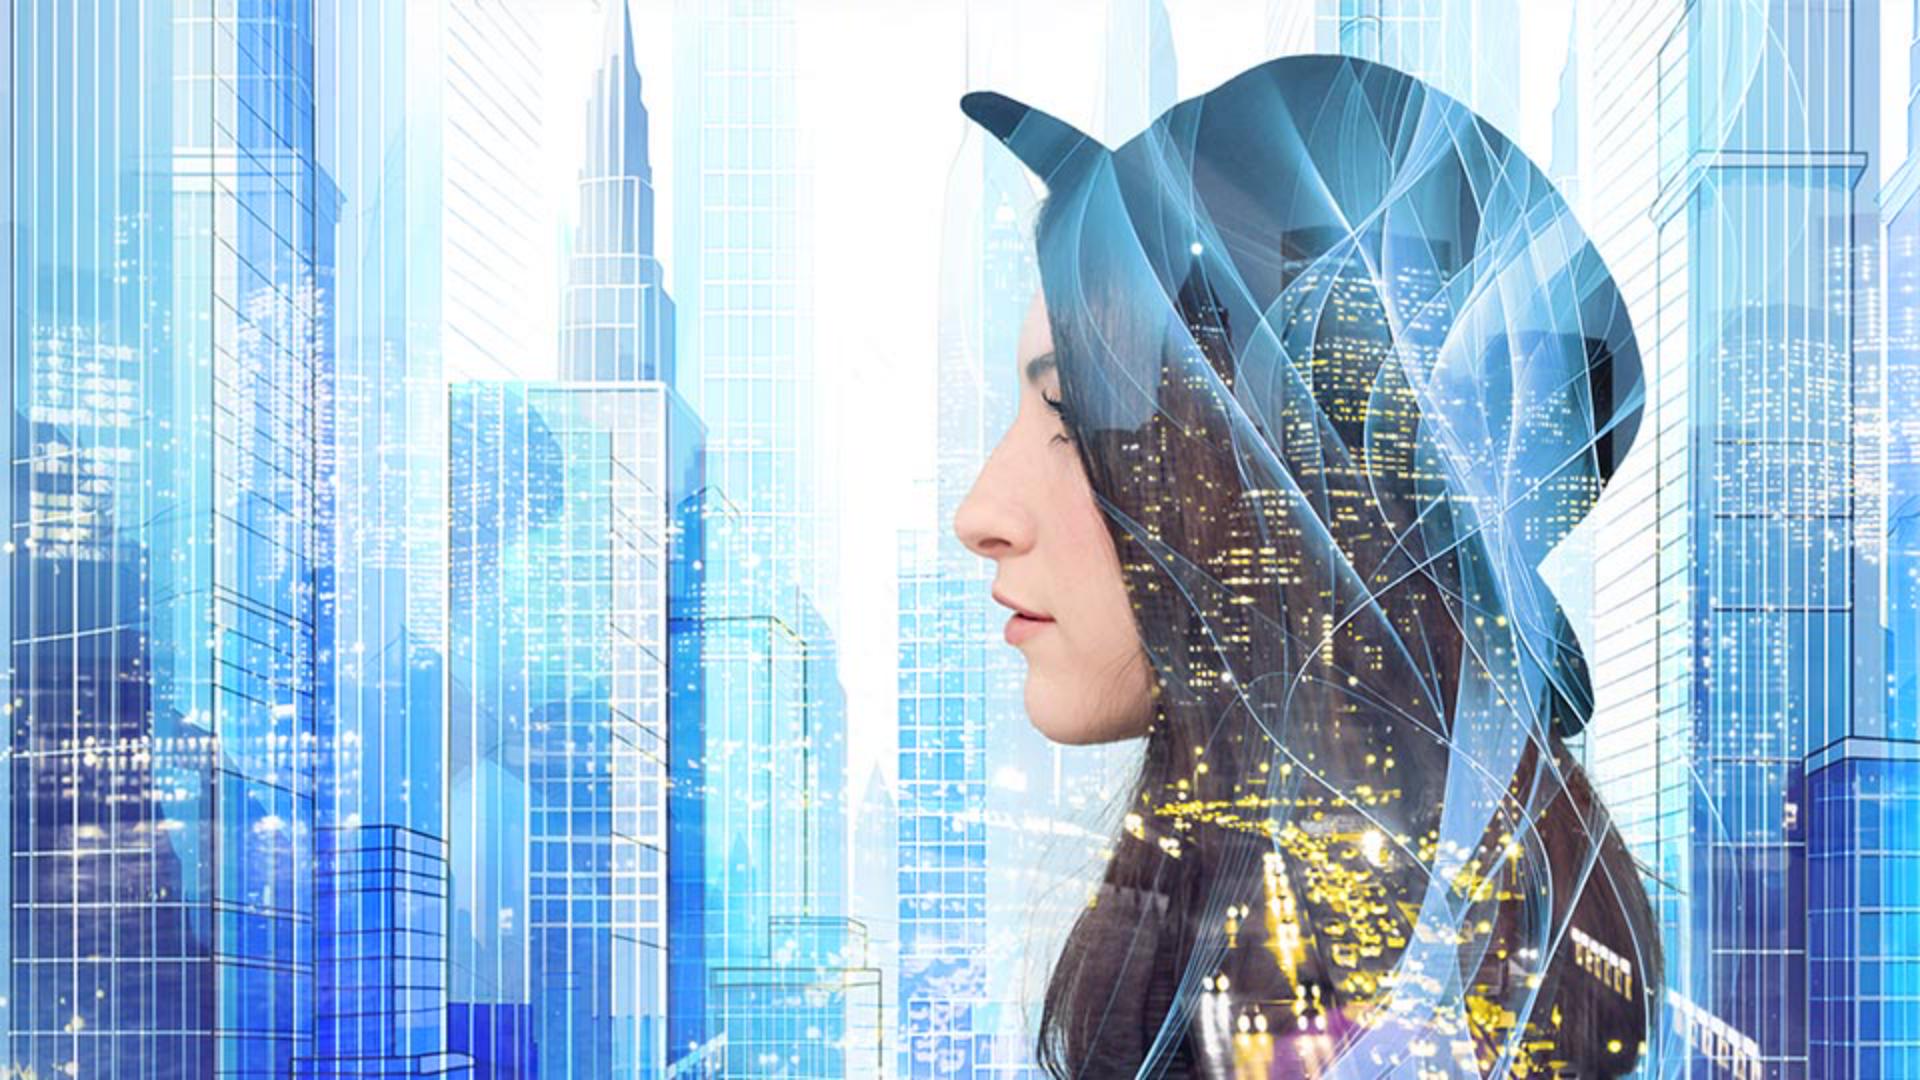
I'll turn off the Blue Ribbons on Black layer for now, and I'll turn on the visibility for the Night City layer and click to make it active.
I'll set its Blending mode to Screen, which creates a double exposure effect with the portrait below.
I don't really like the lights on the woman's face, so I'll click on the Add Layer Mask icon in the bottom of the Layers panel, and I'll get the Brush Tool, and I'll paint on the mask with black to remove the lights from her face.
When you add black to a layer mask, it hides that part of the layer.
Next, I'll click on the Portrait layer.
The layer mask for this layer is currently disabled.
In the main menu, I'll choose Layer, Layer Mask, Enable.
This turned the layer mask back on and reveals the City Art layer below, creating a new background for the portrait.
The keyboard shortcut to disable or enable a layer mask is to Shift click on the mask thumbnail.
I'll turn on the Night City copy layer and I'll select it.
This is the same city image as the layer above, but it's been flipped horizontally.
In the Blend Mode menu I'll choose Overlay for this layer.
Blend modes always affect how the active layer is blended with the layers below.
The main reason that I made a copy of this layer was to add more building lights on the left side of the City Art layer underneath.
If the Overlay mode seems too strong, you can also try Soft Light.
And remember that you can always adjust the Opacity of a layer to tone down a Blend mode's effect.
Finally, I'll go back to the Blue Ribbons on Black layer and turn it on.
The Blending mode for this layer is set to Screen, and I really like how the ribbons look a bit like long flowing hair in this composite.
I'll also add a layer mask to this layer and paint with black to hide the white lines on the woman's face.
There we go.
Our City Dreams portrait is looking pretty good.
There are many other layer Blend modes to explore.
Final adjustments and blend mode best practices
Take them for a spin with some of your own images.
Once you understand some of the key concepts that govern how they work, you'll know what the general effect will be, allowing you to use them more effectively to combine images.
Note: Stock assets provided are for practice purposes only. See terms.
What you'll learn
Use the power of blending modes to combine images
Blending modes can be used in composites in practical ways that hide light or dark areas on a layer, and they can also blend images to create interesting visual effects.
Instruction by