Removing large areas of unwanted content like the hikers standing in front of this gorgeous view might look daunting, but now that Firefly powered Generative Fill is built right into Photoshop, it's a breeze.
Hi, I'm Jan Kabili from Adobe's Learning team.
In this video, I'll show you how to use Generative Fill in Photoshop to remove content from an image.
Yes, Photoshop has other retouching tools, but Generative Fill often gives you the best results, particularly when you're trying to remove something large.
Let's see how it works.
The first step is to make a selection around the objects you want to remove, the hikers.
You can use any selection method for this.
I'll use the automatic Select subject method because it's simple and it's quick.
You could run Select subject from the Contextual Task Bar here, but we're going to do it another way to increase the odds that the selection will include all the little details of the hikers See how to quickly add objects with Generative Fill in our next video. and their gear.
In the Toolbar, click on the Object Selection Tool, then go to the Options bar and click the arrow to the right of Select subject and choose Cloud to get detailed results.
Then click Select subject.
In just a second, you've got a selection around all the hikers and their gear.
Next, we're going to expand the selection because Generative Fill often gives better results when there's some breathing room between your selection and the objects to remove.
So find the Contextual Task Bar on your screen.
I've pinned mine up here so that it doesn't move around.
If you don't see your Contextual Task Bar, go up to the Window menu and choose Contextual Task Bar from there.
In the Task Bar, click the Modify selection icon and choose Expand Selection...
In the window that pops up, type a number of pixels by which to expand your selection and click OK.
Now we've got a selection with a buffer to guide Generative Fill.
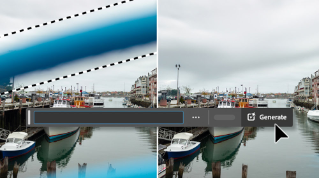
Next, go to your Contextual Task Bar again and click Generative Fill.
Generative Fill doesn't need a text prompt to remove content, so we'll skip this part and just go over and click Generate.
With Generative Fill, you can never be sure exactly what results you get since each time you generate the model makes new content that didn't exist before.
So you just have to wait a few seconds to see the results.
And here's the first result.
The hikers have disappeared, replaced by new content generated by artificial intelligence that matches and seamlessly blends in with the surrounding background.
Generative Fill makes three variations of new content to choose from.
In the Properties panel, there's a thumbnail for each variation, and you can click on each of these to see which you like best in the Document window.
If you don't see any that you like, go back to the Contextual Task Bar and generate again to get three more variations.
And that's all there is to it.
To understand a little more about what's happened, take a look at the Layers panel.
Photoshop has generated new replacement content and put it on a new layer, that's called a Generative layer.
The Generative layer has a mask in the shape of your selection, which defines where the new content appears.
This Generative layer behaves like any other layer and then it's content nondestructively hides content on the layers below.
So if I turn off the Generative layer, or if I were to delete it, the hikers come back into view.
So that's how to use Generative Fill in Photoshop to remove unwanted or distracting content.
It can be a real timesaver, particularly for removing large objects.
See how to quickly add objects with Generative Fill in our next video.
So give it a try in your own images.