For this tutorial, I'm using the Match Clip Colors.prproj file.
You can find that project file with the media associated with this tutorial.
Just double click on the project file to open it in Premiere Pro CC.
I'm in the Color workspace and you can reset the workspace by clicking the panel menu next to the name of the workspace and choosing Reset to Saved Layout.
I have a sequence here with three pairs of clips and each of these has slightly different colors that I need to match.
One of the first stages in any color correction is to make sure clips from the same scene look as if they were shot at the same time in the same location by the same camera.
This usually comes before creative color adjustments which are often applied to all the clips in a scene together.
The second clip I have in this sequence doesn't match the first because of a camera calibration issue.
With the clip selected, I'm going to the Color Wheels & Match section of the Lumetri Color panel.
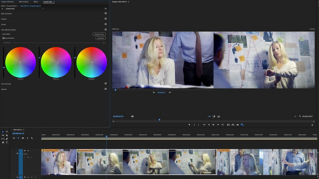
There's a button in this section that will take us to the Comparison View in the Program monitor.
This has the same effect as clicking the Comparison View button here at the bottom of the Program monitor panel.
It's a shortcut to this view.
I'm going to set my reference frame to be somewhere in the first clip in the sequence that has the correct colors.
Over in the Lumetri Color panel, notice there's a checkbox that enables Face Detection.
With this selected, faces are automatically detected, and skin tones are prioritized when automatically matching colors.
Now, I'm going to click Apply Match and now the Shadows, Midtones and Highlights color wheels and the Luma controls next to each color wheel have all been adjusted to match these two frames.
Of course, it's possible that the colors and Luma levels in the shot will change over time and it may be that you need to adjust these controls manually to improve the match.
And that's easy to do because all of the controls are still adjustable.
I can take my Midtones for example and pull them over to the blue.
I'm just making this nice and clear, so you can see it.
And so, by automatically adjusting these controls, the automated color matching can begin to help you learn the adjustments you'll need to make to achieve this kind of match.
That's automatic color matching in Adobe Premiere Pro CC.