Once you've created a look that you're happy with, it's very likely you're going to want to save it and use it again in other projects or on other clips in the same project.
And in fact, there are three ways to do that in Premiere Pro CC.
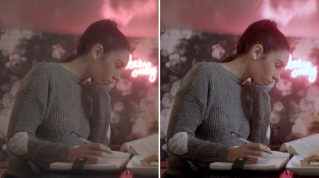
Here I've got to look that I like.
I'll just match frame, I'm pressing the F key for frame, to open up the original and you can see what a dramatic difference this has made.
I really like the strong blue cast here and the deeper shadows.
I think this works and I'm probably going to want to use it again.
One way to make a preset is to use the traditional Premiere Pro CC effect preset method.
If I have this clip selected and I go to my Effect Controls panel, I have my Lumetri Color effect on the list.
In fact, all of the controls are displayed here, just as they are in the Lumetri Color panel, and I can right click, and I can choose Save Preset...
If you have used a Premiere Pro CC presets before, this should be very familiar.
I'm going to give this a name.
I'm going to call this NYC Blue Cast and I can put in a description.
"This is a great look that I want to use on other clips."
You'd probably put a more useful description in there.
The Type option relate to keyframes.
I haven't used any keyframes, so I can just click OK.
Now, if I go to my Effects panel, I can expand my presets and there's my NYC Blue Cast with the description in the tooltip.
Now, when you create an effect preset in this way, you're incorporating all of the adjustments you've made in the Lumetri Color panel, and they'll be displayed and available to adjust later on.
Here for example, I'm going to select the clip.
Select the effect in the Effect Controls panel.
I'm going to delete that effect.
Now, I'm going to drag this preset onto the clip again and you can see in my RGB curves, there are the adjustments I've made.
This gives you a lot of control but of course, it also means that it's possible to tweak and adjust the effect later, which you may not want to do if you are sharing this as an in-house look or a production look with other editors.
Coincidentally, you don't have to right click in the Effect Controls panel to do this.
You can click on the Panel menu in the Lumetri Color panel and you've got the option to save a preset there as well.
It's exactly the same option.
You also have the option to create a .look file.
So, here in the Lumetri Color panel, I'm going to choose "Export .look..."
I'm going to browse into a "Looks" folder I've created, and I'm going to give this a name, let's call this something like "NYC 001.look", so it's easy to find and click Save.
The file I've just created locks in the adjustments I've made, and I can share that file with multiple editors or use it in this project.
To do that, I need to browse to it within the Lumetri Color panel.
So, I'm going to remove this effect again in the Effect Controls panel, I'm pressing the Delete key or the Backspace key, and now inside the Lumetri Color panel, in the Creative section, I'm going to go to the Look menu and I'm going to choose Browse...
Let's browse back in to that "Looks" folder.
Here's my "NYC 001.look" and I'm going to click Open.
The result is the same.
I've got the same blue tint, that's nice.
Deep shadows effect that I'm happy with.
But you will notice that the curves have not been adjusted inside the Lumetri Color panel.
This is, if you like, a self-contained look that's been applied in addition to any other adjustments I might make in this panel.
Now, this is great because it means that I can share a look in a way that's fixed with other editors without risking them messing up the result.
Now, the ".look" file provides high fidelity when sharing work between Premiere Pro CC and SpeedGrade CC, but you may also want to work with other grading applications.
For that purpose, you could also click on the Panel menu in the Lumetri Color panel and choose "Export .cube...", and this will create a more universally compatible file.
In fact, you can use these ".cube" files in exactly the same way in Premiere Pro CC.
So, let's export this.
Let's call this, "New NYC.cube".
Let's remove our Lumetri Color effect altogether in the Effect Controls panel, I'm just pressing Backspace.
And now back in the Lumetri Color panel, let's browse, take that "New NYC.cube" file, open, and we're done.
So, either will work.
Once again, a ".cube" file is not editable, you can't change the settings.
It's a self-contained look that you can share with other editors or of course, use in other projects and on other clips.
So, that's how to create preset looks using the Lumetri Color panel in Adobe Premiere Pro CC.