Introduction
Hello and welcome.
In this video, you will see how to texture a seat for a sports car with Substance 3D Painter.We will define the design, apply materials to parts, use graphics to create surface embossing and embroideries, and finish off by adding seams and stitching.
This nondestructive workflow lets you create variations easily by swapping materials, adjusting parameters, and using Painter’s new path tools to apply and tweak stitching fast and easy.
So let’s get started!
We’ll start with a new project, by going to file > new, selecting the default
Setting up the project and display settings
ASM material template, and loading the seat model.
We set the document resolution to 4K and leave the rest of the settings at default.
In this case, the model only has one UV tile per material.
But if your model has more than one, check the ‘use UV tile workflow’ option.
Make sure the units of your 3D model are also correct, as this matters when you use physical size for materials later on.
If you use color management in your workflow, you can turn it on here.
You can use ACES, Adobe ACE, and other color management profile, or load a custom one.
Then, you can specify the settings for each kind of assets in the color settings.
Remember that you can go into the project’s configuration and change the color management settings at any point after you’ve set up your project.
Before you start to texture, go into display settings, and apply a studio environment map so that the lighting is simple and not tinted with colors.
You can adjust the rest of the settings here too.
Here we’ll work with the shadows off and a focal length of around 30 millimeters, but you may have different preferences.
You can also turn on Anti-Aliasing here as well as activate a specific color profile for the view, if you’re working with one.
I like to keep the texture filtering on the light side, but you may want to turn this up if you have a powerful machine.
The same goes for the shader.
Finally, I will leave the index of refraction of the shader to 1.5, as I will be working mostly with plastic based materials and leathers.
But you can also change this depending on the materials you work with.
This will not affect the exported textures.
Defining seat design with masks and color blocking
Let’s start by masking out some areas and allocating colors, to define our design, and the areas where we’ll apply our materials.
Going over the model’s parts, you can see that there are four texture sets with a single UV tile per texture set.
We’ll go over these and color code areas, so have your color palette ready so you can pick your colors!
Make a new fill layer in your first texture set, leave only the color channel on, and apply the main color to it from your color palette, using the color picker.
This will be your base fabric.
Create a fill layer on top of that, leave only its color channel on, and pick your second color.
Right click on the layer and add a black mask.
With the mask selected, pick the polygon fill tool from the toolbar, select the U.V. chunk mode from its settings, and click in the UV chunks where you want to place the color.
Selecting areas with the polygon fill tool is fast and convenient if your UV layout is tidy enough.
You can use the polygon fill tool to select larger areas or whole UV chunks, then refine the selection with the brush tool.
Add a third layer to your stack and a black mask as before.
We’ll now create a second, round shape on top of this part to frame it.
This time, add a fill to the mask.
In the fill properties, look for the shape border circle.
Place it in the 2D view over the bottom part of the seat, and slightly to the right.
Then add a filter to the mask, and in the filter properties, select the mirror filter.
This will make sure that the frame you’ve created is symmetrical.
Keep in mind that for the mirror filter to work, you must have symmetrical, centered UVs.
Alternatively, you can offset its mirror axis from its properties, to align it with the area you want to mirror.
Once the shape is mirrored, you can adjust its position and border width.
Now add a paint layer to your mask and use a brush to paint the rest of the areas for your third color.
Turn the brush symmetry on and the hardness quite high to match the circle’s hardness.
If you use a tablet, it helps to turn off pressure sensitivity for hardness.
You can hold shift down after you’ve placed your first point, to create a straight line.
Now add a contrast/luminosity filter to your mask to make the edges of the gray material sharper.
We are now ready to move on to the next texture set, but before we do, we want to right click and copy the base layer, so that we can use it as an instance.
Instances are a good way to keep materials consistent across texture sets.
They replicate changes you make to the original, to all instanced copies.
Let’s name our layer appropriately and then move on to the next texture set, where we can start by pasting the first instance .
You need to have a layer in place first, before you can place an instance layer.
If you click on the instance icon, you can view the original material as well as all its instances, and you can jump from one to the other.
From this point on, any changes you make to the original will be applied to all instances.
Go ahead and create new fill layers with black masks on top, and select areas by using either the polygon fill tool or a paint layer in your mask.
Then increase the contrast of the masks if needed.
Experiment with changing the alignment of the brush to U.V. while painting.
It will give you better results in some cases by avoiding spillovers to other UV chunks.
Remember that you can add a fill layer to your mask and add all sorts of parametric shapes to it, like in this case, a rectangle.
The next
Applying and adjusting materials across texture sets
step is applying materials to these areas.
Feel free to explore the transportation section of the 3D assets Library and pick your favorite for your own model.
For this example, we just use materials that ship with Painter.
Regardless of where the materials come from, you can simply drag them from Painter’s library, into the material slots of the layers that you have already defined.
Any instances will also be updated with the original material.
Go in the parameters of the material and change its color to reflect your palette.
Setting its size to physical size will reflect its real-world size, in real-world units, like centimeters.
Then just continue and apply the rest of the materials to the predefined zones and set color and size the same way.
If you want the height or normal channel of the material on top to override the height or normal channel of the materials below, you will have to set the top layer’s normal or height channel to the “normal” or “replace” blending mode.
You might also want to rotate some of the materials to align them better, or to give your design a more dynamic look.
Now that you’ve placed your materials,
Adding thickness, seams, and embossed graphics
let’s add some thickness to them as well as some seams.
If your material has height controls, you can do this by either adjusting the height parameters of individual materials.
If it doesn’t you can duplicate the material layer, keeping just the mask and the height channel.
Then you can get rid of the new layer’s material, and turn up its height value.
To create seams around your materials, you can add a UV border distance filter to your mask.
This will select an area along your UV chunks’ edges, allowing you to create a seam or a groove, by adjusting the layer’s height channel.
Let’s now use a graphic to add an emboss effect to one of our materials.
This is a vector graphic that was downloaded from Adobe Stock, which we re-exported as a PNG.
You can use any graphic, as long as it’s grayscale, as you will add it to the height channel of your material.Go to file > import resources and add a graphic file.
For this purpose, you can import it as a texture or as an alpha.
I will import this as an alpha here.
To apply it, create a fill layer, leaving just the height channel on, add the graphic as a bitmap mask, and τurn up the layer’s height.
Next, add a levels effect to the mask to invert it, and a mirror filter to mirror it.
Then drag it under the top leather layer.
You can then adjust its size and position in the 2D view.
Last, a dd a paint layer to the mask and delete any unwanted areas or seams.
Creating embroideries and stitching details, then exporting
Now let’s move over to Substance 3D Sampler for a minute to create some embroidered logos.
Sampler is a dedicated app for authoring materials in very intuitive ways, by stacking up filters and other elements as layers.
For this tutorial, we are interested in Sampler’s embroidery filter, which can convert graphics to embroideries.
Create a new Sampler project, Drag any graphic file that you have into Sampler’s 3D view, and select “use as bitmap”.
You may want to set the physical size of the logo here, if you know it.
Add an embroidery layer on top of the logo and set the texture tiling for the 3D view to one, so there is no tiling.
In the embroidery properties, set the color count to one and the orientation of the fill stitching to whatever works for you.
In this case, I will choose auto.
Add a colorize layer on top, and expose the color parameter so that you can access it in Painter.
Under color variation, turn luminosity down to zero and color up to one, so that the embroidery’s color is the driver for its color variation.
Do the same for any other logos.
Then click the ‘send to painter’ icon to send your embroidery materials over to painter.
Drag and drop an embroidery material to the part you want.
As it is a projection layer, you’re able to place it in the 3D view, as well as by using numeric values.
To make the logo’s background transparent, go to the texture set’s settings and add an opacity channel.
Then under channels mapping in the material properties, set the mask to opacity.
You can then access the colorize parameter you set up in sampler to change the embroidery’s color.
With all the elements now in place, we can go ahead and add some stitching for our final detailing.
Create a new paint layer, name it ‘Stitching’, and look for the top-stitching tool in the library.
Make sure to pick the top-stitching tool and not a stitching brush, which is different.
Selecting this tool will turn on the pen tool, so that you can place editable curves.
Having symmetry on will mirror the stitching over to the other side.
Click once to place the first point and then follow along the edge of the part, to place the rest of the curve points.
You want to place the points sparsely, only adding more to go around difficult areas like corners.
This will make editing the paths later easier.
As the path’s contents are editable on the fly, you can go in its settings and change the kind of stitch, its size and thickness, the spacing between stitches, and its color.
You can also add jitter to it, and easily offset its position.
Aside from just stitching, we can also do puckering.
This will simulate the bunching effects of stitching on thick, thin, or leather fabric.
It only takes a few minutes to do stitching using this technique, and because it’s fully dynamic, you can always go back and adjust it later.
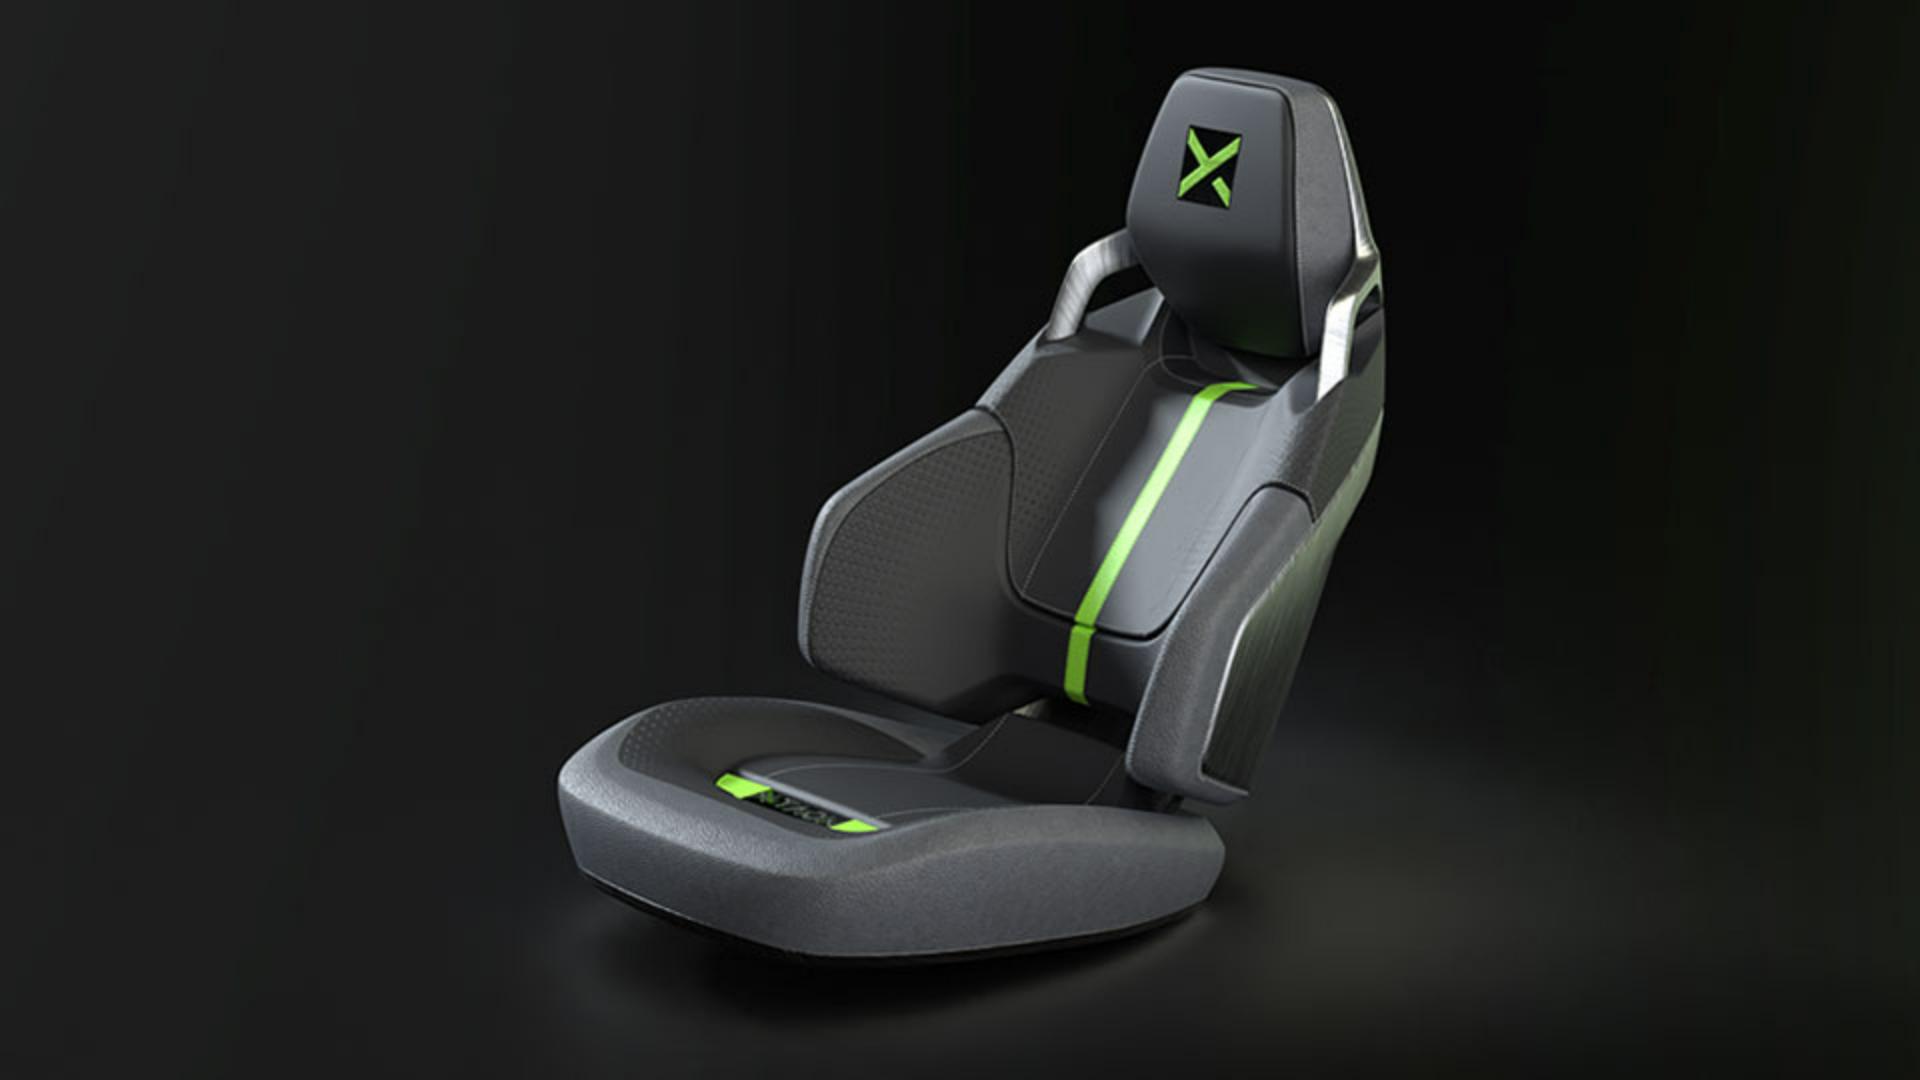
The seat is now complete!
At this point you can easily make some variations to your own liking.
All it takes is dragging and dropping materials, and then using their presets and adjusting parameters.
Or you can go back to the stitching and embroideries and change colors, finishes, size and placement.
When you’re ready, go to file > export textures and export your textures as an SBSAR package, or as separate maps, to use in the software of your choice.
Alternatively, you can send your model directly to Substance Stager for rendering, using File > Send To Substance 3D Stager.


