Introduction
Substance Painter 11.1 now has Ribbon Paths, a new advanced way to work with familiar path tools.
So how are ribbons different from the regular “Paint Along path”?
Understanding ribbon paths vs paint along path
Like the name suggests, Paint Along Path repeats a brush stamp along a path, so it’s not ideal if you wanted continuous, bending and repeating shapes, as it overlaps its stamps.
Ribbon paths solve that problem.
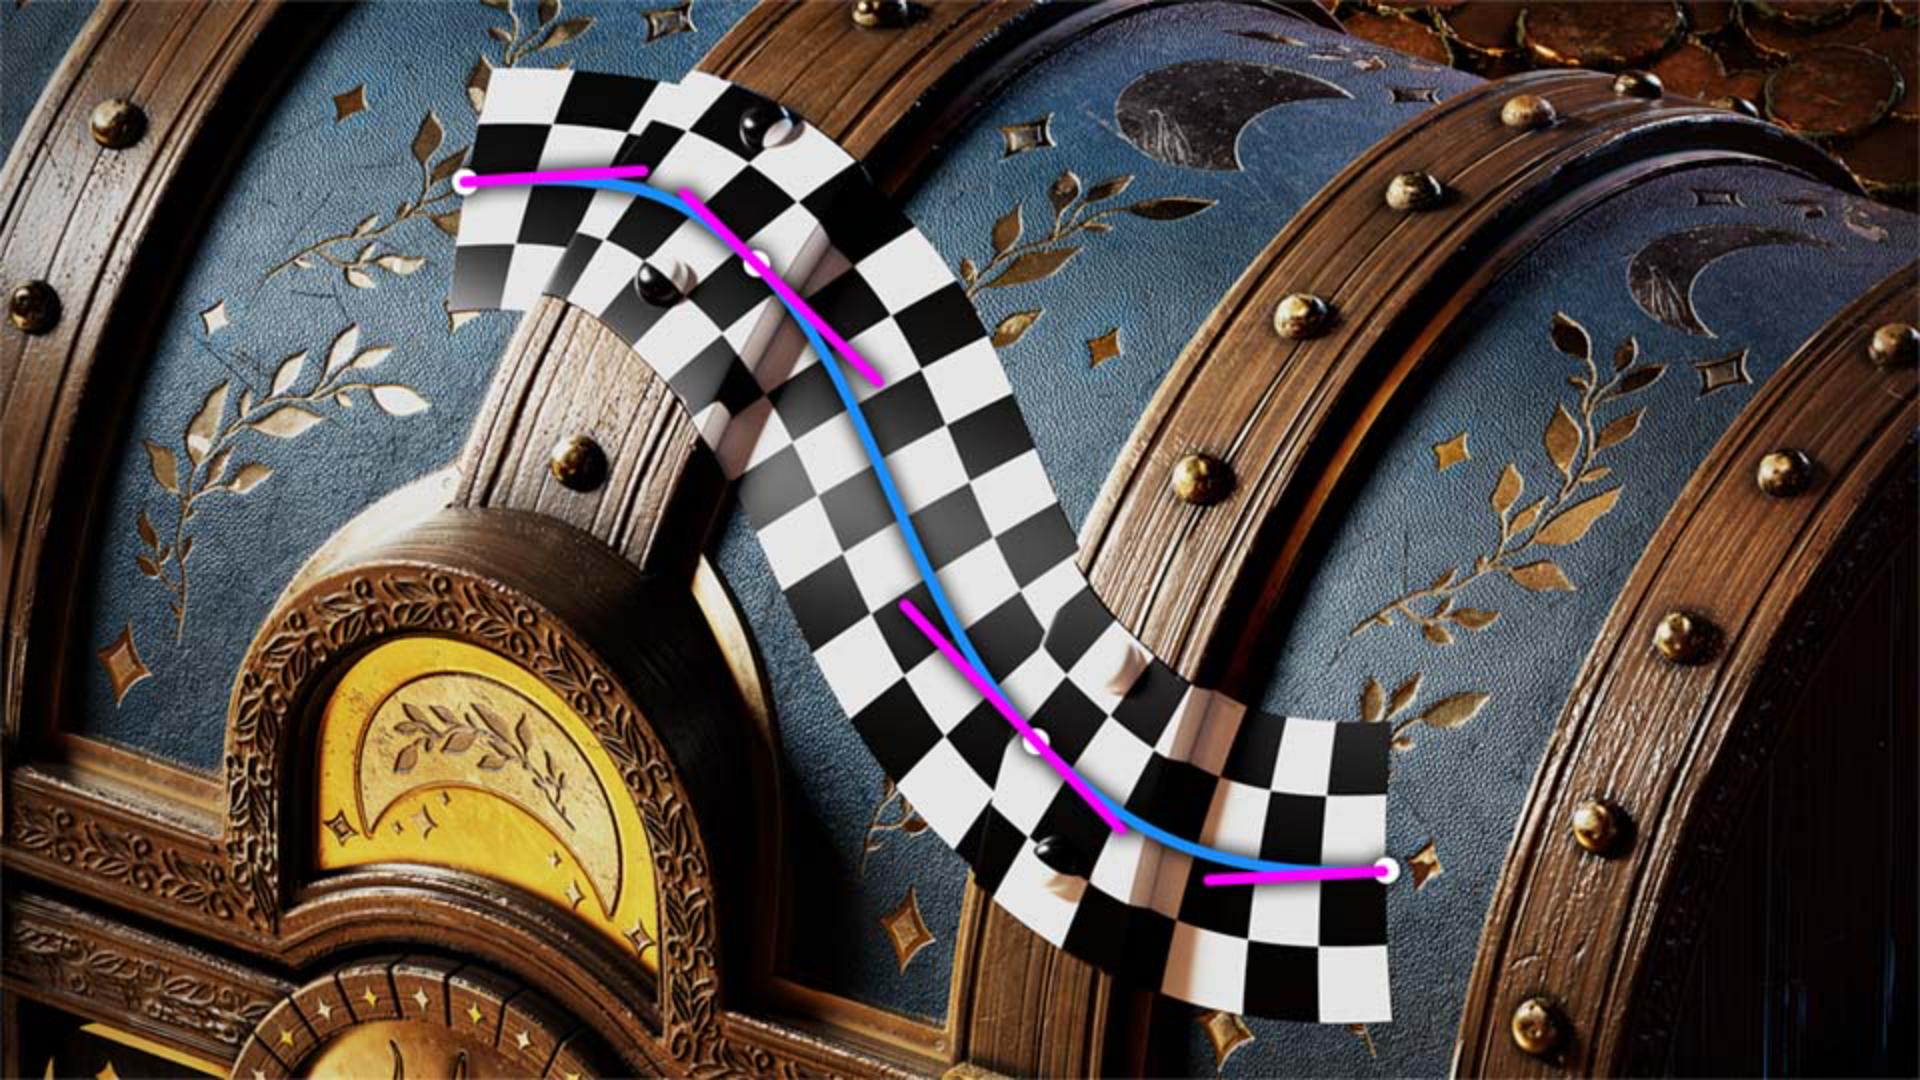
They transform and repeat a texture along a path shape, with extra control for the start and end, as well as options for sharp corners.
That means it’s possible to do things like transform text along paths, have a perfect gradient along a path, and easily create your own advanced trims to wrap around a mesh.
In short, the ribbon is the perfect tool for more precise texturing with paths.
In this video, we explore using these new Ribbon paths.
We’ll look at the new presets for paths, explore the core settings for creating your own ribbon paths and then get into the Custom Ribbon tool, which is a shortcut to creating complex ribbon setups quickly.
Before we go any further, I want to point out an important change in path settings.
All path tools, including ribbon, now split the older “pressure” value for each vertex, into two separate controls; Vertex stroke Width and Vertex Opacity, letting you control width and opacity separately instead of tying them together.
Alright, let’s start using Ribbon paths.
Using ribbon path presets for gradients, text, and patterns
Like Paint Along Paths, you can use them in two areas: directly in an empty paintable layer, or in a mask.
In an empty layer you create full material data, in a mask you only work with grayscale values.
Once you create an empty layer or mask, and select the path tool, you’ll see the new Path presets at the top of the path properties.
These presets are the quickest way to start creating with Paths, and offer a new way to quickly apply various Path settings.
The first category, favorites, is empty, but you can easily add your own by right clicking an existing preset or asset and picking “add to favorites”.
You can also tell if they are Ribbon or Paint paths, by their icon.
Let’s look at some examples.
Smooth gradients are impossible with the regular paint along path, but with Ribbons this is now easy.
Gradients come in a few presets, from repeating grayscale gradients, to tricolor full material.
Just like with regular brushes, make sure to keep in mind what part of the ribbon you work on.
With this full material gradient, I make sure the Alpha is set up correctly, before I move to tweak the material settings.
If you work in a mask, the material settings turn into a simple grayscale value.
Just like with other paths, ribbon paths have a width and projection depth you probably want to tweak.
You’ll also want to make sure to add enough points on your path, to conform to the surface as well as possible.
Another new possibility with Ribbon paths, is placing text along paths.
There are some handy presets available for this, that mainly pre-set text alignment and repetition.
Pick whatever is closest to your intentions and adjust afterwards.
The main thing to be mindful of is that your text needs to fit within the stroke the ribbon path places.
Playing with the “advanced” section of the text parameters can help solve any alignment trickiness.
The apparel section is another interesting category.
Building on the familiar stitches, these new and improved version take the classics and expand them with new and improved, stitches, seams and zippers.
Big changes are that you can now make much sharper corners with stitches, and that all of these presets nicely terminate with realistic start and end shapes, rather than just fade in and out.
Finally a worthwhile category is the hardsurface one, stacked with grip patterns, shutlines, tape and welding seams.
A trick I’m doing here, is to use the “Snap To mesh Wireframe” option, and then clicking on every vertex.
If you shift-click, the created point is a sharp corner, adding smooth tangents after that helps avoid some of the strange bends the path tool can make in these cases.
If you want to move beyond the presets,
Creating custom ribbon paths and adjusting core settings
let’s look at making our own basic Ribbon.
Pick The Basic hard Ribbon preset to start from a clean base, and draw some initial paths to get started.
Moving down through the settings, first you get the familiar path type, letting you switch this path between paint, filled, ribbon erase and smudge at any time.
The projection depth is below it, and should be adjusted on a case by case basis, but keep in mind that adding more points is usually a good idea.
Below that is the self-explanatory ribbon width and opacity, before we get to the more unique settings.
To use those, let’s swap the alpha for something easier to read and understand, we’ll use “Arrow Fire”.
Under Stroke you can then change the image Orientation to better align your image to the path.
If you set one of your vertices to sharp corner,
Controlling tiling, stretching, and corner behavior
you can test the Corner modes, ranging from Miter, Round, Bevel to Cut Join.
With Cut join you can see something interesting, the arrow are trying to scale to whole images, never cutting off and trying to place the best amount along the path.
This behaviour is set by the Stretching and Tiling parameters.
If Scale Mode is set to Stretch, and Tiling to Auto, they work together and try to place the amount of strokes with the least stretching.
Changing any of these modifies and breaks that behaviour.
Let’s turn on “Stretch Between Offsets Only” and set the tiling to Custom.
What happens now is that the first 25% of a stroke is not stretched, as well as the part past 75%.
This stretches the inside of the arrow, but not the ends.
Tiling Mode None only starts a new stroke between sharp corners.
There are a few more modifiers for specific behaviours, but we won’t get into every detail with this video, play around with them or refer to the documentation!
Building advanced ribbons with custom start, middle, and end images
What we do want to still cover, is probably the most important Presets: Custom Ribbon grayscale and Material.
We mentioned before that ribbons have special support for different start and end stamps, as well as special stamps for sharp corners.
These are normally only accessible through special Substance files created in Substance 3D Designer, but we’ve wrapped the majority of those behaviours into these two Custom Ribbon presets.
The difference between the two is that the Grayscale version is meant for use with simple grayscale alpha stamps, and only lets you paint solid color materials, while the Material version lets you use full-color images for basecolor, and has controls for Roughnes, Metallic and Height as uniform values.
When you use them, you can always set a Start, Middle and End image, along with controlling some aspects of it.
If you turn on Custom Corners, you can set two additional images for a left and right sharp corner.
These corners then get warped to match the exact angle of sharp corner you drew.
You can build some pretty complex trim Ribbons with these tools, here we’ve replicated one of the Pattern Brushes from Illustrator using Artboards straight out of Illustrator.
You can even use the artboard functionality to pick what artboard from the source AI file to use in which context.
There’s a lot possible with these new ribbon paths, we’re excited to see what you come up with!
Have fun!