Introduction and meet Martin Schmitter
[Martin Schmitter] Hi, by the end of this video, you learned the important changes and key features in Sampler 6.0 and will be able to create complex, digital materials within minutes.
With the release of Adobe Substance 3D Sampler 6.0, we introduced the new OpenPBR standard.
This results in a consistent look across software both inside and outside the Adobe Substance ecosystem that supports OpenPBR.
Set up materials with OpenPBR and custom presets
To begin, open Sampler and select quick start.
This opens the new material panel, which serves as your central hub for predefined assets.
Currently, the interface offers six high quality material presets to jumpstart your workflow.
While these are ready to use out of the box, the system is designed for many different materials.
After this tutorial, you will have the capability to create and save your own custom presets, allowing for a personalised library of frequently used materials.
Inside the panel, you have the flexibility to name the asset, tweak the resolution and select your underlying material model.
While the Adobe Standard Material option is available, we will be utilising the new OpenPBR model for this demonstration.
Customising your material presets is intuitive.
If you want to tweak an already existing preset, simply click on edit list.
Then use the directional arrows to move material channels either into your active stack or if you change your mind, out of the selected channels list.
This modular approach allows you to tailor the data your material carries, whether you are focusing on a simple matte surface or a complex fuzz finish.
When you’re happy with your preset, simply save it as a new preset.
It is now available in the custom preset list.
In this custom preset section, you can as well get rid of presets you customized, or start new presets from scratch.
For those moments when you aren’t sure where to begin, the add base material feature is an invaluable tool.
If you deselect it, you create a blank project without any layers.
Select this option to automatically apply preset values based on the most common characteristics of your chosen material type onto a base material layer.
This provides an excellent starting point, giving you a realistic base to refine rather than starting from a blank slate.
Once the material is created, inspect the results in the properties panel.
Here, you will find all the channels we previously configured.
You have the power to toggle these channels on or off depending on the specific needs of your 3D scene.
This list includes your standard PBR layers, as well as any specialised channels you’ve added.
If you change the parameters of a channel that isn’t in the list, you have to add this channel manually before.
As you can see here, they have been renamed according to the OpenPBR standard.
With this organised structure, your material is now ready for fine-tuning and export.
Build a fabric material with fuzz and tiling
Now we’ll dive deeper into the preset and create a fuzz material.
If you know the specific physical properties of your material, such as a metallic surface with specific anisotropy, carpaint with a coat layer on top or a fuzzy fabric, you can select those presets immediately.
For our first example, we will look at the fuzz preset.
By selecting this, the system automatically populates the necessary channels for a soft, fabric-like appearance.
When starting with a predefined material, like the microfiber suede fabric we are using today, you must define your asset details.
First, name your asset clearly in the properties field.
Next, choose your document resolution.
For this project, we will stick to a standard 2K resolution.
Ensure your material model is set to Open PBR.
It provides a standardised set of inputs so that a material looks the same no matter which software you use.
Let’s take a moment to review the channel list to confirm exactly what data will be included in our material output and finally create our project.
We use the cloth mesh, because we create fabric, with the studio tomoco environment map for a studio light environment as starting point and a tiling of 2.
To maintain high performance while working, keep the path tracer off by default.
Periodically toggle it on to review fine details and ensure materials align with your design, then switch it back off to resume editing.
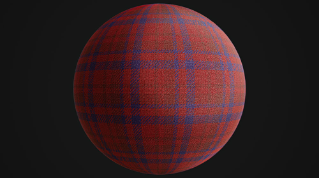
Let’s import a non tileable microfiber image into the layer stack.
We use the image to material AI filter with the fabric category to create the other base maps.
As you can see here, we have individual control for large, medium and small details.
To get rid of the bigger irregularities, we reduce the large and medium details slightly and push a bit the micro details.
Next I noticed a bit of a discoloration which we can fix by adding the equalize filter and playing with the radius.
This balances the colors nicely.
So let’s move on to tiling.
If we press F, we focus on the material in the 2D view, and pressing T shows the tile preview, which is very helpful.
Now we add the tiling filter.
In the properties panel we can enable show seam to see where the material is being cut.
We tweak the threshold slider to control the organic look of the seam and make it less noticeable.
Let’s further tweak the blur amount for a smooth result.
If we still see a strong line, we could also change the direction of the tile and decrease the region of interest until the tiling looks natural.
For a slightly rougher look we use a brightness contrast filter to increase the brightness slightly on the specular roughness channel.
Let’s use a normal height adjustment filter to reduce the normal intensity.
Use Shift + RMB to rotate the environment light frequently to check your material.
To add fuzz to our fabric, let’s go back to the fuzz section in the base material.
To see the effect better we tweak the color to red.
Now we add a channel switch filter to copy the height data onto the fuzz weight channel and use a brightness contrast filter to increase the contrast and tweak the brightness for a more subtle and realistic effect.
The same channel switch method we use to copy the roughness data to the fuzz roughness channel and tweak it as well with a brightness contrast filter.
Finally we switch the fuzz color back to white.
Here is our final result with the path tracer activated.
Explore coating, subsurface, and transmission effects
Now we explore a wood floor example.
We choose the base coating preset.
When you want to add a coat layer to a parquet floor, you have to go to the coat section in the base material layer and increase the coat weight to add an additional coating layer on top with a very low roughness value.
Here is our final result with the path tracer activated.
As final material we look into a resin material with subsurface scattering.
For this example, we start with the subsurface preset, rename it, and make sure that add a base material and apply preset thumbnail values are activated for a good starting point.
We further add the radius channel to our channel list.
Let’s use the preview sphere as mesh and the studio tomoco environment light.
With Shift + RMB, we can rotate the environment, which is really helpful to check our material under different lighting conditions.
We as well work with the path tracer activated, because subsurface scattering and transmission result in a huge visually difference between renderers.
Now we tweak the base color to a nice dark orange.
Further, we make the specular roughness less rough for a smoother surface.
This really depends on the type of resin.
Let’s introduce some subsurface scattering.
The higher the value is, the stronger the effect becomes.
A nice orange in the subsurface radius scale results in a pleasant gradient from red to orange values.
For further transmission details, we can increase the transmission weight.
Pushing the values helps to better see the effect before dialing in the final value.
A yellow transmission color results in an even nicer transmissive appearance.
With different values in transmission and subsurface scattering, you can achieve all kinds of resins.
Here is our final result.
As you can see, the OpenPBR implementation is a huge step forward and improves visual consistency across different software.
Thanks for watching, we’re really excited to see what you’ll create.
Have fun!