Craft character likeness and cinematic posters in Boards
Part 1 of 2: Jesús Ramirez shares his modular workflow to create character sheets and backgrounds for poster concepts.
Published
Introduction and meet Jesús Ramirez
[Jesús Ramirez]: Learn to generate images you can actually deliver to a client.
My name is Jesús Ramirez, and I create TV and movie posters professionally.
In real client work, a single flattened generation isn't enough.
Clients ask for revisions, layouts get repurposed, and the same artwork has to go from a large billboard down to a small social media graphic.
That means every piece of the image needs to stay editable, modular, and at high resolution.
In this video, I'll show you my professional workflow for creating fully modular and editable posters in Adobe Firefly Boards.
To demonstrate the process, we'll build a Luchador wrestling poster from scratch.
This is a two-part tutorial.
In this first video, you'll learn how to build character sheets that lock lightness across generations, composite multiple images together in Firefly Boards, and generate everything you need to composite the finished poster in Photoshop.
To start, go to the Firefly website at firefly.adobe.com.
From the sidebar, click on Boards.
Boards is Adobe's AI-powered ideation canvas.
Think of it as a sketchbook that never runs out of pages, where you can explore as many ideas as you like.
Click the Create board button, then click on New board.
From here, you can generate characters, build reference sheets, and create backgrounds, all in one place.
The goal here is to create three assets - our two wrestlers and their background.
Let's start by generating the first wrestler.
Click on the Generate image button in the Task Bar.
The first step is to select the model.
Each model has its own strengths and unique characteristics.
The same prompt can produce completely different results depending on which one you choose.
For this project, select Gemini 3.1 (w/ Nano Banana 2).
It's the strongest model here for generating consistent characters that you can later reuse across multiple poses and scenes.
Then change the Aspect ratio to Tall, since we want the full body image and this gives us the best fit.
Set the Resolution to 4K.
We want the highest quality possible, since these will become reusable production assets we'll take to Photoshop.
Then click inside the Prompt box.
To save time, I'll paste in a prompt.
You can see the prompt on screen.
Pause here to read it or take a screenshot for reference.
Notice that this is a structured prompt.
I developed this prompt formula to make prompting in Firefly more organized and easier to edit.
Think of it as a set of controls.
Use only the ones that matter for this generation.
Subject is always required, but every other element is optional.
Add more elements when you want more control and leave them out when you're happy to let Firefly decide.
For this generation, Subject does the heavy lifting.
It describes our wrestler in full, including mask, costume, and the Aztec-inspired detailing.
The remaining elements set the pose, place him on a clean studio backdrop, and shape the lighting, color, and framing.
Exclusions keep the results clean by removing anything we don't want in the shot.
Now, click on Generate and we'll see our results in a few moments.
Also notice that I use the 1,800 characters available for the prompt.
Keep an eye out for those limits when you're crafting your prompt.
And here it is.
You can now drag it onto your Board.
When you click away, you can see the result is exactly what we wanted.
At this point, we can keep ideating the wrestler.
You can change the outfit, colors, or any detail you like.
For the sake of time, we'll work with this image.
Next, let's bring in a second wrestler.
But this time we'll use a photo from our device.
This could be an Adobe Stock photo or a shot taken on location - any photo will work.
Click on the Add content button, choose Your device, and select the image.
I'll position this photo of a wrestler below our current working asset.
Now we have two wrestlers - the generation and the photo we imported.
Generate consistent characters
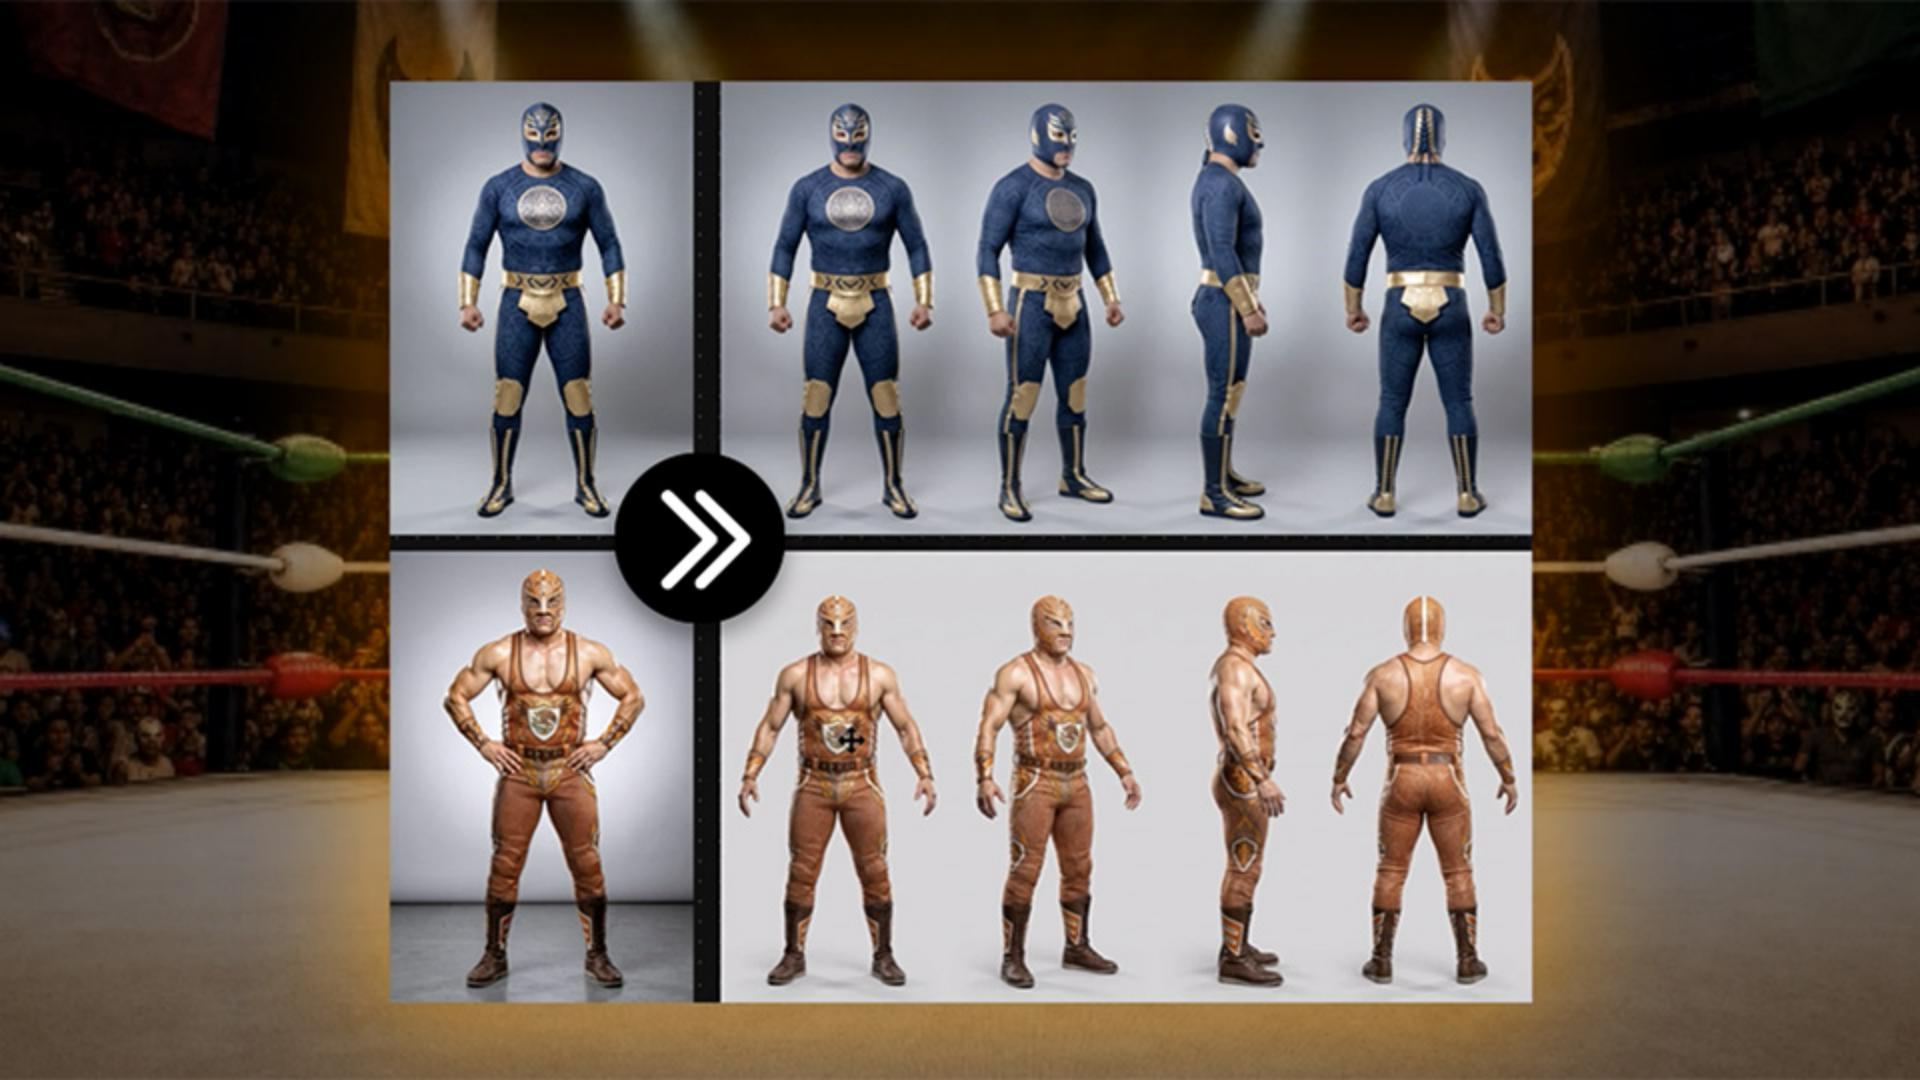
Next, let's create a character sheet for each wrestler.
We want to keep character consistency across all the different posters we generate.
A character sheet shows the model every angle of their wrestler, which means we can place them in any pose and the likeness will hold.
To start, click on Generate image from the Task Bar, then highlight the entire prompt, and hit the Backspace to clear it.
Now, I'll paste in a new prompt.
This prompt instructs the model to generate a character sheet with four full body views in one single frame, each held in the same neutral A-pose, so the figure stays consistent across every angle.
The rest of the prompt keeps the backdrop clean and the lighting even so the sheet reads as a clear reference.
Now we need to reference our wrestler.
Click on the reference Image icon, then with the Eyedropper, click on the first wrestler.
That becomes reference image one.
Each image you load as reference gets the next number in sequence.
And those labels are how you refer to them in your prompt.
Change the Aspect ratio to Widescreen, since a character sheet needs horizontal room for all four views.
Keep the Resolution at 4K, then click on Generate.
Now, drag the character sheet onto your Board.
Zoom out and place it to the right of the original wrestler so the assets stay organized as you build.
Now you can repeat the same process for the second wrestler.
Once it generates, drag it into the canvas and place it to the right of the second wrestler.
Now we have both character sheets.
This is exactly what we need to do to keep our characters consistent across every future generation.
Next, let's create the background.
You have a few options here.
You can find a background on Adobe Stock, take a photo on location, or generate one in Firefly.
Let me show you how to generate one.
Click on Generate image from the Task Bar, now clear the prompt - you can also press Control A on Windows, that's Command A on the Mac to select all text, and tap on the Backspace key to clear the prompt.
Delete all reference images, and I'll paste in a prompt.
This prompt creates the interior of a wrestling arena.
We're using Gemini 3.1 (w/ Nano banana 2) with a Widescreen Aspect ratio and 4K Resolution.
I'll click on Generate.
Here's the first version of the background.
It looks fantastic, but make sure you give yourself different options.
You can run the same prompt through different models to get different results.
Switch the model to FLUX.2 [pro], keep the Aspect ratio at Widescreen, and click on Generate.
Now switch to GPT Image 2, change the Aspect ratio to Landscape, set the Quality to High, and click on Generate.
Then you can run one more variation through Gemini.
Remember, with Firefly Boards you can generate multiple images at the same time.
Now arrange your images in a 2x2 grid on your Board.
In this case, the GPT Image 2 variation is the strongest.
You can see the model's icon on the top right of the image and the Content Credentials when you hover over it.
Next, let's bring everything together.
Click on Generate image, clear the prompt, and load the three reference images: the first character sheet, the second character sheet, and the background you chose.
Composite references into a cinematic poster
Then I'll paste in a prompt.
This prompt creates a cinematic poster where the wrestlers are facing each other in the arena.
It also includes instructions for color grading and depth of field.
Select Gemini 3.1 (w/ Nano Banana 2), change the Aspect ratio to Portrait for a poster shape, and keep the Resolution at 4K.
Then click on Generate.
To have more options to choose from, repeat this process using other models.
I'll use FLUX.2 [pro]. and GPT Image 2.
Then place the results next to each other on the Board so you can get a better look at them.
In this case, I like Gemini's result the best.
Notice that GPT Image 2 had issues with one of the arms and the FLUX.2 [pro] pose is not something I'm happy with.
In a real project you can keep ideating from here.
Try different poses, swapping backgrounds, or adjusting the prompt until you land on the result you want.
But in this case, we'll stick with this image.
Prep full-body assets for editable, scalable output
This will become the roadmap for our final poster in Photoshop.
Next, let's create one final asset that we'll take into Photoshop in the next video.
The goal here is to isolate the two fighters from the background and extend their body, so we have full figures to work with - not just what's visible in the poster.
Click on Generate image from the Task Bar, clear the prompt, delete the background reference, but keep the two character sheets loaded as Image 1 and Image 2.
Now load the poster you just generated as a third reference.
We'll use Gemini 3.1 (w/ Nano Banana 2), change the Aspect ratio to Tall because we want to generate full bodies in this pose, not just what the poster shows.
Now, I'll paste in a prompt.
This prompt is short and direct.
We don't need the full structured formula here, since we're just isolating the subjects and extending the figures.
It tells the model to lift the fighters out of the poster and place them on a gray background, using the character sheets to fill in the rest of their bodies.
Then click on Generate.
The reason we want to generate an image with the full body is that we want room to work with later, if the client requests a change, or if you need to repurpose the poster as a widescreen banner or as social media graphic, you'll have the entire figure available for crop, scale, and reposition without regenerating anything.
Then you can drag the result onto your Board and scale it up, so it's easy to see.
Now we have a clean, full body composite of both figures on a neutral background, plus our chosen arena background as a separate asset, and we're going to combine these in Photoshop.
Now that you know how to generate posters with consistent characters in Adobe Firefly, go ahead and give this technique a try.
Then join me in the next video where we'll take everything we just built into Photoshop and composite the final poster while keeping every element fully editable just like real client work demands.
Again, my name is Jesús Ramirez.
Thank you for watching.
What you’ll learn
Generate consistent characters
Create character reference sheets that capture several angles of your subject, so likeness holds across poses, scenes, and future generations.
Composite references into a cinematic poster
Bring character sheets and a background together in a single prompt. Direct the pose, lighting, and depth of field to shape a cinematic poster.
Prep full-body assets for editable, scalable output
Isolate and extend the figures onto a neutral background so you have full bodies to crop, scale, and reposition for any layout or format.
Instruction and design by