
PHOTOGRAPHY
How to make a GIF in Photoshop.
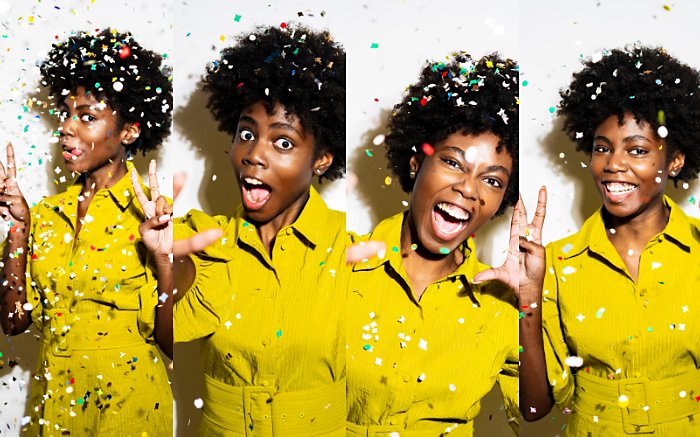
If you’ve got a funny picture or feel a meme coming on, why not make an animated GIF? Use the Timeline features in Adobe Photoshop to create a GIF from any image in just five easy steps.
Make an amazing animated GIF.
Learn what GIFs are and how they’re different from other file types. Then just load any stack of images — a funny picture, a short video clip, even a set of stills — into Adobe Photoshop. The Timeline tools will do the rest. In five simple steps, you’ll have a looped GIF to share. You may even have the next big meme.
What is a GIF?
GIF — best pronounced like the peanut butter — stands for the Graphics Interchange Format. GIFs are really nothing but a type of image file. And not necessarily an optimal one, at that. The 8-bit format means they can only display 256 colours. They make photos look grainy. Although they can’t contain any audio, they can still be as bulky as an MP4 video file because they’re not compressed.
The format was introduced by CompuServe back in 1987 — the digital Stone Age — to post simple graphics like stock market quotations. (In fact, GIFs were actually born two years before the World Wide Web.) As a relic of chat rooms, MySpace and dial-up, they should have gone extinct long ago.
But this tech dinosaur is somehow more popular than ever, thanks to one thing: animation. Although the format was developed to display basic graphics, it can hold more than one image at a time. One day, someone realised that if you put a series of images into a GIF and sequenced them properly, you would have a simple animation.
GIFs were well enough suited for their original purpose: displaying logos, line art, charts and such on the web. Today, though, we think of them primarily as short, looping animations. A GIF isn’t the same thing as a video — no audio, for starters. (That’s why it’s called an animated GIF instead or a GIF animation.) But they are so useful for that one purpose that they’re now one of the most popular formats for images that will appear mainly on the Internet.

What’s the difference between a GIF and other image file types?
GIF (Graphics Interface Format)
GIFs are ideal for small graphics on websites and in emails. If you see any small animated image on the Internet, you’re probably looking at a GIF. However, GIFs are limited to just 256 simultaneous colours, so they can’t achieve photographic quality. Although they are not compressed, these files are typically small and highly portable. That makes them well suited for web images. And, of all these image file types, only GIFs can be animated.
JPG or JPEG (Joint Photographic Experts Group)
JPGs are the best choice for nearly all other types of online images and for some printed photographs and artwork. These files are compressed, but with only a slight loss of quality. The JPG format supports millions of colours and is popular for storing digital photos. JPG files are very common on the Internet. They are also used for non-professional printing and for inserting images into documents of all kinds.
PNG (Portable Network Graphics)
PNGs are a lossless format that was intended as the next-generation replacement for GIF. It supports transparency and up to 16 million colours. Although GIFs are technically suitable for buttons and banners on websites, which don’t require lots of colours, web developers typically prefer to use the newer PNG format because it supports a broader range of colours and blends smoothly with webpage backgrounds.
TIFF (Tagged Image File Format)
TIFFs are the workhorse format for high-resolution printing, including art photography and other fine artwork. It’s a lossless type of image file that retains extremely high photographic quality for scanning and printing. However, TIFF file sizes are huge, making them best reserved for high-quality prints, professional publications and archival purposes.
What’s the difference between a GIF and a meme?
A GIF, even an animated GIF, is just an image file type. Whether it moves or not, it can be any type of image (or series of images), used for any purpose.
Memes, on the other hand, are typically static images, often a photo or an artwork, usually displayed with a caption of some kind. Normally, they make a topical or pop culture reference — often humorous — spreading like wildfire across the Internet and mutating quickly as they go.
Like memes, GIFs are a quick visual way to communicate a joke, an idea or an emotion — that’s one reason they’ve become so popular. And, all that said, GIFs can certainly be used to make a great meme.
What are GIFs good for?
The earliest animated GIFs were so crude that no serious web developer would consider using them. But, somewhere between the birth of YouTube and the expansion of broadband — as the Internet began to catch fire — they started coming into their own. Technical quality improved and they became easier to create. Social media sites stopped shunning them. Designers and artists began exploring what they could do with them. Whole platforms developed just to collect and share them. Once they hit smart phone keypads, there was no stopping them.
Today, you could hardly escape GIFs if you tried — they’re everywhere. All over the Internet, of course, in websites and blogs and social media. In your emails and Slack convos and direct messages. In the ads and digital marketing campaigns that bombard you every day. On your phone and so much more.
GIFs are now part of our cultural infrastructure. They provide a common visual language we’ve come to rely on as a way to express our emotions, demonstrate a reaction to something or just share a laugh.
Are you ready to make an animated GIF of your own? It’s so simple, you can do it in five easy steps.
How to create a GIF in Photoshop.
When you use creative software like Photoshop, it’s so easy to make a GIF. Whether you want to create a GIF animation for school, for a job or just for fun, learning how to add motion is a great way to take your artwork to the next level.
For this Photoshop tutorial, let’s start by doing a simple frame-by-frame animation and then we’ll turn into that a looping GIF.
All you need to begin is a series of images. The images can be anything you like — video frames, animation frames, even still photographs. In this example, we’ll use a set of animation frames from Adobe Stock. You can make a GIF from a short video clip, too, but you may have to choose just a segment of the video if it’s too long.
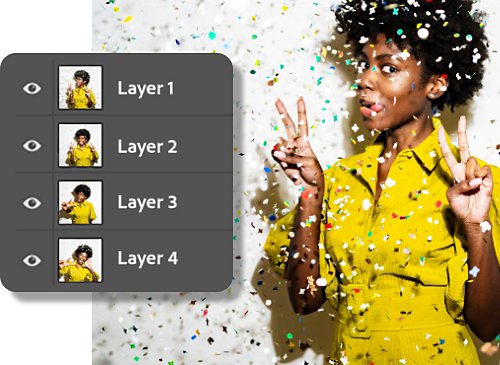
1. Upload your images and open each frame as a layer in the Photoshop file.
You can prepare your frames in advance, if you like, in another programme such as Adobe Illustrator. Then, import the frames (source files) into Photoshop by going to File > Load Layers. Choose two or more files to load into an image stack, add all the frames and press OK.
If you haven’t already created the frames, you can use any Photoshop file that has multiple layers. Just be sure that each frame of your animation is its own layer (or folder/group of layers). Unlock your original layer.
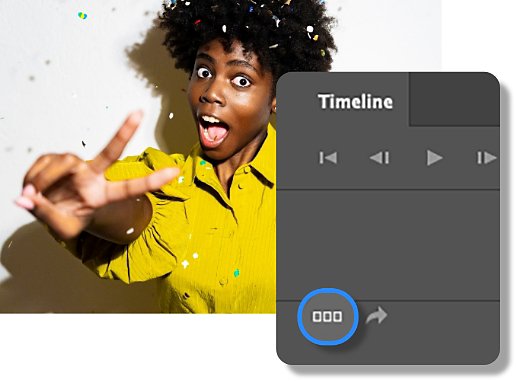
2. Open the Timeline panel and select Create Frame Animation.
With your Photoshop layers open, go to Window > Timeline and click Create Frame Animation.
3. Convert your layers into animation frames.
Select Make Frames From Layers from the menu in the right corner of the Timeline panel. This will allow you to take your layers and separate them into frames within the window.
Preview the animation by either pressing Play on the Timeline or using the spacebar on your computer. You can play around with the order of the frames by simply dragging them. Use the dustbin icon to delete a frame and the sticky note icon to add a new one.
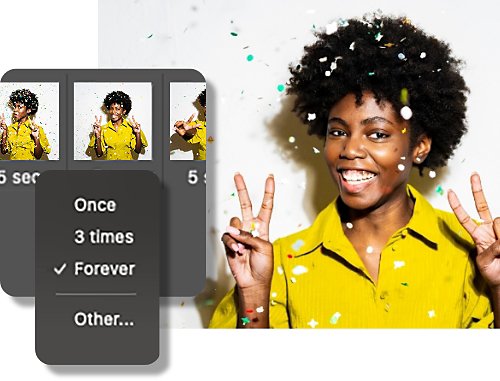
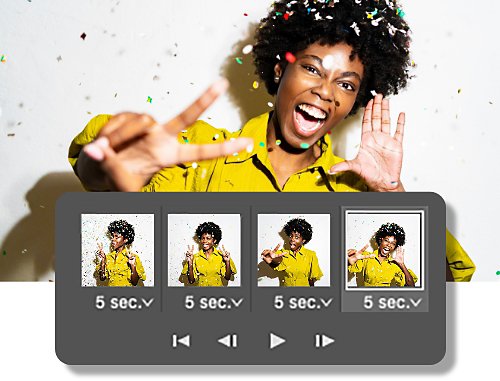
4. Set your GIF to loop.
Set your GIF to Loop by clicking the repeat menu. Within the Timeline you can adjust how long each individual frame is on screen and decide how long the GIF should loop. (Most GIFs will loop at the Forever setting.)
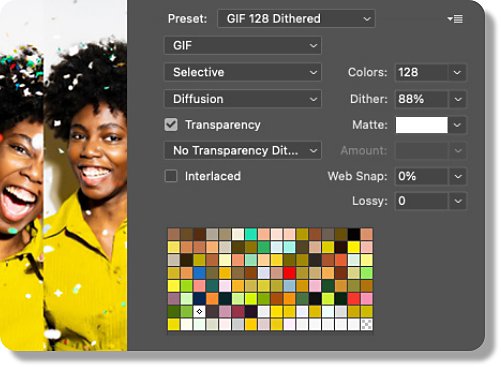
5. Export your GIF and save it.
Once you’re happy with your animated GIF, export it by selecting File > Export > Save for Web (Legacy). Then make sure you save it as a GIF in the proper folder.
Learn more about animation.
Want a more in-depth tutorial on how to use Photoshop to make animations? Discover more projects you can create using the Timeline tools.
And, if you’re interested in doing more frame-by-frame animations, you might enjoy Adobe Animate.

Not sure which apps are best for you?
Not sure which apps are best for you?
Take a minute. We'll help you to figure it out.
Take a minute. We'll help you to figure it out.