


Introduction
Creating selections of the main subject in an image has recently gotten a lot easier in Photoshop, with some amazing behind-the-scenes improvements to the Select subject command.
Hi, I'm Seán Duggan with the Adobe Learn team.
Let's take a look at how you can use Select subject to automatically select the main subject in an image, even if it has complex and intricate edges.
Let's begin with a simple example.
Selecting a main subject with select subject
In this file, I have two layers.
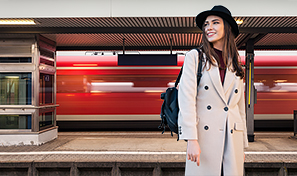
The top layer is a photo of a woman standing next to a train, and below that is a layer with another image of a train arriving in the station.
I want to use this more colorful and dynamic photo as a new background, and the first step is to select the woman on the top layer.
I'll click on that layer to make sure that it's active in the Layers panel.
The easiest way to access Select subject, is in the Contextual Task Bar.
If you don't see the Contextual Task Bar, go to the Window menu and select it to make it visible.
By default, the Contextual Task Bar appears below the image when there's no selection active, but you can move it anywhere you want.
I'll move mine up above the image, and I'll click here to pin it to that position.
Let's click Select subject and see what we get.
And that did a very good job.
I'll click on the Mask icon in the Contextual Task Bar to turn that selection into a layer mask that shows the woman, but hides the other parts of the top layer.
Now we can see the arriving train photo as the new background.
In the layer mask for the top layer, the area that was not selected is filled with black, and black on the layer mask hides the corresponding image area on the masked layer.
Before we get to the next example, let's take a quick look at the Photoshop preferences
Understanding select subject settings and preferences
and an important setting that determines how Select subject works.
On a Mac, I'll go to the Photoshop menu and choose Settings..., and then Image Processing...
On Windows, you'll find this in the Edit menu.
The default Image Processing for Select subject is Cloud.
This will provide better results, but depending on the speed of your internet connection, it could take a bit longer.
If you don't have internet access, you can choose to set this to Device.
But if you do have internet access for the best results, leave this set to Cloud.
Now let's try Select subject on a composite image
Creating detailed masks for complex subjects
where the main subject has more complex and intricate edges.
The top layer is the primary subject.
A photo of a bicycle on the shore of a lake.
Below that, there are two layers with photos of clouds.
The bicycle layer is currently the active layer, so I'll click Select subject in the Contextual Task Bar.
After a few seconds, it creates a very detailed selection of the bicycle and that looks great.
You can see that it's selected the individual spokes in the wheels.
With the selection active, I'll click the Mask icon in the Contextual Task Bar to create a layer mask from the selection.
And now when we see the bicycle with the layer mask composited over the clouds layer, you can see just how good the selection was.
The thin spokes in the bike wheels are clearly defined, and if I Option- or Alt-click on the thumbnail of the layer mask in the Layers panel, you can really see the detail of what Select subject created.
If I zoom in for a closer look, you can see that there are a few areas where the edges of the spokes are a bit soft, but that's because in the original photo, the background detail behind some of the spokes is very close in tone and contrast to the spokes themselves, or there are bright highlights reflecting off the spokes.
But overall, Select subject has done an incredible job with this complicated subject.
I'll Option- or Alt-click on the layer mask thumbnail again to return to the main image view.
As a final touch, I'll reorder the layer stack
Refining composites and final workflow tips
and place the foreground clouds layer above the bicycle layer.
I've already added a simple layer mask to this layer to create the effect of the bicycle in the clouds, and that looks great.
And the real star of the show is the amazingly detailed and accurate mask for the bike that I was able to create using Select subject.
Whenever you need to select the main element in an image, Select subject is a great place to start and it can really help speed up your processing workflow.
Give it a try on some of your own photos.