


Introduction
For some types of selections, you can let the image itself - as well as Photoshop help you out.
One way to do this - is to use the Selection Tool that can detect edges - and differences in color and brightness.
If you have an area in a photo - that's a different color from the rest of the scene, you can take advantage of that difference with the right Selection Tool to quickly select that area.
Hi, I'm Seán Duggan, a photographer, Photoshop author - and an instructor.
Let's check out how to do this - with the Quick Selection Tool.
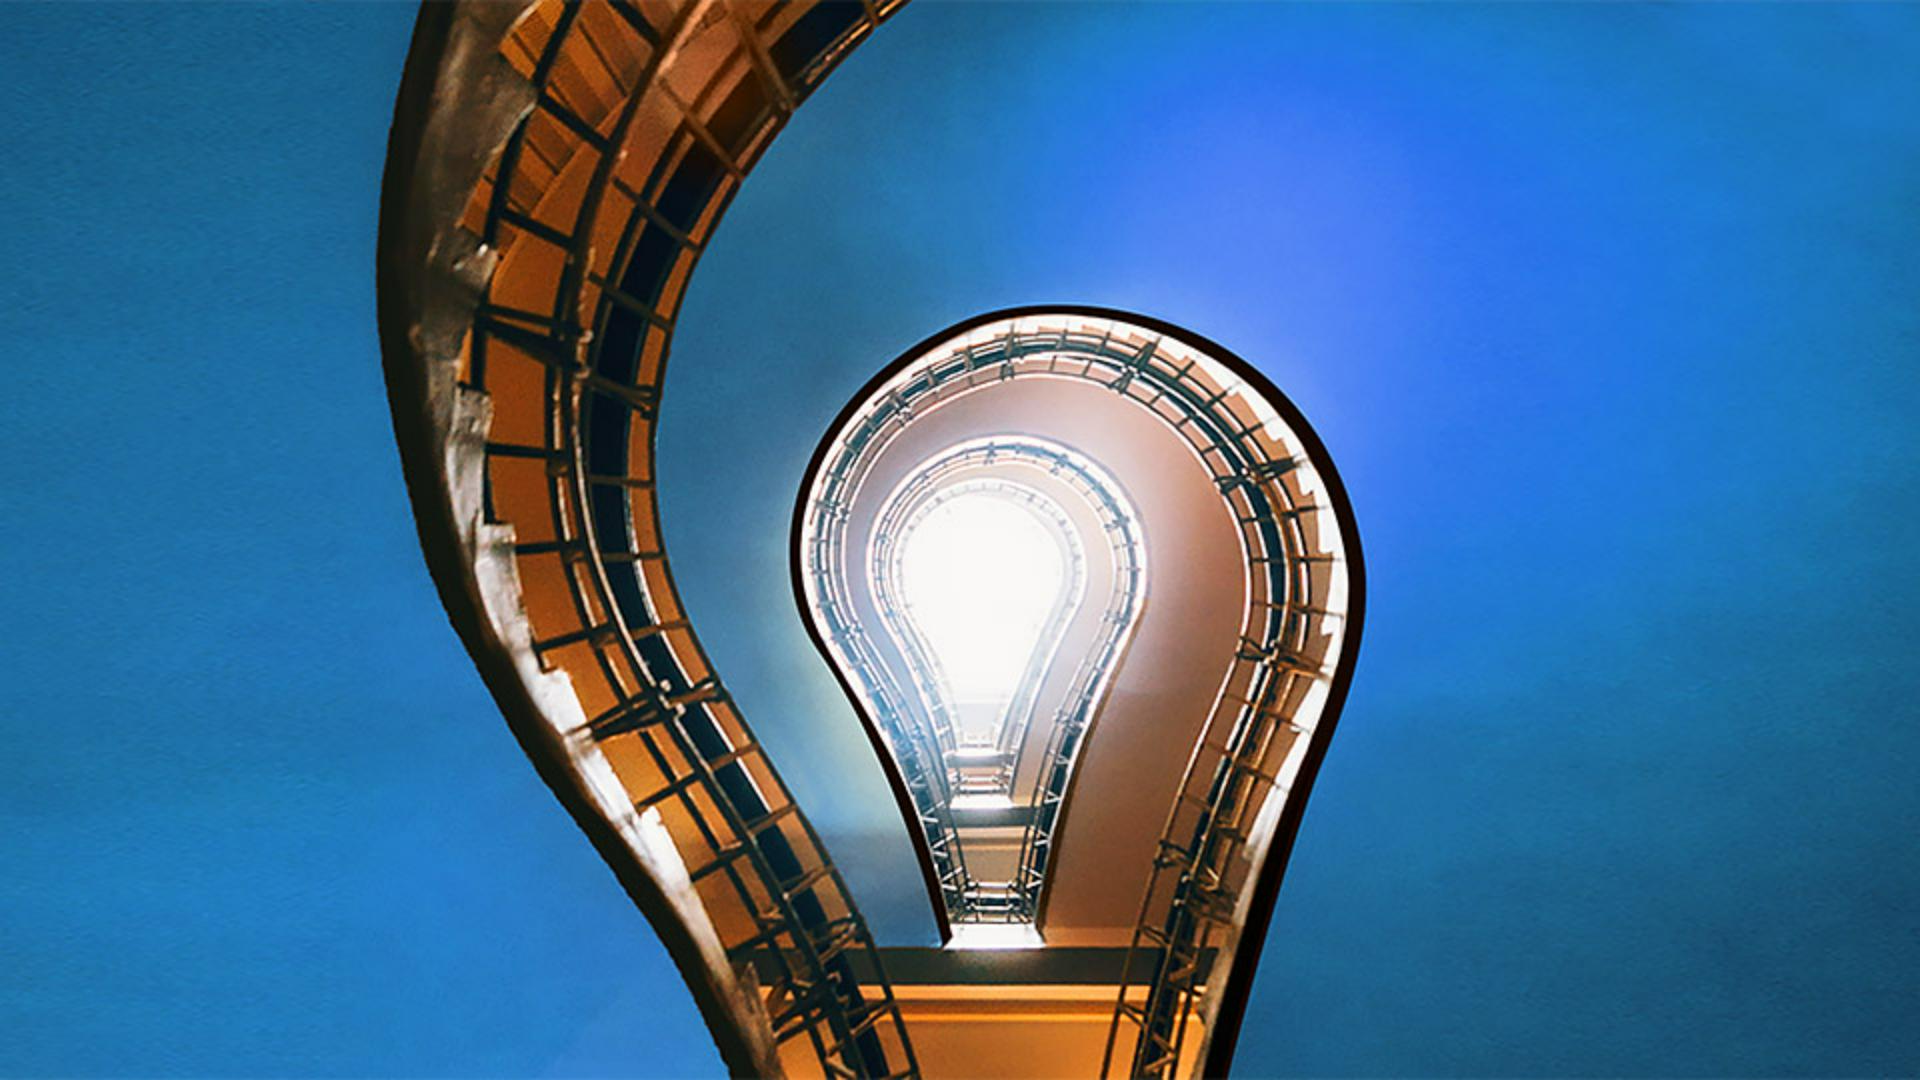
In this photo,
Choosing the quick selection tool for color-based selections
which is a view looking up - through a stairwell at a skylight several floors above, I want to select - most of the orange ceiling area on the left and the right side - of the image and then apply an adjustment to that area.
Since this area is different - in both color and brightness from the structure of the staircase, the Quick Selection Tool is a good choice - for this selection.
I'll go to the Toolbar - and I'll click and hold on the icon for the Object Selection Tool - to open up that tool menu and I'll choose the Quick Selection Tool.
This tool uses a brush interface - and you can see that in the circular shape of the cursor.
Adjusting brush size and building a selection
You can change the size - of the Selection Brush in the Brush Options dropdown menu - on the left side of the Options bar.
You can also use - a very useful keyboard shortcut to change the size of the brush by tapping on the right bracket key - to make the brush cursor larger or tapping on the left bracket key - to make it smaller.
I'm going to set my brush cursor - to 100 pixels and I can see that size indicated up here on the left side of the Options bar.
Next to the Brush Options menu - are icons for a New Selection, Add and Subtract.
Right now the tool is set - to make a New Selection.
The Quick Selection Tool works by dragging - over the area you want to select.
And I'll do that here in the upper left.
Start dragging there and you can see how the selection - is getting bigger as I drag.
And it's jumped ahead - and selected a big chunk there.
Now, one really useful feature - of the Quick Selection Tool is that once you begin a selection, it automatically switches - to the Add to Selection mode.
And you can see that the Add icon is selected there in the left side - of the Options bar.
So I can continue to drag over this part of the ceiling - to add that into the selection.
Now I'll work on adding the right side - of the ceiling to the selection.
I'm going to start - near the skylight area here between these two railings.
I'll tap the left bracket key - a couple of times to make my brush cursor a bit smaller, and I'm just going - to start dragging slowly here in short little movements - to add that area into the selection.
Fixing selection mistakes by subtracting areas
And so far, it's doing a pretty good job, except it did make a mistake up here.
But let me explain what has happened, because it's always good to understand - why a tool behaves in a certain way.
The reason that this happened is that there's not much difference - in brightness between this part of the ceiling and then this part of the wall - on the upper floor.
The contrast of that edge - is just not strong enough for the Quick Selection Tool - to recognize it as an edge.
Fortunately, this is very easy to fix.
In the Options bar, - I will click on the Subtract icon and now I can just drag - over the area that I want to subtract - from the selection.
The keyboard shortcut - to subtract from selection is to hold down Option or Alt.
So this is looking pretty good.
And now that we have a selection - of the area that I want to change,
Applying targeted color adjustments with a selection mask
I'll go over to the Layers panel and I'll click - on the Add Adjustment Layer icon at the bottom of the panel and I'll choose Hue/Saturation...
The selection is turned into a layer mask.
The area that was selected is white - on the layer mask and the area - that was not selected is black.
Black will hide - the hue/saturation adjustment that I'm about to make so that it only affects - the orange sealing areas which are white on the layer mask.
In the Properties panel, I'll move the Hue slider - to shift the hue of the orange into different colors.
Now some of these colors look pretty cool, but I think what's going to work well - with the yellow orange areas in the rest of the image - is to choose a blue color.
So I'm going to move that Hue slider - all the way over to the right to +180, and that's looking pretty good.
The Quick Selection Tool - is an excellent choice when you can take advantage of differences - in color and brightness that are already in the image - to help you make a selection. -