How to improve a Sculpted Wall with Designer and send it to Painter
During a production, Substance 3D Designer and Painter can be very efficient for material creation - both for a regular surface (like plaster) or a patterned one (you know, brick walls!).
Those materials are applied on a surface to provide detail that didn’t exist on the geometry in the first place.
But sometimes, the opposite can happen, and it would make more sense to need and have to sculpt those details. When making a stone wall, it is necessary to work with a 3D object, if we want to break it or introduce some rubble at its base.
How to take advantage of the iterative freedom of Substance 3D Designer and Painter while working with a hand-sculpted input? Second part
As we’ve seen so far, one of the main goals of this tutorial is to separate different stages of texture creation as to be able to easily iterate and still benefit from the pleasures and strengths of sculpting.
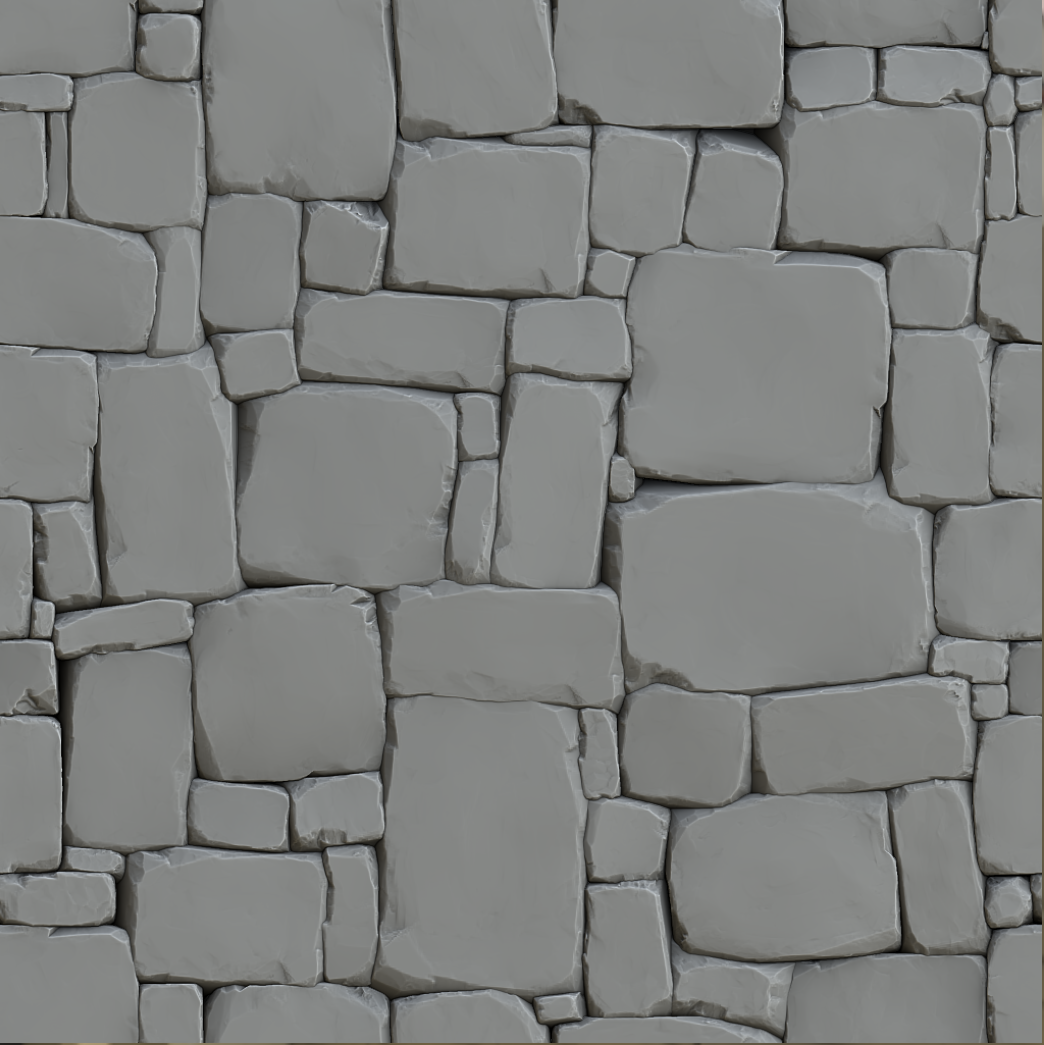
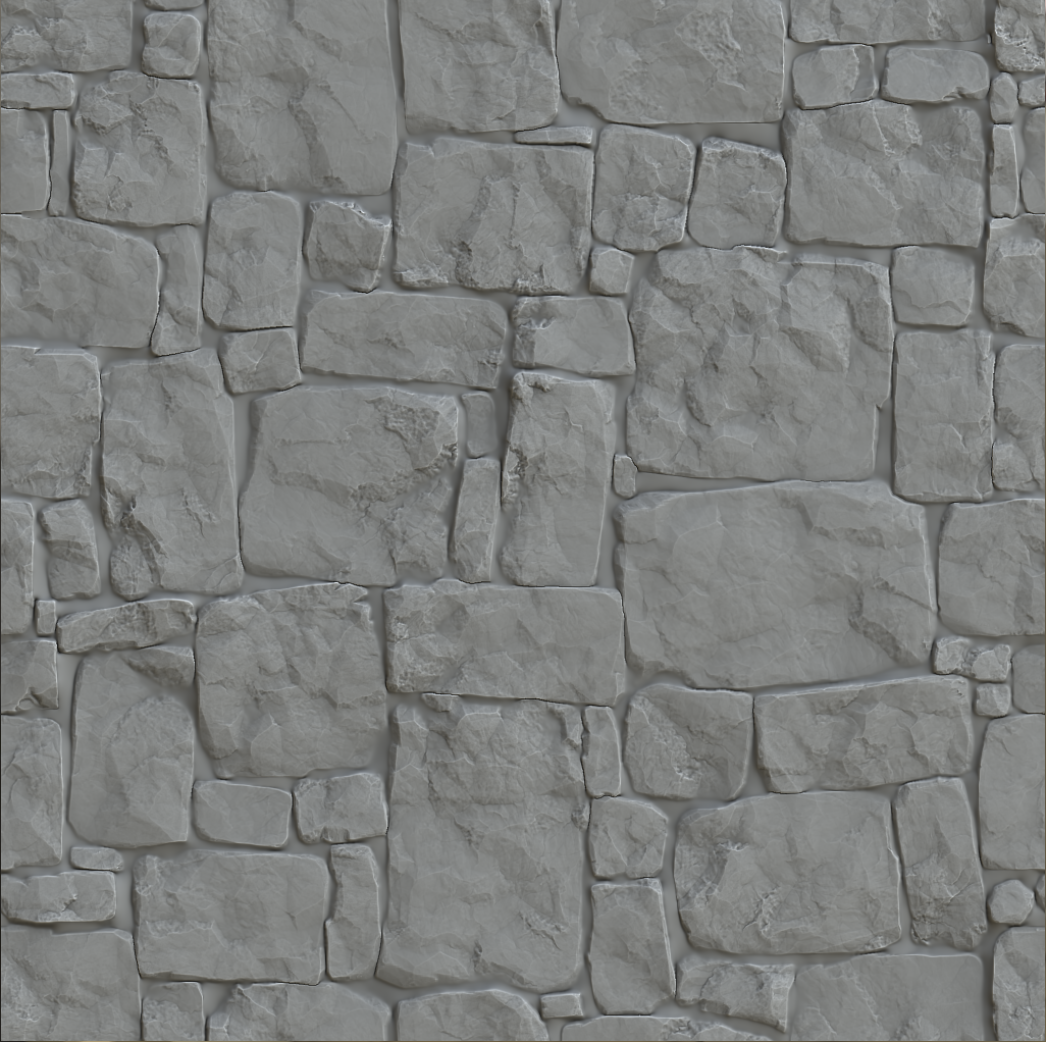
In that part, we are going to see how to generate and apply a Stone surface to the wall and how to generate the grout that are separating the blocks.
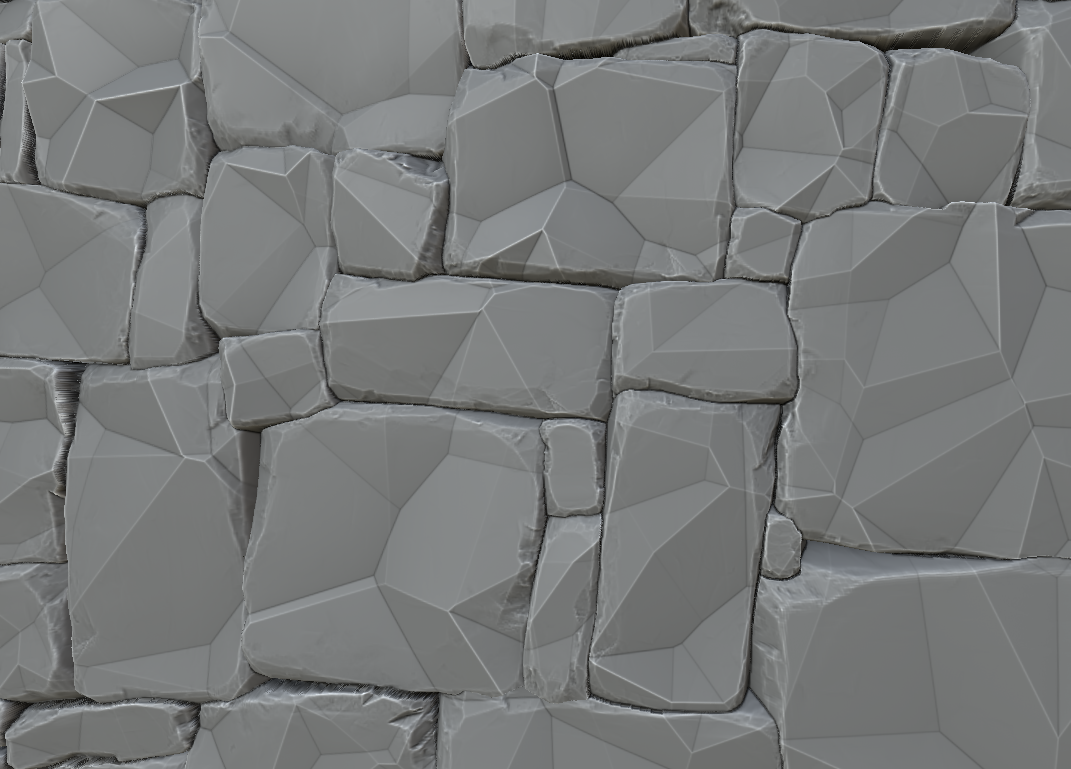
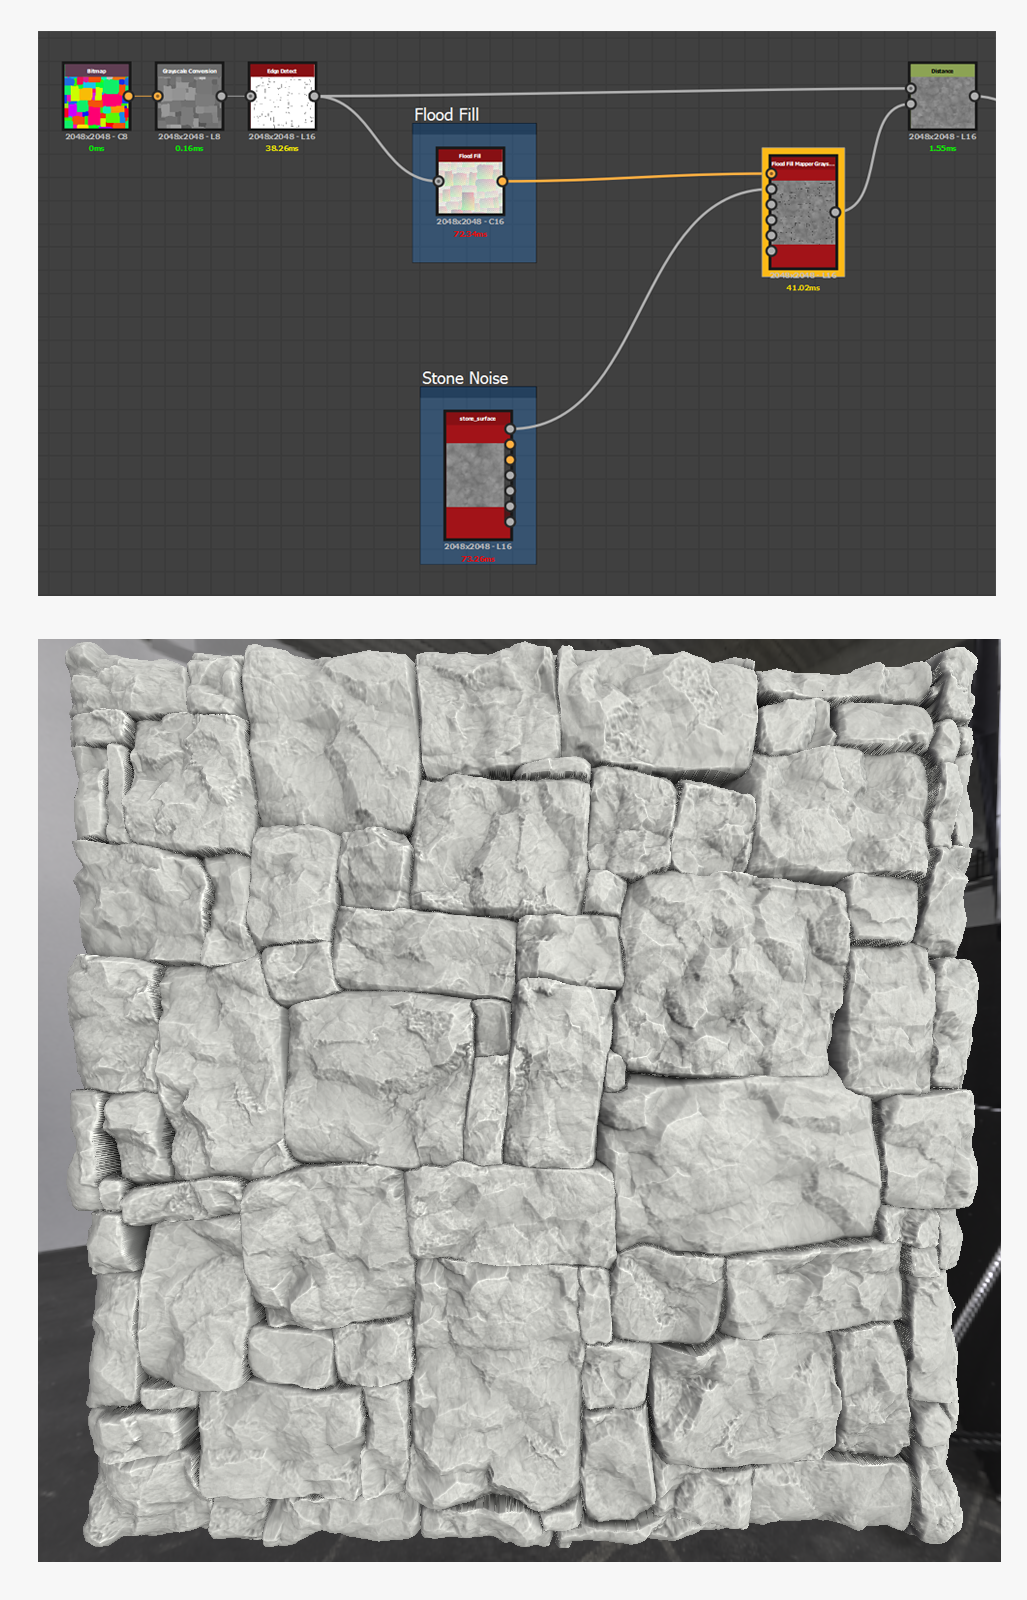
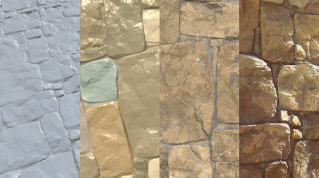
See below the before and after states:
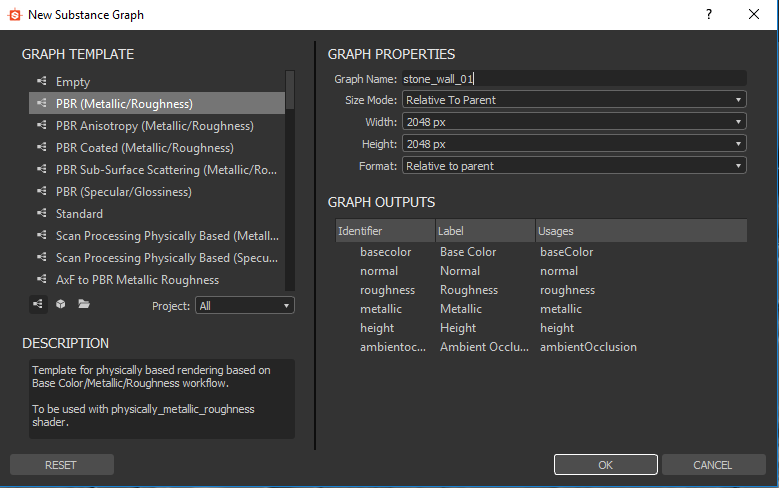
We’ll start by creating a new graph. In our case, we are going to take “PBR (Metallic/Roughness)” as the material does not need any particular shader properties.
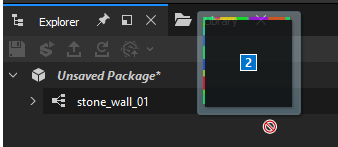
Once that’s done, we can drag and drop the Height and the ID map into the newly created package. Be careful not to drag and drop onto the graph itself! The package may contain resources, but not the graph itself.
Designer will then ask how we’d like to import our files.
“Link” allows to directly read the files from the source and update them automatically within the graph whenever a change has been made;
“Import” allows to directly place the files in the .sbs and makes sharing the substance file easier, eliminating the risk of forgetting resources.
In our case, we are going to use the first method (Link Resource(s)...)
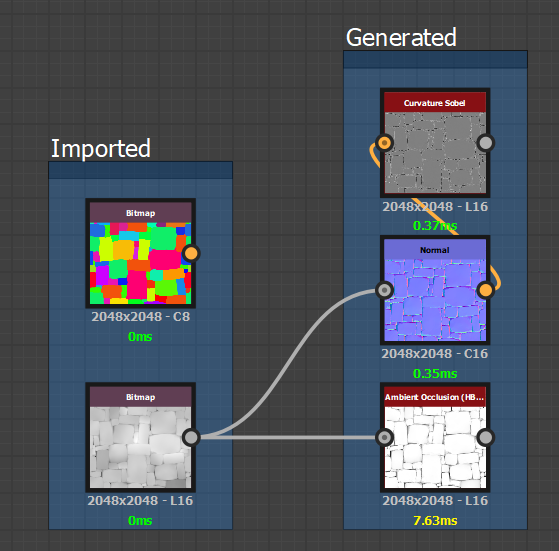
Once both of our files are imported, we are going to make sure that we can generate the missing information through the Height map - the Normal map and the Ambient Occlusion, and then the Curvature Sobel from the Normal map.
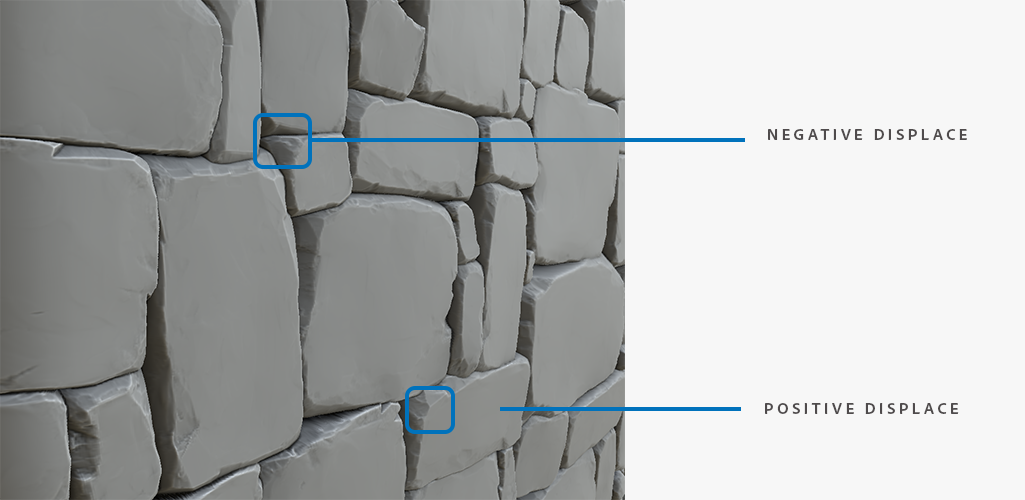
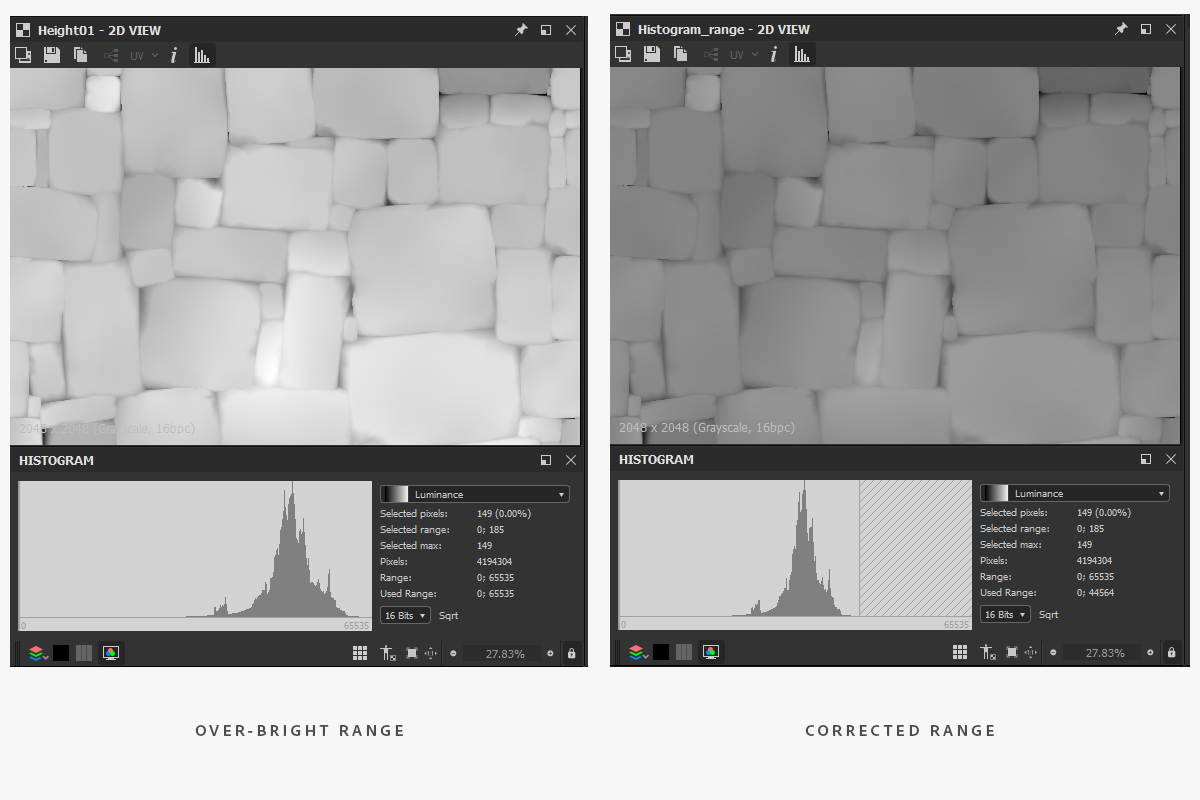
Once we’ve checked that tiling and render work as intended, we are going to proceed with correcting the displacement for elevation.
In our case, the material has: 1. Crevices / Negative displacement (cracks in the stones); 2. Extrusions / Positive displacement (variation of height with some stone blocks).
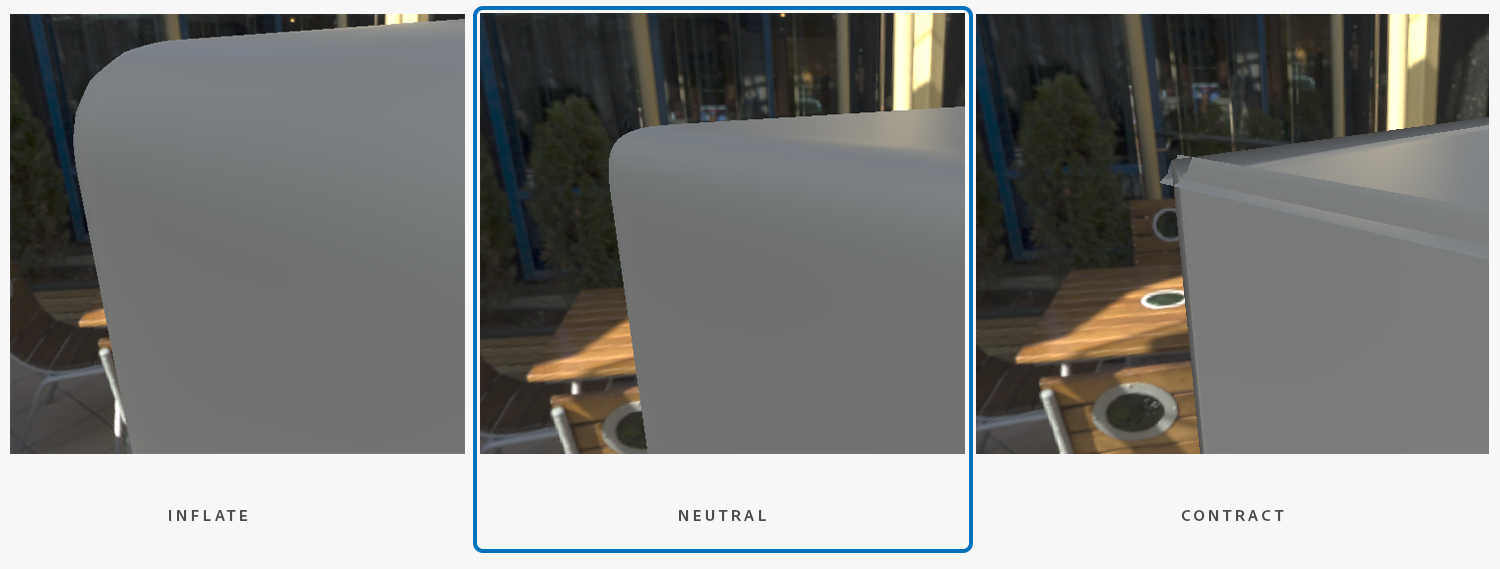
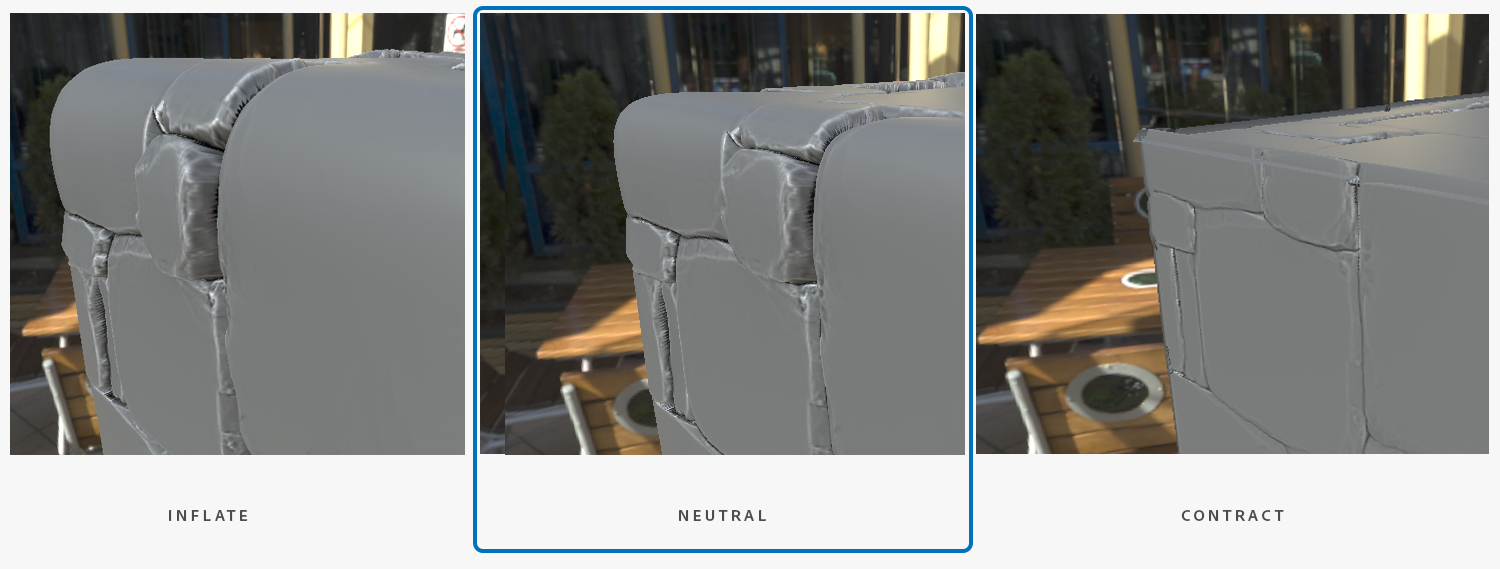
It would be ideal to define a displacement neutrality (neither extrusion nor intrusion) close to the blocks’ surface so as to avoid the effects of “swelling' or “contraction” when we apply our material on the geometry.
With the help of Histogram Range, it is possible to obtain a satisfactory result.
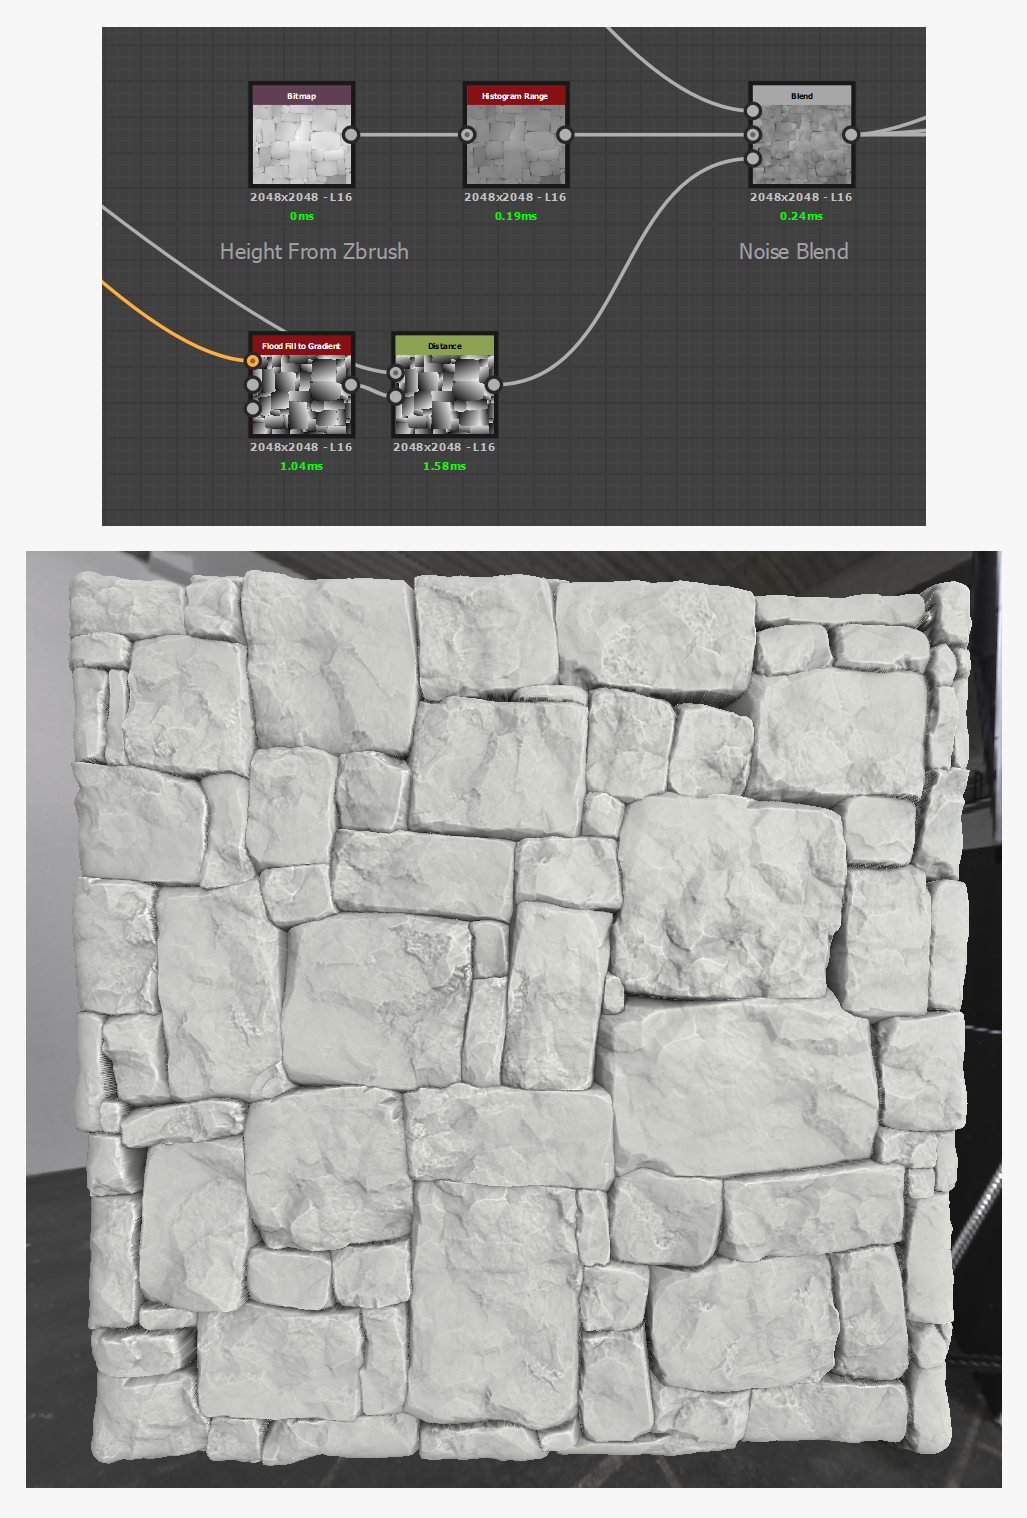
As we begin on our stone noise, we can make a small test to experiment with combining the two heights to see if any issues appear.
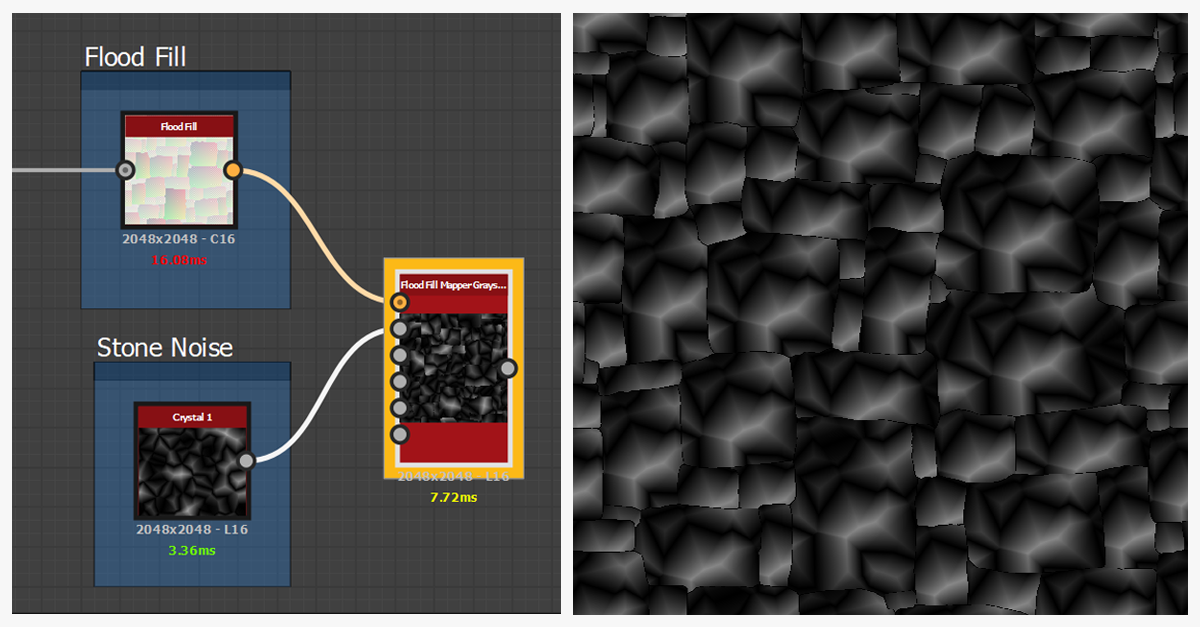
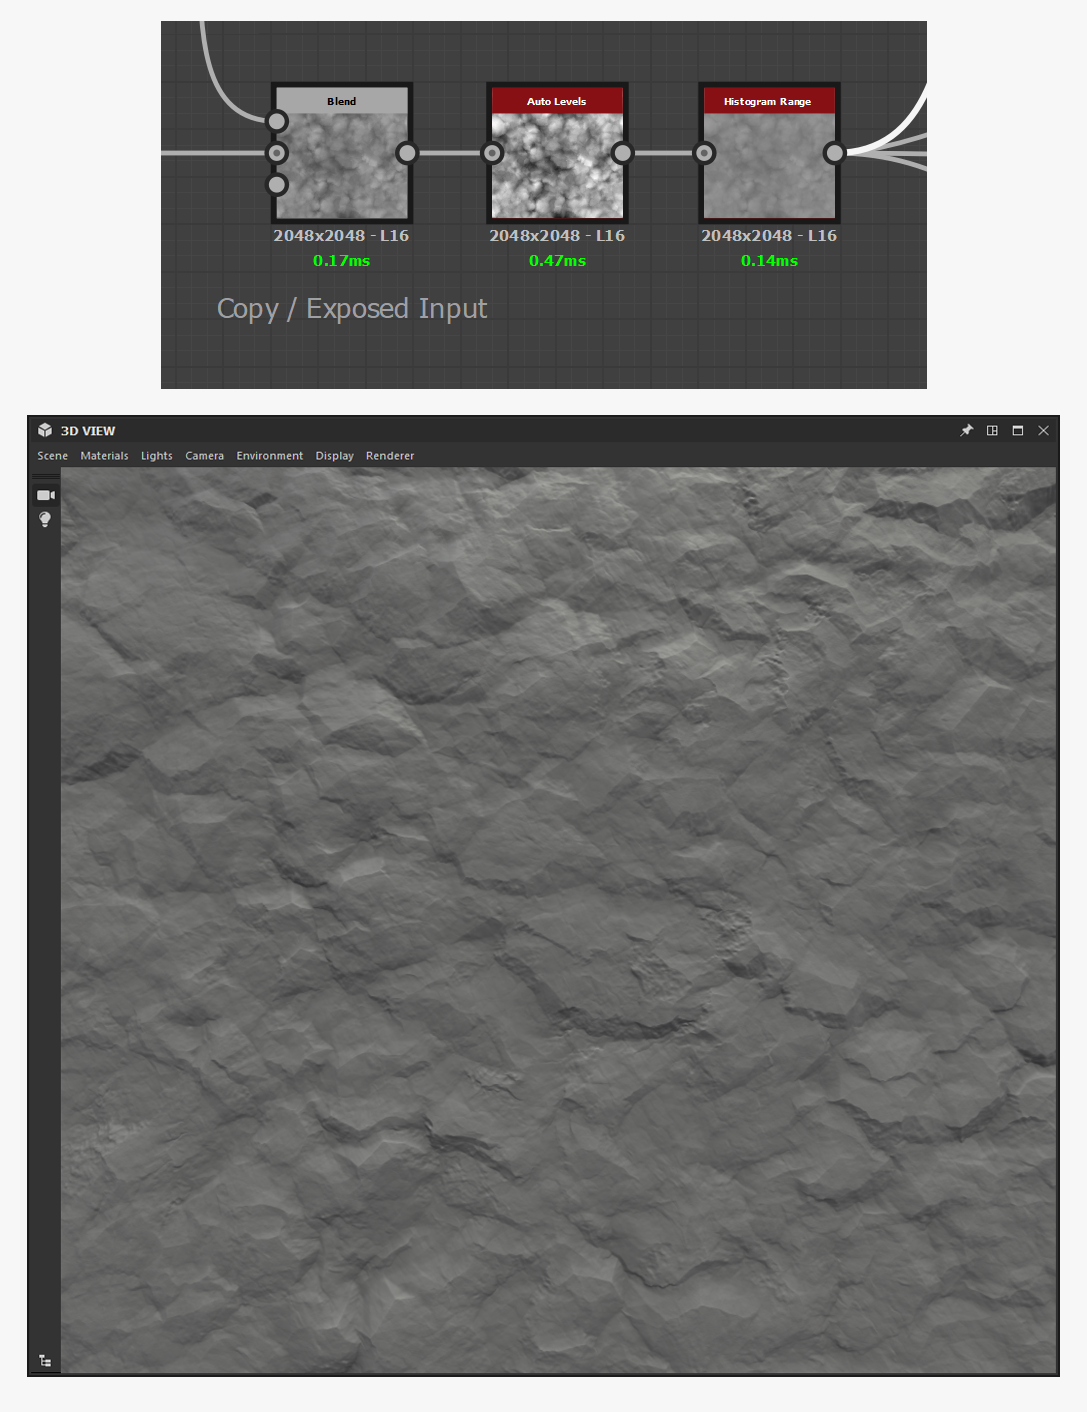
There are no specific issues to keep in mind, apart from that the noise is applied in a continuous manner in overlay mode on all of the stones. We can try to correct this issue by using our ID map to generate a Flood Fill which will allow us to apply our noise uniquely to each block.
Flood Fill is an extremely powerful and useful node, as it allows to apply a global treatment on each cell. And that’s exactly what we are going to do! With the help of the previously mentioned Flood Fill Mapper, we can randomly spread the surface noise on every stone.
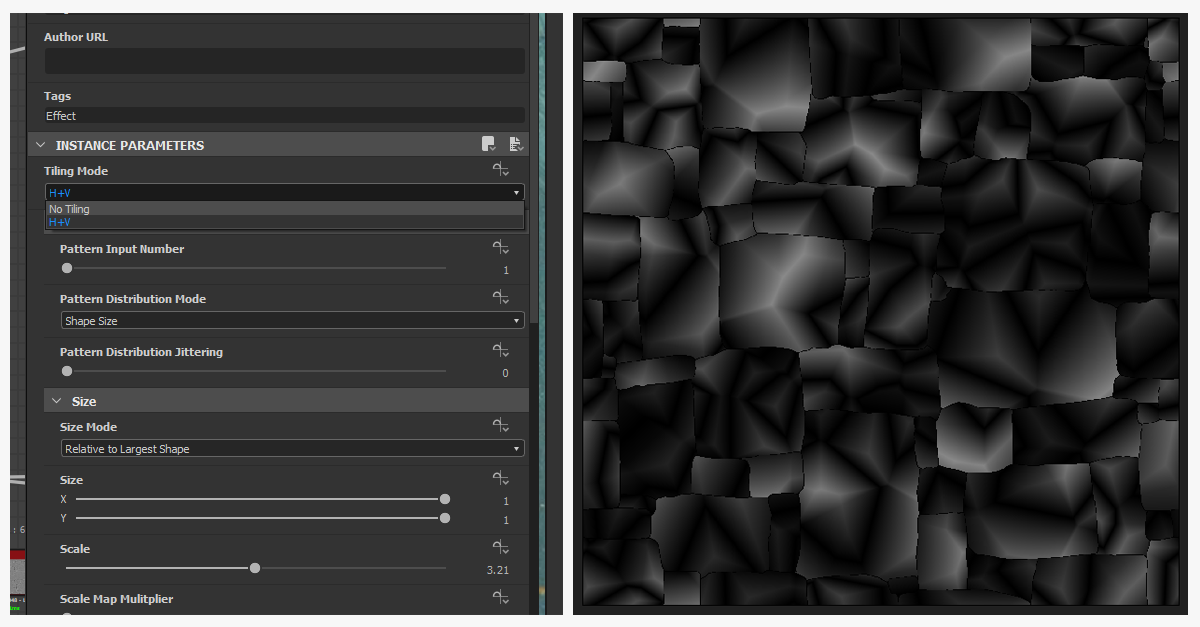
The Flood Fill Mapper is very similar to nodes like Tile Sampler, Shape Mapper, etc. since it offers similar parameters when it comes to Pattern, Size, Rotation, Position and Color.
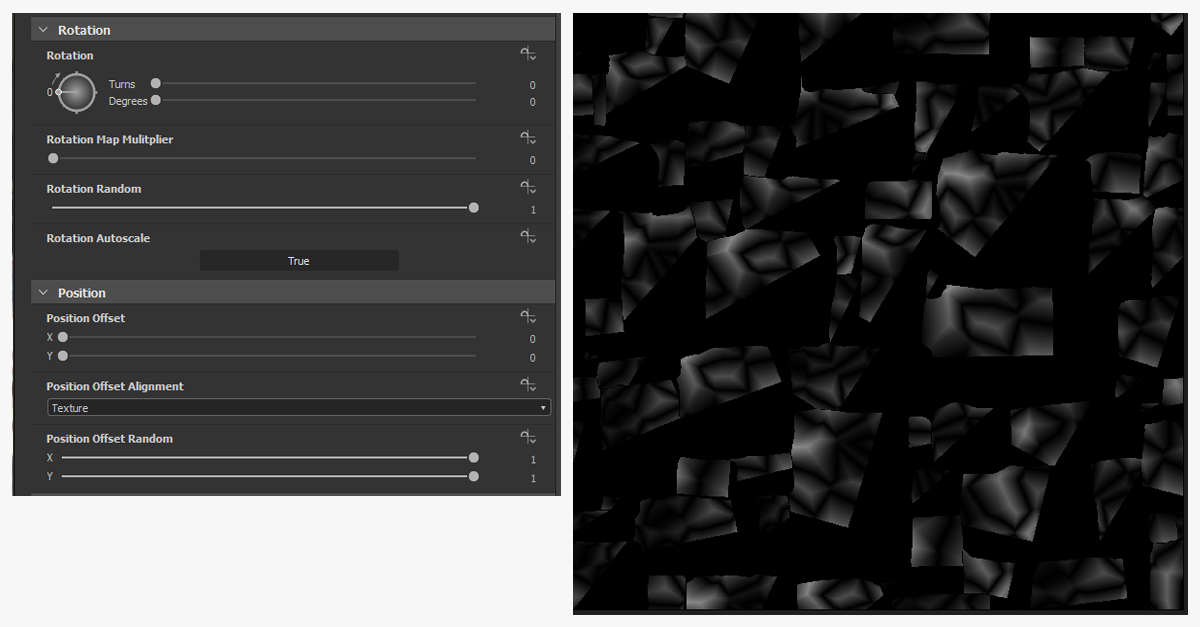
By default, Pattern 1 is applied identically on every block. We are going to add a bit of random Random to the disposition - why not in the Offset and the Rotation ?
There should be a small issue. If you play with the randomness slider, noise progressively disappears from the cells… as if it weren’t tiling.
That is actually the case! If we go up in the parameters, you can tweak the Tiling Mode on H+V Tiling.
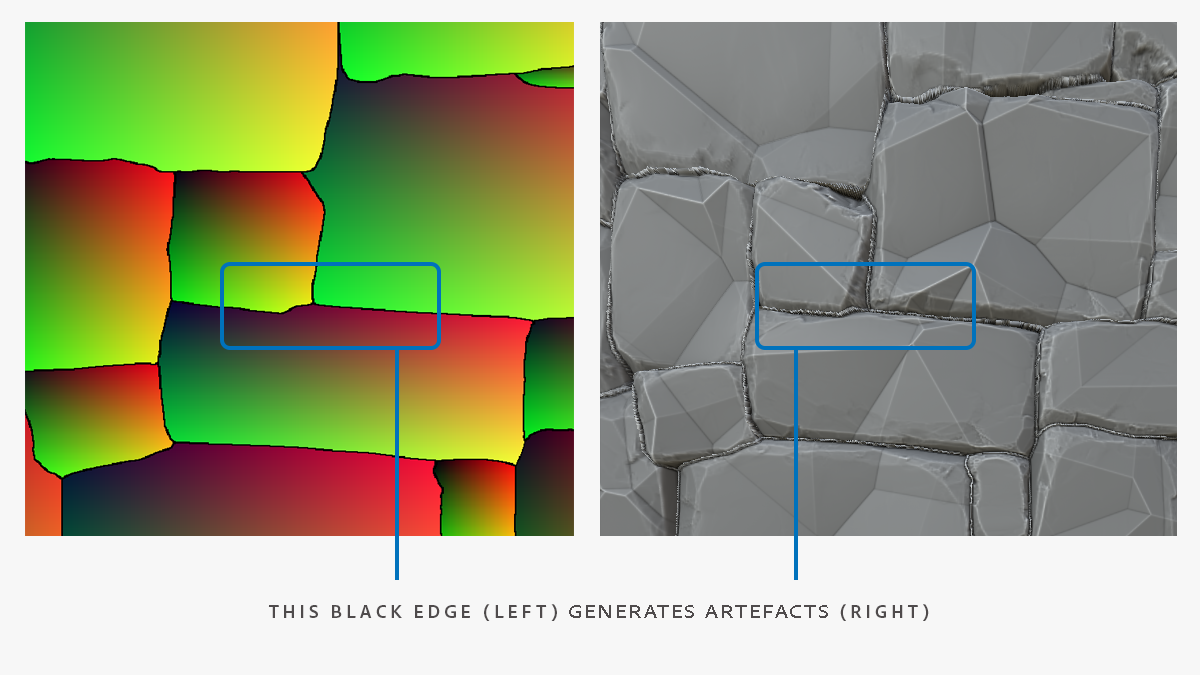
Results are starting to be not too bad. However we still have a nasty little issue with the intersections between the stones. It is connected to the way the Flood Fill is generated - there is a small black edge about 1 pixel large that’s an area without information.
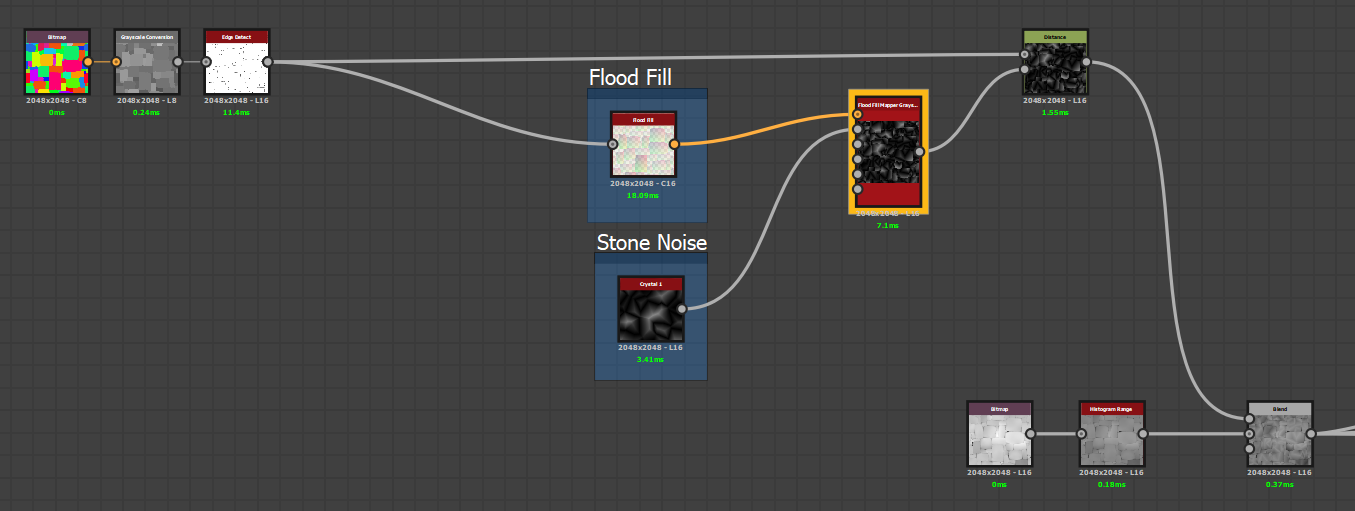
To correct that, we can make the pixels fuse with the crevice by using the Distance node, using a mask which will define their movement… this is very efficiently achieved by Edge detect plugged into the Flood fill!
All we have to do now is connect the distance into the blend and enjoy the result.
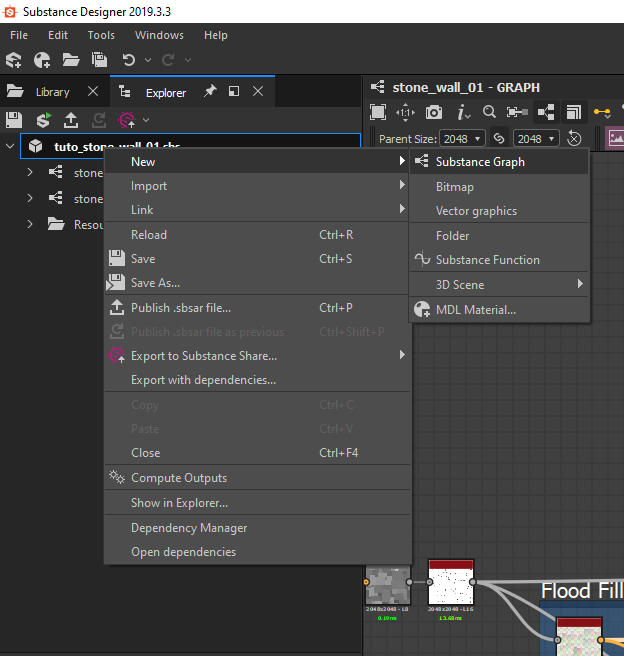
Well, it is no longer necessary to preoccupy ourselves with the first graph (stone_wall), as we are going to create a new one, which shall be used for our surface noise. It will already be more realistic if we just use Crystal 1.
Right-click on the package/New/Substance Graph and get the PBR (Metallic/Roughness). In truth, we are going to only export Height but to visualize it, it is more practical to have a ready-made material.
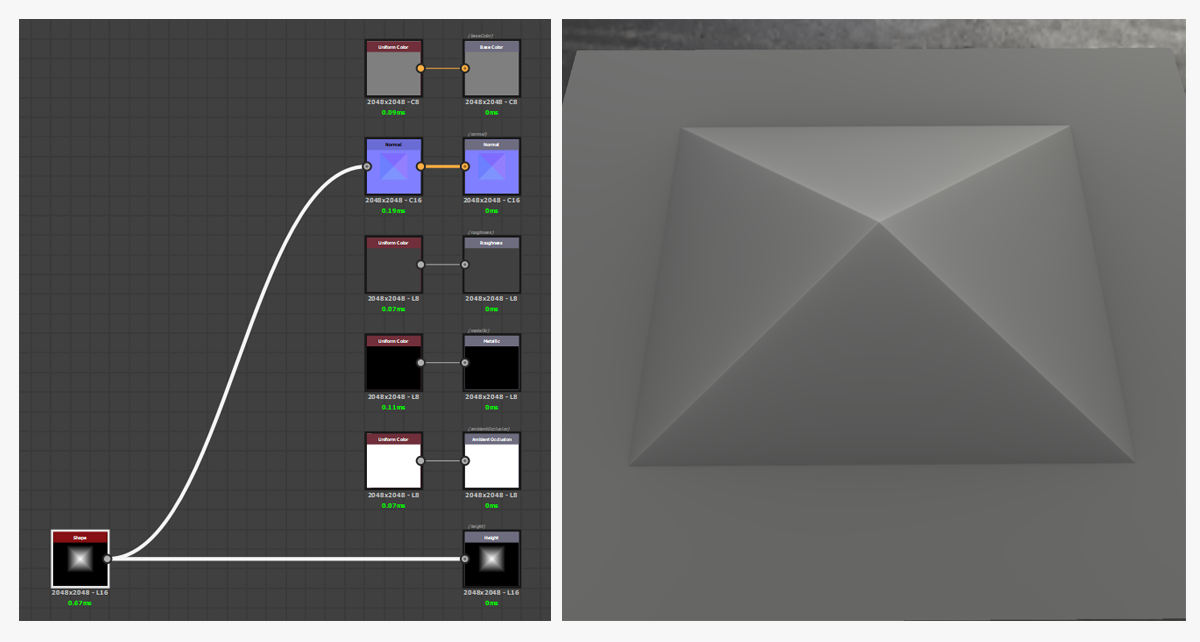
One of the first things I do is make sure that my 3D viewport correctly shows displacement, as well as normal information of the asset that I am working on. For that, I use a Pyramid from the Shape node.
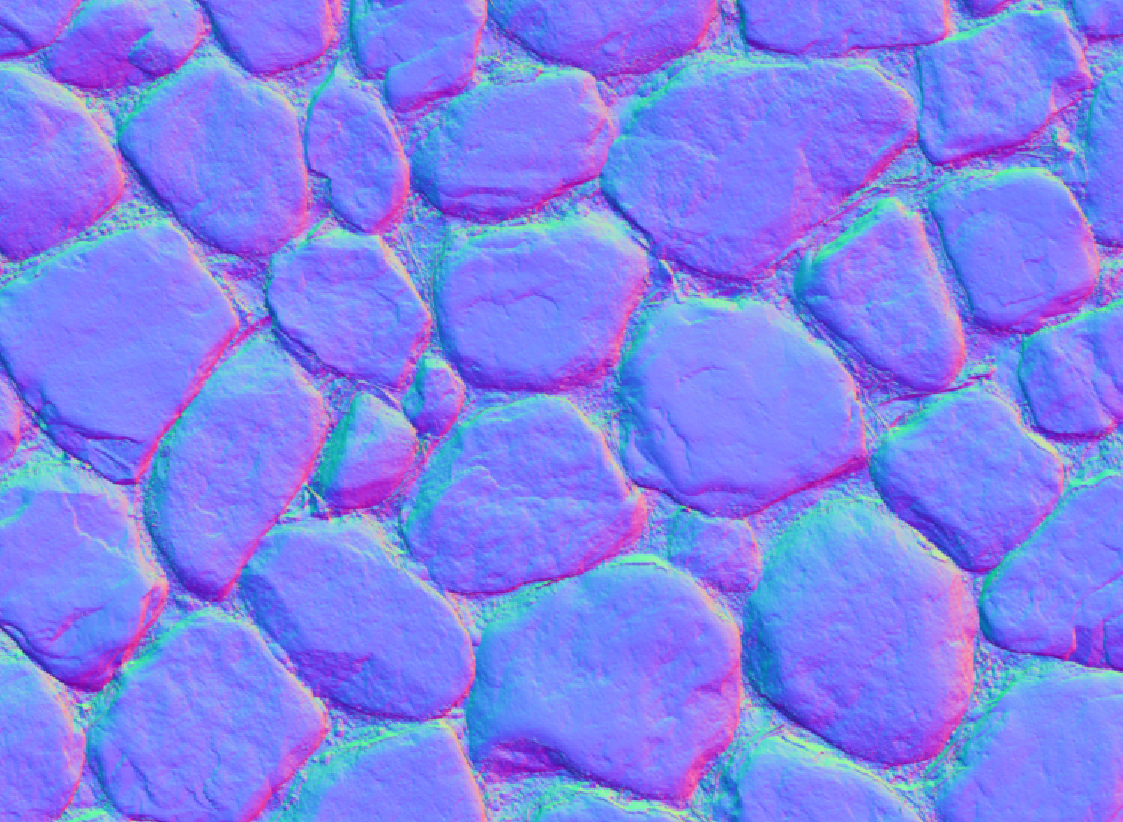
Once we are certain that everything works, we can start on our material. A good working habit to have is to gather as many references as possible. Scans are an excellent source of information, and it saves you from numerous false interpretations of the relief. I really like to make use of the normal map to give me a good idea of what my result would look like.
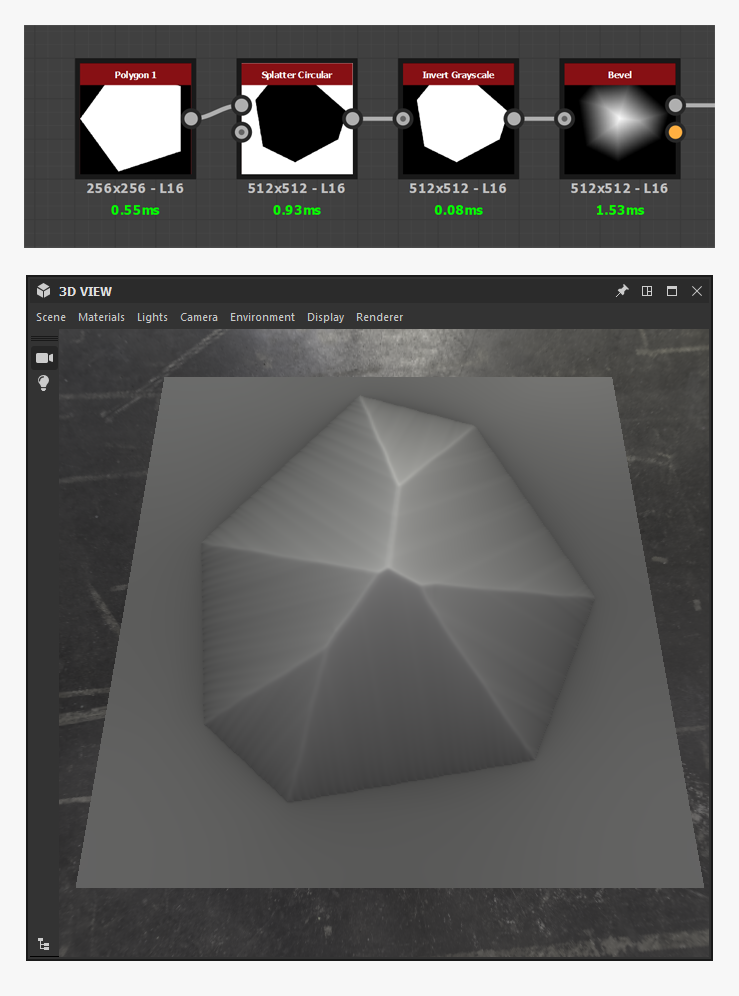
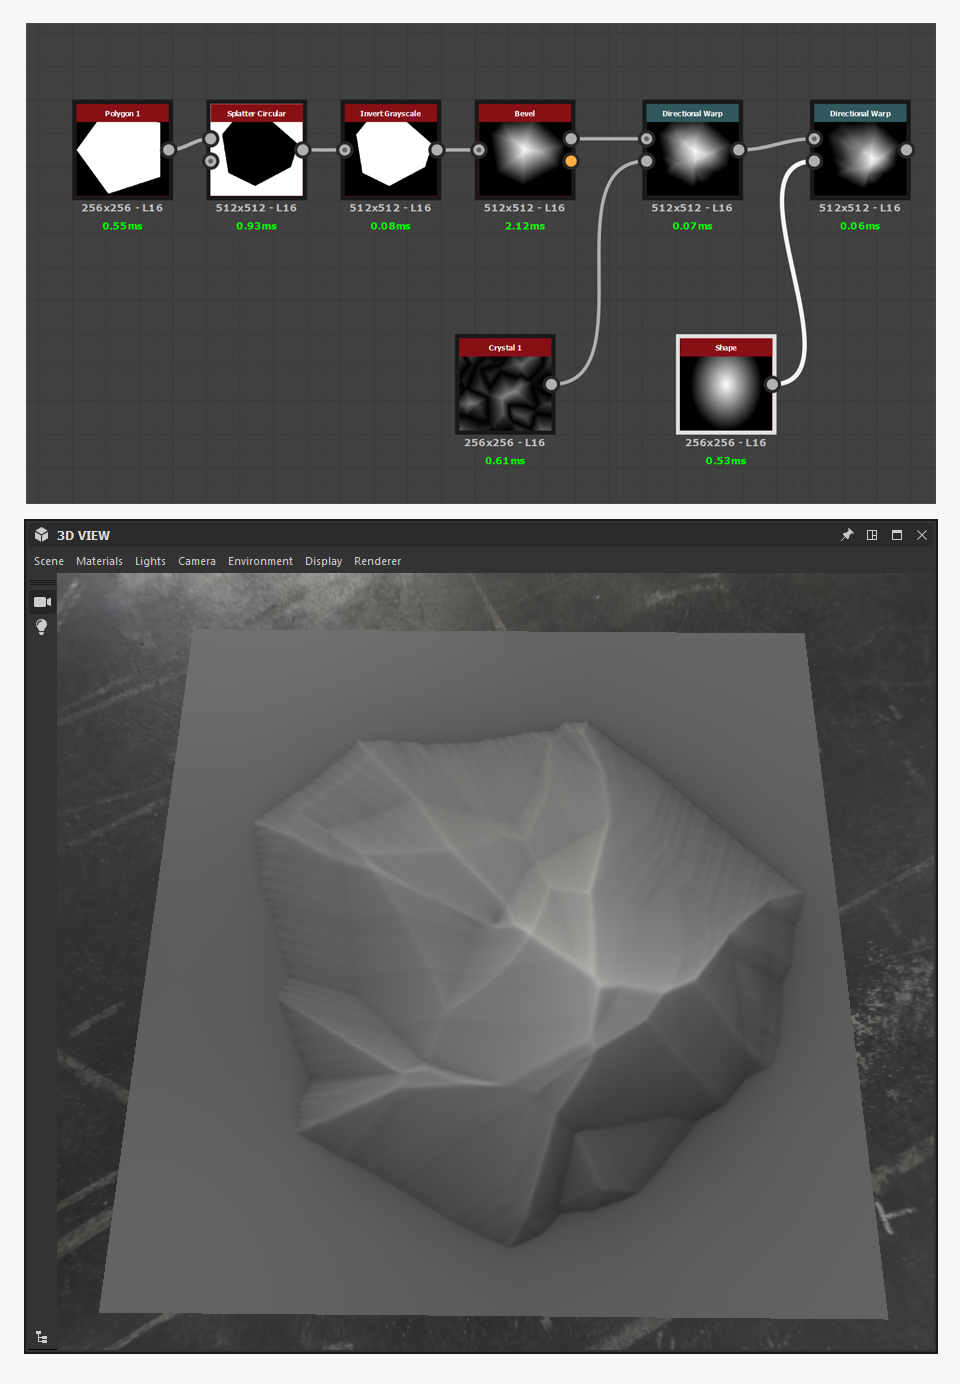
We can start by producing the main volumes of the texture with a deliberately simple technique for the purposes of this tutorial. Using Polygon 1 in Splatter Circular, it is possible to obtain a wreath shape that will define the shape of the rock chunk once we invert the results. The Bevel node allows us to add relief and so create the volume for our chunk.
Now, to give it a more natural flow, the idea is to come and break our original shape with the help of different Directional Warps. The presence of the line left over from the Bevel is not very bothersome at the moment because of the eventual size of our chunk.
The choice of noise is rather important. If you use the Cloud type noises, you are going to add high frequency information within the shape, even though for the moment we need to only work on the global volume. It is best to favor less noisy nodes, such as Crystal or Perlin in order to** avoid parasitic information**. The
Paraboloid used in the second Directional Warp allows us to shift the peak of the chunk towards the edges and get a less conical and regular shape.
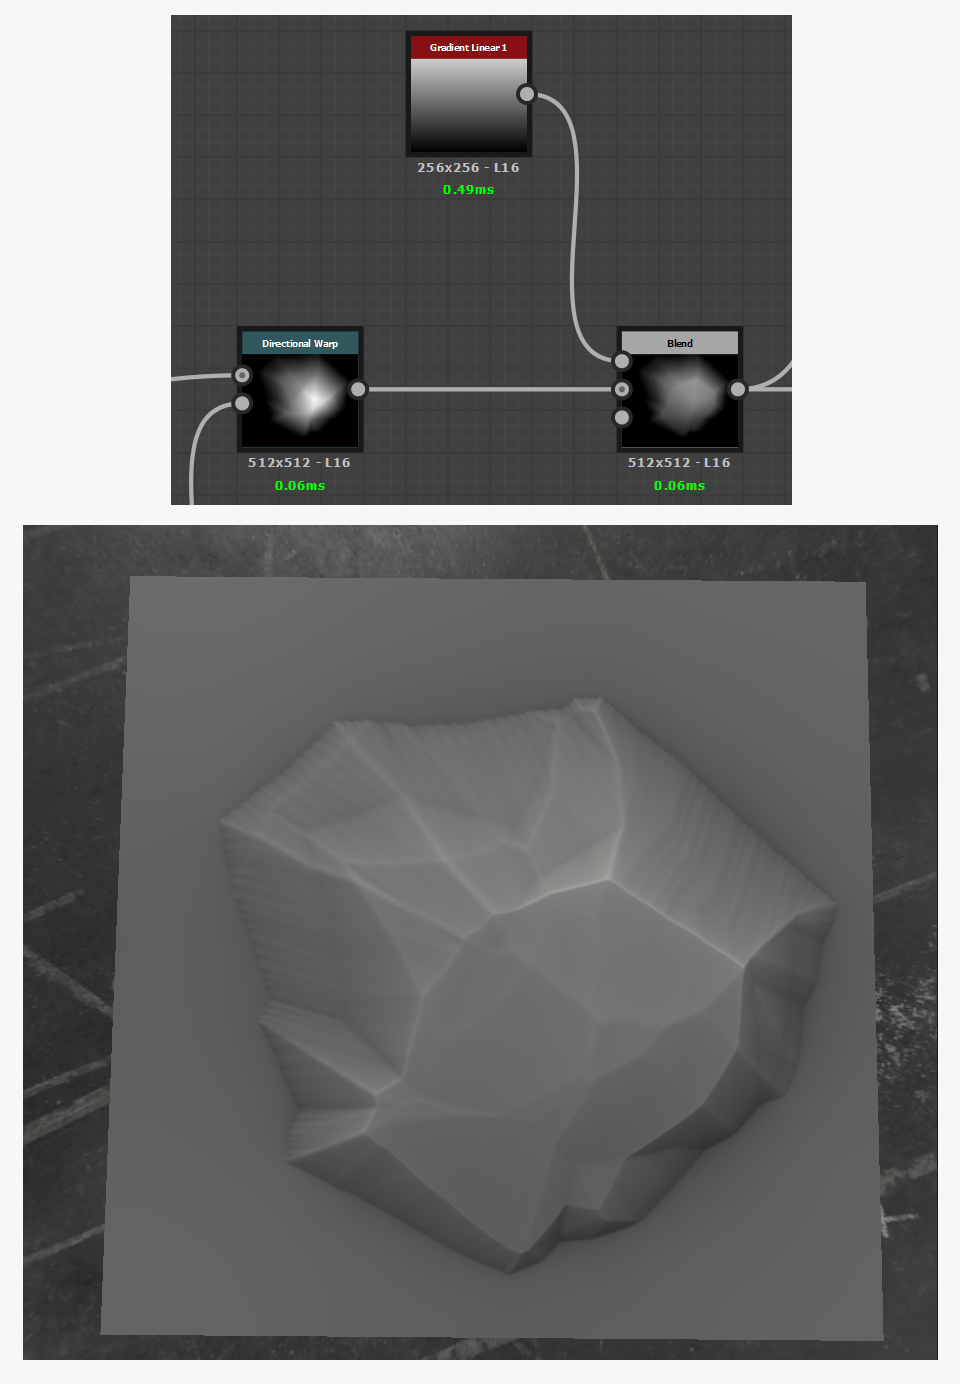
The next step consists in adding a Gradient linear 1 with the Blend in Min (Darken) mode to give a slight direction to our surface. This blending mode behaves a little like a Boolean in the sense that it cuts the surface according to the slope of the Gradient. It is unnecessary to leave the blend opacity at maximum. A 0.8 intensity will allow us to preserve some details on the surface.
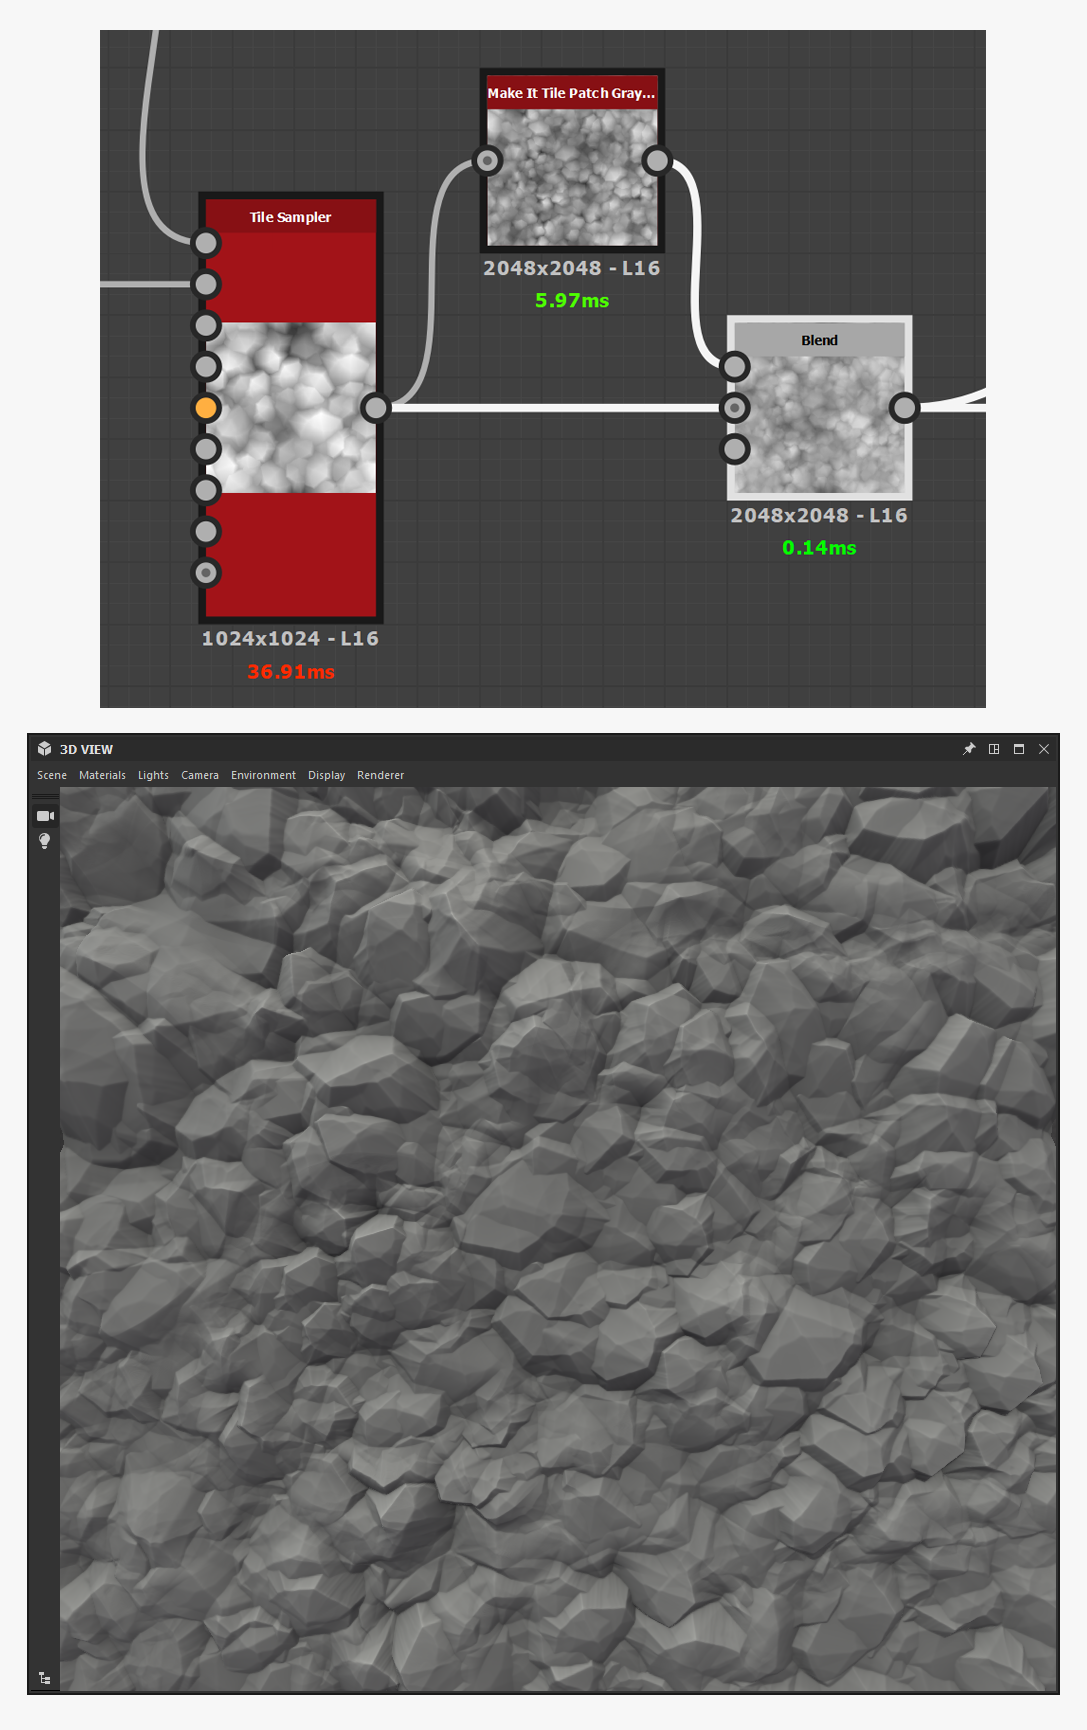
With the help of the Tile sampler, we are going to scatter our chunk. Do not worry about interpenetration, it is intended! The point of having generous slopes on our chunk is that it facilitates the interlocking of shapes and forms a large solid mass. By playing with some parameters (mostly Rotation Random and Position Random), we can get rather satisfactory results. In order to introduce a few variations here and there, it is possible to connect one of the already made noises so it influences the scale of some chunks, and so, obtain more roughness by slightly reducing their size.
When I am content with my general shapes, I usually like to reuse what I’ve made to get higher frequency details. For instance, by increasing the tiling and adding a few quick variations (with the direction), we can obtain a height which can be combined (Copy blend/0.5) with the one coming out of the Tile sampler. This simple process will add a layer of detail at little cost.
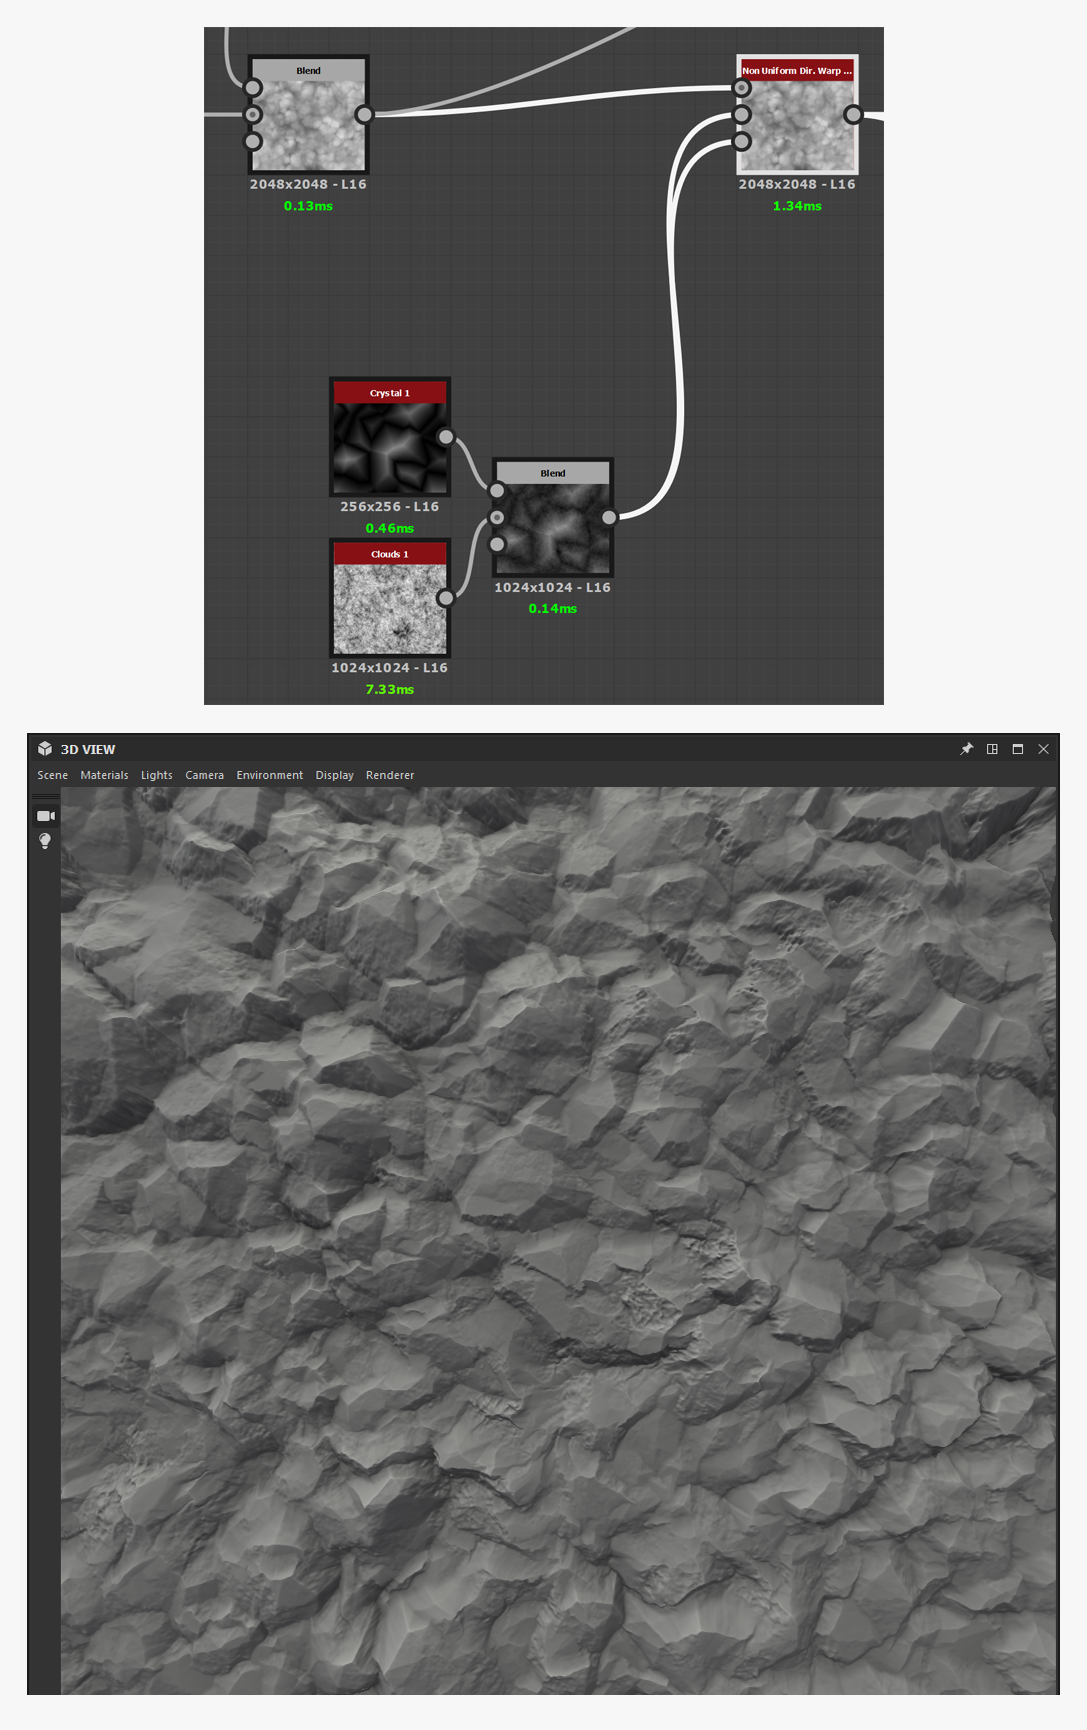
Now my goal is to polish the surface a little.
In order to do so, I will use one of my new favorite nodes, the Non uniform Dir. Warp
, which allows me to add variation to all directions with little cost to performance. I mix together two noises (one for high frequency and the other for low frequency detail), which I then feed into the Intensity and Warp Angle input.
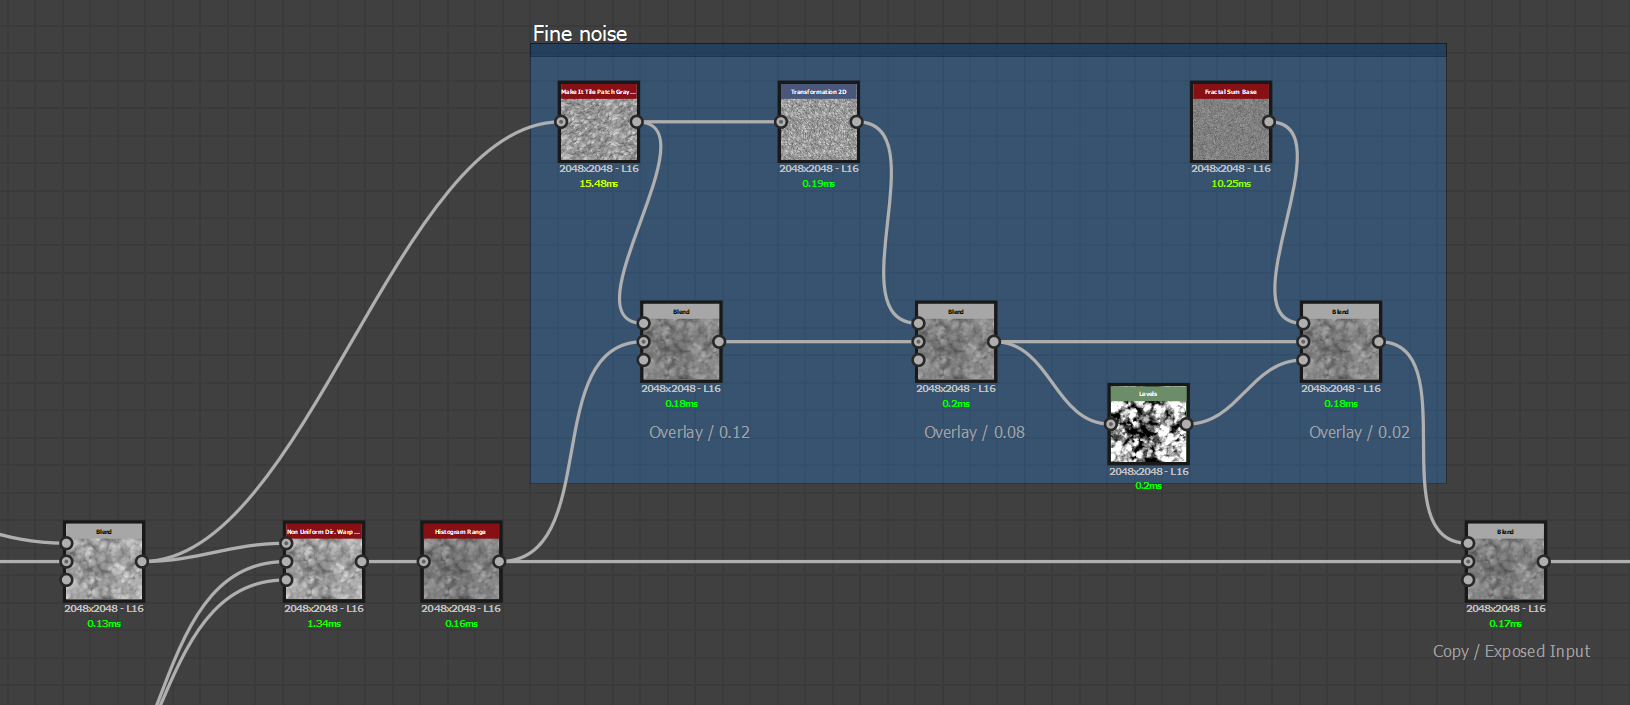
Now we get to an important junction of the process - fine noise generation.
In this junction, I am trying to add rather dense details to my base so I can obtain a noisy and detailed version which I will combine to the base version via a blend node. This way I can get an exposable parameter (blend intensity) that will allow me to rapidly adjust how visible I want the details on my surface to be.
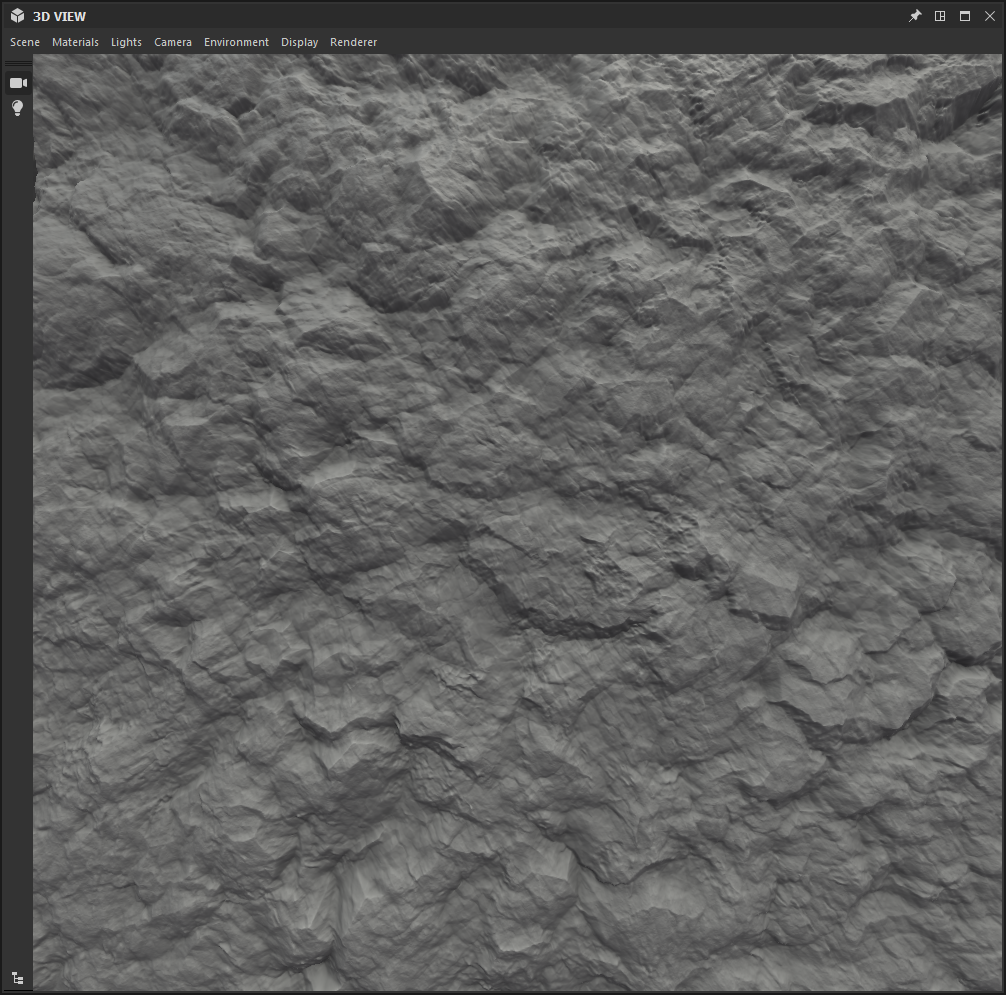
Last steps - I am adding an Auto level (to make sure that I am using the entire range of the grayscale), then a Histogram Range which will allow me to decrease noise intensity and get something a bit more subtle
. We have to make sure that the result is connected to the Height Output of our graph, and our Stone noise is ready for use.
We replace the stone noise (drag and drop the Stone Surface Graph into the main graph) by the new one we’ve just finished.
Nevertheless, as is, it is still a little too regular
.
We are going to reduce the intensity of detail so our texture does not look overloaded. It is a good idea to have areas which will progressively fill with details. Starting with Flood Fill, it is possible to generate random gradients which will provide the desired effect. As before, let us not forget to use the Distance node as to avoid artifacts on the edges.
And here is the newly moderated height.
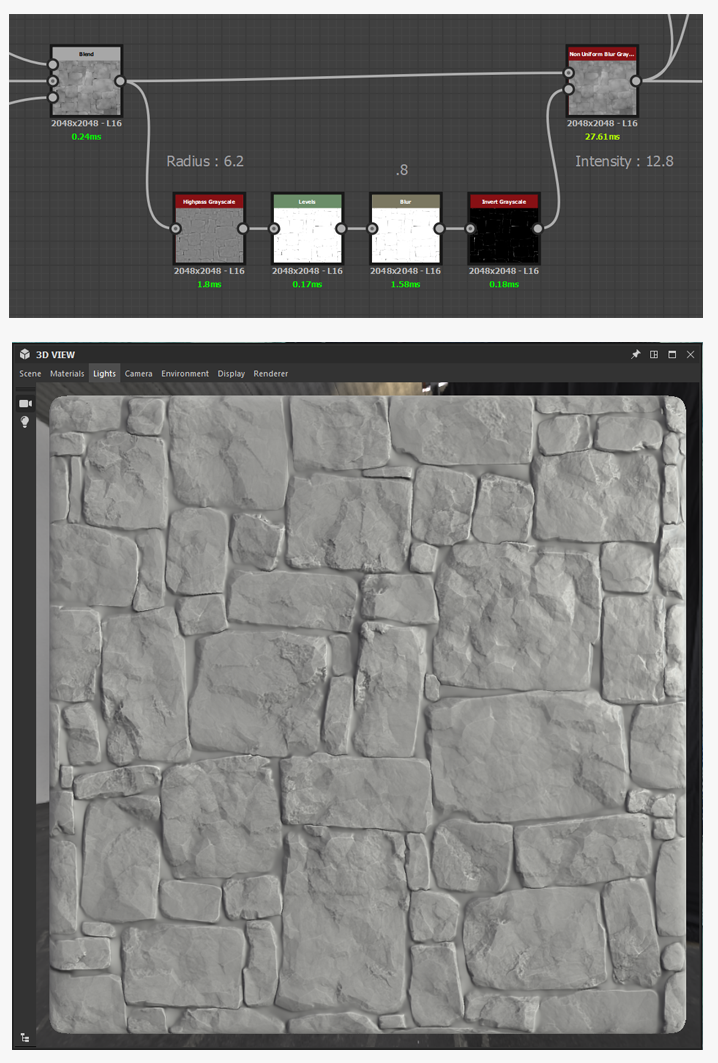
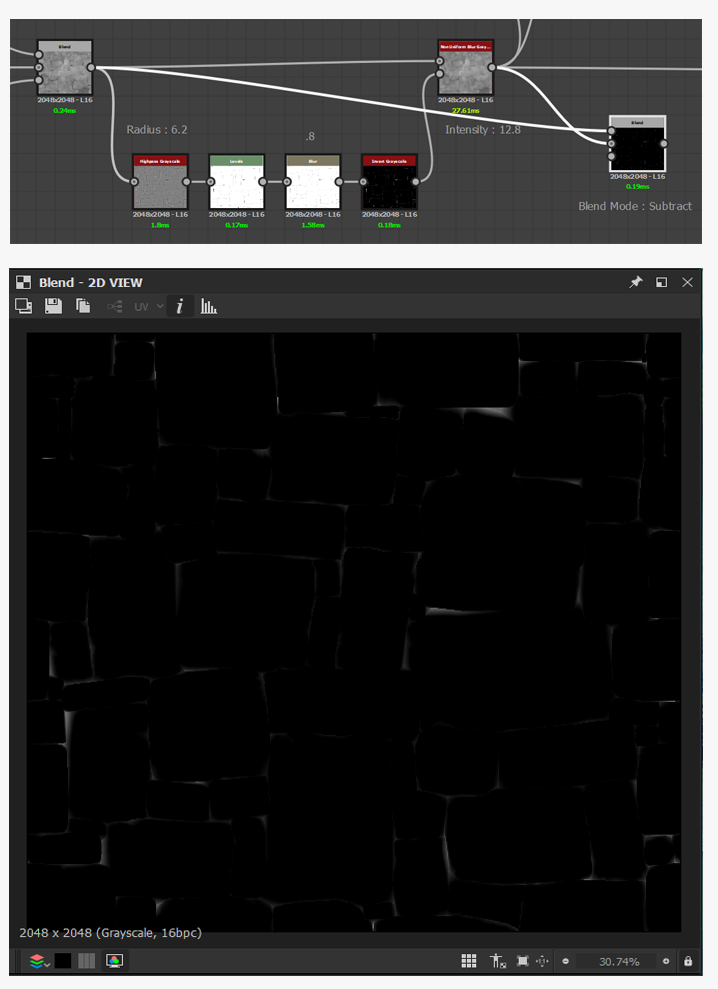
Now, let's add some grout between the stones
. As usual, with Designer, there are t ons of ways to achieve this. We will go with the quick way here by using the Height directly and a Non Uniform Blur.
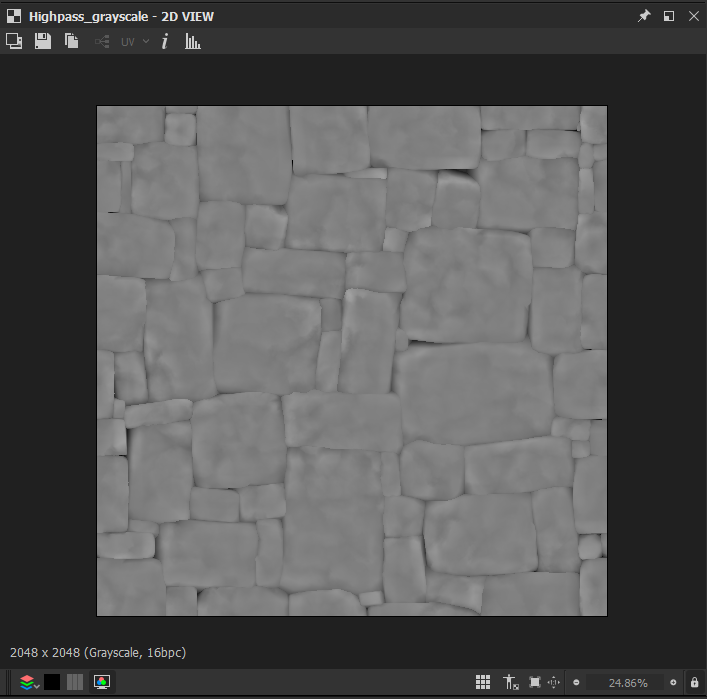
By making use of the Highpass Filter with a small radius, you can remove larger volumes from the Height to highlight only medium scale information such as cavities or edges.
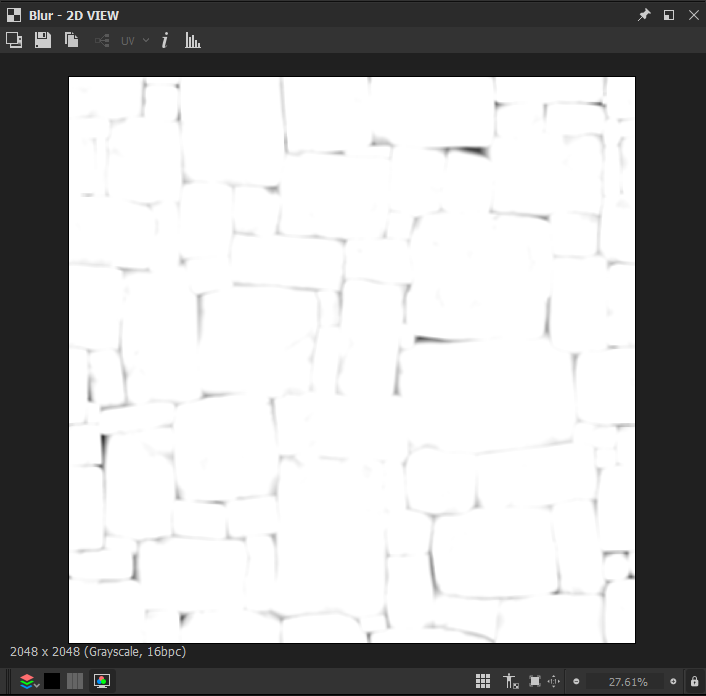
With a Levels and a Blur, you can straighten your mask to isolate the darkest part and then blur it a little to get
softer transitions.
Finally - as to the Non uniform blur we were talking about - you’ll first have to invert your mask to get white values where you want your grout to be. Then you should feed the result inside the Blur Map input of a Non Uniform Blur. Next, just connect your improved height to the Grayscale input and increase the intensity to blur the cavities and get flat areas which will be used as grout.
We are really close to switching to Painter, don’t worry - the hardest part is over now.
What you first need is to generate a mask that will help you hide the grout part. It’s simple - we can do that by making a comparison of height in two different states with a Subtract blend. You’ll get dark grayscale variations - but what does it mean? It means that every time you have a Height value that differs from the original Height, the pixel will be lighter according to the intensity of that difference.
Anyway, you don’t want a mask that gives you the difference in intensity, you only want the location where the different pixels are. So - just boost this value with a level and add an Output node to be able to export the mask generated.
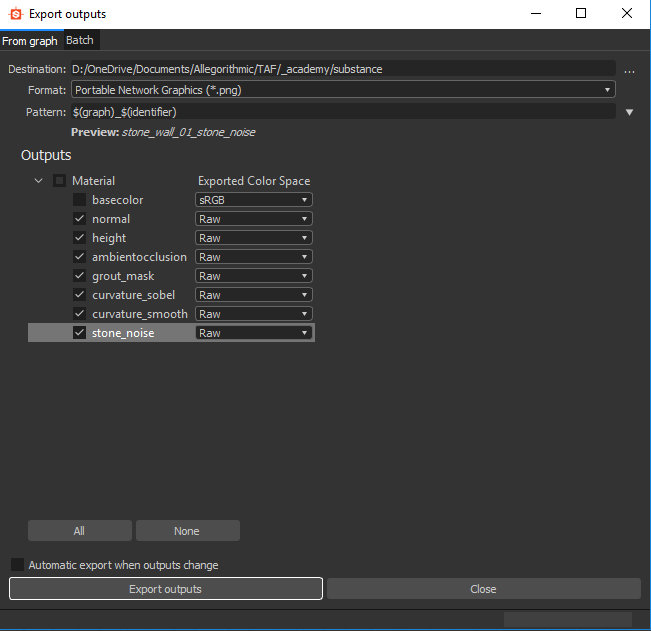
Since we are going to export a few things, let’s generate as much as we can so as to not do it in Painter.
The .png format will do fine.
Helpful things to export :
Normal map
Height
Ambient Occlusion
Grout Mask
Curvature Sobel
Other Good things to export ( optional) :
Curvature Smooth
Stone Noise
Notice that we won’t need Metallic, Roughness or Base Color since we didn’t work with these.
You can control how Adobe websites use cookies and similar technologies by making choices below. But note that if you disable cookies and similar technologies entirely, Adobe websites may not function properly.
Cookies are small text files stored by your web browser when you use websites. There are also other technologies that can be used for similar purposes like HTML5 Local Storage and local shared objects, web beacons, and embedded scripts. These technologies help us do things like remembering you and your preferences when you return to our sites, measure how you use the website, conduct market research, and gather information about the ads you see and interact with.
You can make choices in the menu below about what cookies and other technologies you want us to use on Adobe sites when you visit them from this browser. You can always change those choices later by clicking on the Cookie Preferences link at the bottom of the page.
If enabled:
We can improve your experience by tailoring the site and the content to things we think might be of interest
We can better keep track of your preferences — like what language you prefer to use
We will better understand your likely interests so we can provide you more relevant Adobe ads and content on non-Adobe websites and in non-Adobe apps
It will help us improve the performance of our website and those of our partners who use the Adobe Experience Cloud
If disabled:
We won’t be able to remember you from session to session so the experience may not be tailored to your interests
You’ll still have access to the content of the site but certain features that depend on cookies may not function
You’ll still see ads, they just may not be as relevant to you
General information
You can control how Adobe websites use cookies and similar technologies by making choices below. But note that if you disable cookies and similar technologies entirely, Adobe websites may not function properly.
Cookies are small text files stored by your web browser when you use websites. There are also other technologies that can be used for similar purposes like HTML5 Local Storage, web beacons, and embedded scripts. These technologies help us do things like remembering you and your preferences when you return to our sites, measure how you use the website, conduct market research, and gather information about the ads you see and interact with.
You can make choices in the menu below about what cookies and other technologies you want us to use on Adobe sites when you visit them from this browser. You can always change those choices later by clicking on the Cookie Preferences link at the bottom of the page.
If enabled:
We can improve your experience by tailoring the site and the content to things we think might be of interest
We can better keep track of your preferences — like what language you prefer to use
We will better understand your likely interests so we can provide you more relevant Adobe ads and content on non-Adobe websites and in non-Adobe apps
It will help us improve the performance of our website and those of our partners who use the Adobe Experience Cloud
If disabled:
We won’t be able to remember you from session to session so the experience may not be tailored to your interests
We’ll still count your use of our site and services
You’ll still have access to the content of the site but certain features that depend on cookies may not function
You’ll still see ads, they just may not be as relevant to you
Operate the site and core servicesOperate site and measure engagement
Always active
These cookies are required, and they are used to enable the site and related services core functionality. Without them the site could not operate, so they cannot be disabled.
These cookies enable the site and related services’ core functionality and collect statistics about user engagement, such as counting active use to help us understand trends. These cookies cannot be disabled.
Measure performance
These cookies are used to analyze site usage to measure and improve performance. Without them Adobe cannot know what content is most valued and how often unique visitors return to the site, making it hard to improve information we offer to you.
These cookies are used to analyze site usage to measure and improve performance. Without them Adobe cannot know what content is most valued, making it hard to improve information we offer to you.
Extend functionality
These cookies are used to enhance the functionality of Adobe sites such as remembering your settings and preferences to deliver a personalized experience; for example, your username, your repeated visits, preferred language, your country, or any other saved preference.
Personalize advertising
These cookies are used to enable Adobe and our partners to serve ads more relevant to your interests. Without them you will still see ads, but they might not be as relevant to you.
Personalize advertising
These cookies are used to enable Adobe and our partners to serve ads more relevant to your interests. Without them you will still see ads, but they might not be as relevant to you.