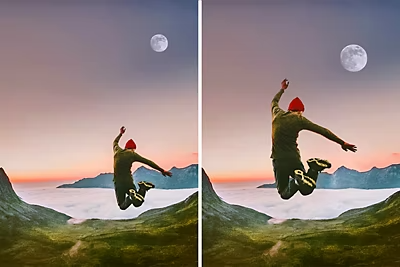
What is the Move and Scale Object guided edit?
Move and Scale Object is a guided edit in Photoshop Elements that lets you select any object in a photo and move it to a different position, scale it up or down, or duplicate it to create a copy. When you move an object, Photoshop Elements uses AI to automatically fill in the area it was taken from, so the background looks natural rather than leaving a blank gap. It’s useful for all kinds of situations like nudging a subject closer to the center of a photo, making an object larger or smaller to improve the composition, or duplicating something to create a repeating effect.
Time required: About 5-10 minutes. Skill level: Beginner-friendly
Before you begin, make sure you have:
- Photoshop Elements installed and open on your computer. Don’t have it yet? Start a free 7-day trial.
- A photo with an object you’d like to move, resize, or duplicate.
Step 1: Open your photo in Guided mode
Open your photo in Photoshop Elements and click Guided at the top of the screen. Click the Basics tab below and select Move and Scale Object to open the guided edit.

Step 2: Choose a selection tool
The guided edit gives you two tools to select the object you want to move. Choose whichever works best for your photo:
- Auto Selection: drag a box around the object and Photoshop Elements automatically detects its edges. Best for objects with clear, distinct outlines.
- Quick Selection: paint over the object with a brush to build up a more precise selection. Useful for objects with complex or detailed edges.
You can also use the Add and Subtract options to refine your selection after the initial pass — adding areas that were missed or removing areas that were included by mistake.
Step 3: Select the object
Using your chosen tool, draw around or paint over the object you want to move. A selection outline will appear around it. Take a moment to check that the selection covers the whole object without including too much of the background.
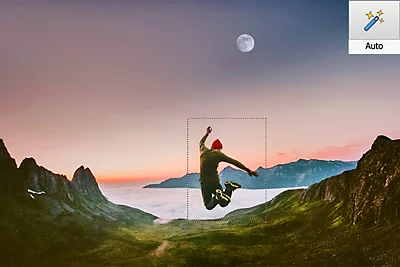
Step 4: Move, scale, or duplicate
With your object selected, you have three options in the panel:
- Move: click and drag the selected object to a new position anywhere on the canvas.
- Duplicate: creates a copy of the object that you can drag to a new location, leaving the original in place.
- Scale: drag the corner handles to make the object larger or smaller.
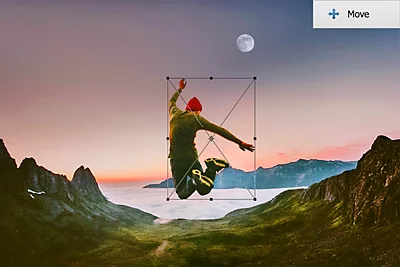
Step 5: Refine the result
When you move an object, Photoshop Elements automatically fills in the area it left behind using AI. The result is usually clean, but if you notice any imperfections — repeating patterns, smudging, or mismatched texture — you can clean them up with the Healing Brush or Clone Stamp tool.
Click either tool in the guided edit panel and paint over any areas that need touching up. A few clicks is usually all it takes.
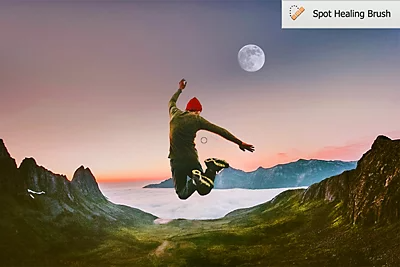
Step 6: Save your photo
Once you’re happy with the result, click Done in the guided edit panel. Your edited photo will appear in the main editor window where you can continue making changes or go straight to saving.
Go to File > Save As and give your edited version a new name to keep your original photo safe and untouched.
Helpful hints for better results
Objects with plain backgrounds move most cleanly
The AI fill works best when the area around the object is relatively consistent — a clear sky, a grassy field, a plain wall. If the object you’re moving is surrounded by complex detail, the fill may need a bit more clean-up with the Healing brush afterward.
Use Duplicate to create a natural-looking repeat
Duplicate is great for adding more of something that’s already in the photo — an extra flower in a garden, another bird in the sky, a second candle on a table. Because the copy comes from the same photo, it blends in naturally without any color matching needed.
Scale before you move
If you need to both resize and reposition an object, it’s usually easier to scale it first and then move it into position. That way you can judge the right size relative to its surroundings before committing to a new location.
You can always undo
Press Ctrl+Z on a PC or Command+Z on a Mac to undo any step. Photoshop Elements keeps a full history of your edits, so you’re never stuck with a result you’re not happy with.
Common questions

You may also like
Photoshop Elements 2027
Photoshop Elements &
Premiere Elements 2027
Create
- Restore a photo
- Insert an object into a photo
- Warp text into curves and shapes
- Extend a photo background
- Remove objects and people from photos
- Remove or replace your background
- Add text styles like shadows and glows
- Touch up portraits
- Create a custom pattern brush
- Move, scale, or duplicate an object
- Combine multiple photos into one
- Add text to a shape
Connect