.

How to remove or replace a photo background in Photoshop Elements

Swap out a distracting background, drop in a new photo, or make it transparent entirely. The Replace Background Guided Edit does the hard work for you. No complicated selections or masking skills required.

Explore Photoshop Elements

What is the Replace Background Guided Edit?

Replace Background is a Guided Edit in Photoshop Elements that automatically separates your subject from its background, then helps you swap the background for something new. You can replace it with another photo from your computer, generate a brand-new background using AI, choose from a set of built-in presets, pick a solid color, or remove the background completely to get a transparent one.

The Guided Edit walks you through each step on screen, so there’s no guesswork involved. Even if you’ve never edited a photo before, you’ll be able to get a clean result in just a few minutes.

Time required: About 3–7 minutes. Skill level: Beginner-friendly.

Before you begin, make sure you have:

  • Photoshop Elements installed and open on your computer. Don’t have it yet? Start a free 7-day trial.
  • A photo with a subject you’d like to keep. A person, pet, or object works well.
  • A second photo to use as the new background (optional). You can also use a preset or generate a background using AI.

Step 1: Open your photo in Guided mode.

Open your photo in Photoshop Elements. At the top of the screen, you’ll see three editing modes: Quick, Guided, and Advanced. Click Guided to switch to that mode.

Once you’re in Guided mode, look for the panel on the right side of the screen. Click Special Edits, then scroll down and click Replace Background.

Tip: Photos with a clear subject and a reasonably distinct background give the best results. For example, a person standing in front of a plain wall, or a dog sitting in a garden.
Hand holding an ice cream cone. Yellow background.

Step 2: Select your subject automatically.

In the Replace Background panel, click the Select Subject button. Photoshop Elements will automatically analyze your photo and select the main subject. You’ll see a selection outline appear around it. Don’t worry if the selection isn’t perfect yet. You’ll have a chance to clean up any rough edges in a later step. For now, just check that the main subject is roughly selected.

Selected Subject: Hand holding an ice cream cone

Step 3: Choose a new background.

Now it’s time to pick what goes behind your subject. You have five options in the panel:

  • Generate image: type a description and let Photoshop Elements create a brand-new background using AI
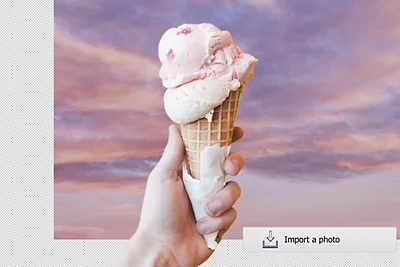
  • Import a photo: use one of your own photos as the new background
  • Preset: choose from a selection of built-in background images included with Photoshop Elements
  • Color: replace the background with a single solid color of your choice
  • None: remove the background entirely to make it transparent (useful if you plan to use the image in another project)

Click the option that fits what you have in mind, then follow the prompt to select your photo, preset, color, or enter your description.

Tip: For the Generate Image option, use clear, specific prompts that describe the setting, style, and mood in plain, natural language. For example: “A cozy living room with warm light, modern style.”
Import a photo for the background

Step 4: Refine the edges of your selection.

Take a close look at the edges where your subject meets the new background. If there are any rough spots, such as stray background pixels or parts of your subject that got cut off, you can fix them now.

Click the Refine Edge brush button in the panel, then paint over any areas that need cleaning up. The brush is designed to handle tricky edges like hair or fur, so don’t be afraid to paint over those areas.

Tip: Use a smaller brush size for detailed areas like hair or the outline of a face, and a larger brush for broad areas like clothing or a simple background edge. You can adjust the brush size using the bracket keys on your keyboard: [ to make it smaller, ] to make it larger.

Step 5: Apply and save your result.

Once you’re happy with how things look, click Done in the Replace Background panel. Your edited photo will appear in the main editor window, where you can continue making adjustments: cropping, color correction, adding text, or anything else you like.

When you’re ready to save, go to File > Save As and give your edited version a new name. This keeps your original photo untouched and safe on your computer.

Helpful hints for better results

Try Generate Image for something completely new.

If you don’t have a background photo in mind, the Generate Image option lets you describe one in plain words and Photoshop Elements will create it for you. Try something like “a misty mountain lake” or “a warm living room.” You can generate multiple options and pick the one that fits best.

Try a preset background first.

If you're not sure which background to use, start with one of the built-in presets. They’re designed to blend naturally with a range of subjects, and trying a few takes only seconds. You can always swap to one of your own photos afterward.

Use the Refine Edge brush for hair and fur.

Hair, fur, and fine edges are the trickiest parts of any background replacement. The Refine Edge brush is specifically designed for these situations. Paint over those areas and Photoshop Elements will pick out the fine detail, even in complex cases.

Common questions


Save today