.

How to remove objects and people from photos in Photoshop Elements

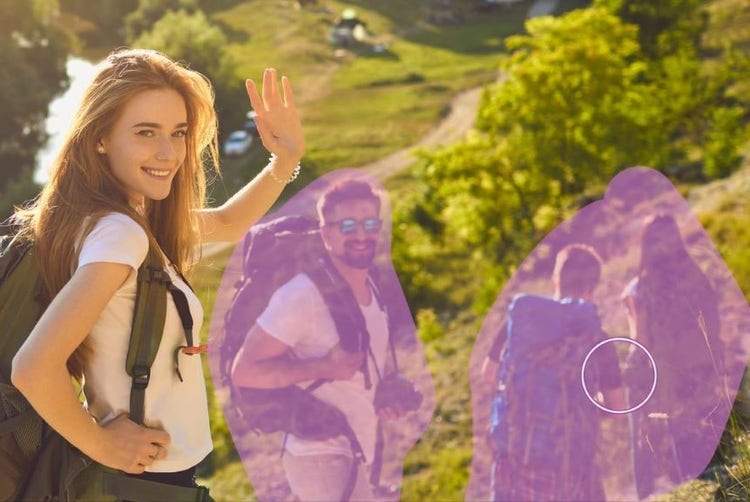
The AI-powered Remove tool makes it easy to erase distractions from any photo. Brush over what you want gone and Photoshop Elements fills in the space automatically. It even detects and removes people for you. No complicated editing required.

Explore Photoshop Elements

What is the Remove tool?

The Remove tool is an AI-powered feature in Photoshop Elements that erases unwanted objects, people, or distractions from your photos and fills in the area naturally. You simply paint over whatever you want gone, and Photoshop Elements figures out what should be in its place based on the surrounding area of your photo.

The Remove tool also includes automatic people detection. If there are strangers or bystanders in the background of your photo, Photoshop Elements can find them and offer to remove them for you — no manual brushing needed.

Time required: About 3–7 minutes. Skill level: Beginner-friendly.

Before you begin, make sure you have:

  • Photoshop Elements installed and open on your computer. Don’t have it yet? Start a free 7-day trial.
  • A photo with something you’d like to remove. Objects, people, or other distractions all work well.

Step 1: Open your photo and select the Remove tool.

Open your photo in Photoshop Elements. You can work in any editing mode, but Advanced mode gives you the most control. To find your photo, drag and drop it into the editor window or go to File > Open and browse for your file.

In the toolbar on the left, click the Remove tool. It looks like a band-aid with a sparkle symbol next to it. If you’re not sure which one it is, hover over the tools and a label will appear with the name.

Tip: The Remove tool works best when the object you want to erase is surrounded by a relatively consistent background, like grass, sky, pavement, or a plain wall. The more consistent the area around the object, the cleaner the result.
Selecting remove tool

Step 2: Adjust the brush size.

Before you start brushing, take a moment to set the brush size. You want it to be roughly the same size as the object you're removing — big enough to cover it in a few strokes, but not so large that you’re painting over areas you want to keep.

You can adjust the brush size using the size slider in the options bar at the bottom of the screen. You can also use the bracket keys on your keyboard: [ to make the brush smaller, ] to make it larger.

Tip: For small objects like a piece of litter or a sign in the distance, use a small brush and take your time. For larger objects like a car or a person, a bigger brush lets you cover the area more quickly.
Adjusting brush size

Step 3: Brush over what you want to remove.

Click and drag to paint over the object or person you want to remove. A colored overlay will appear as you brush, showing Photoshop Elements what to erase. When you release the mouse, the tool gets to work and the object disappears, replaced by the surrounding area of your photo.

Brushing over items to remove

Step 4: Use automatic people removal.

Photoshop Elements can automatically detect people in the background of your photo and offer to remove them for you. When you select the Remove tool, look for the “Find people in the background” in the tool bin at the bottom. Click it and Photoshop Elements will scan your photo, highlight people it finds, and let you remove them with a single click.

This is especially useful for photos taken in busy public places, where bystanders may have walked through the background. Instead of painting over each person individually, the automatic detection handles the whole process for you.

Step 5: Save your result.

Once you're happy with how the photo looks, go to File > Save As and give the edited version a new name. This keeps your original photo safe and untouched on your computer.

Finished photo with objects removed

Helpful hints for better results

Use automatic people detection for busy scenes.

If your photo was taken somewhere public, like a park, beach, or street, the automatic people detection can save you a lot of time. Let Photoshop Elements find the people in the background first, then use the brush to clean up anything it missed.

Work in stages for larger objects.

For a large object like a car or a building, try removing it in sections rather than painting over the whole thing at once. Working in smaller overlapping strokes often gives a cleaner, more natural result than one big sweep.

Zoom in for better precision.

For small or detailed areas, zoom into your photo first using Ctrl++ on a PC or Command++ on a Mac. Working at a larger zoom level makes it much easier to brush accurately around edges and fine details.

You can always undo.

Press Ctrl+Z on a PC or Command+Z on a Mac to undo any step. Photoshop Elements keeps a full history of your edits, so you’re never stuck with a result you’re not happy with.

Common questions

Can Photoshop Elements automatically remove people from photos?

Yes. Photoshop Elements includes automatic people detection in the Remove tool. It scans your photo for people in the background and lets you remove them with a single click. You can also use the brush manually for anything the automatic detection doesn’t catch.

What kinds of objects can I remove?

You can remove almost anything — people, vehicles, signs, litter, power lines, shadows, and more. The tool works by filling in the removed area with surrounding pixels, so it works best when the background around the object is relatively consistent.

What if the result doesn’t look quite right?

Try brushing over the area again — a second pass often cleans up any imperfections. If the result still isn’t right, press Ctrl+Z (PC) or Command+Z (Mac) to undo and try a slightly different brushstroke. Adjusting your brush size can also help.

Will this work on photos taken with a phone?

Yes. The Remove tool works on photos taken with any device, including smartphones. JPEG and PNG formats are both supported. Just open your photo the same way you would any other file.

Will my original photo be changed?

Not unless you save over it. Use File > Save As to save your edited version with a new name and your original will stay exactly as it was.

How is this different from using the eraser tool?

The eraser tool simply deletes pixels, leaving a blank or transparent area. The Remove tool uses AI to intelligently fill in the space where the object was, making it look like the object was never there. The result is far more natural and requires no manual retouching.


Save today