


Design
How do you prepare print-ready files with bleed, crop marks, CMYK, resolution, and PDF export?

Adobe Express
11/05/2026
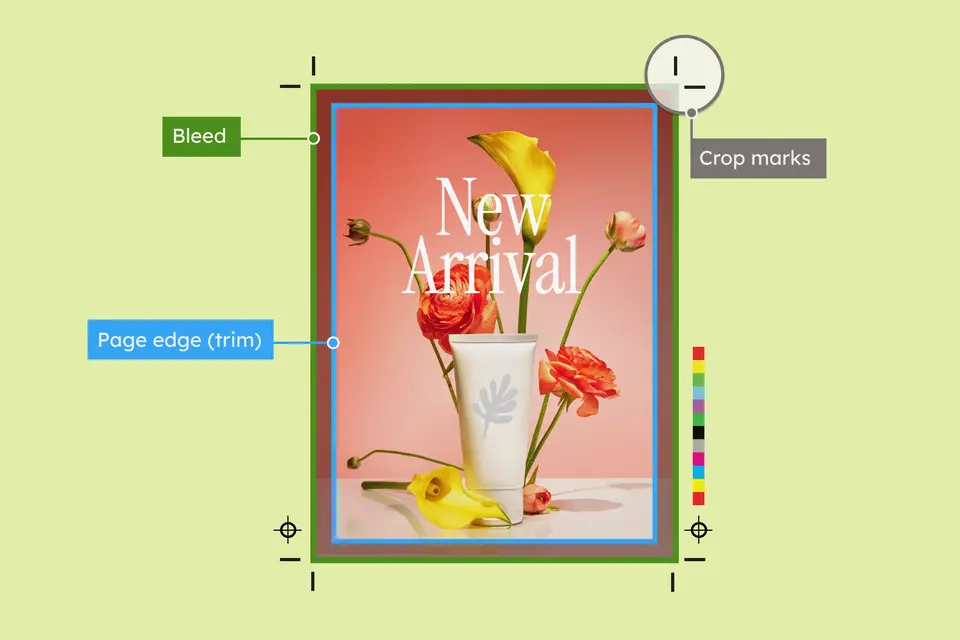
A business card can look finished on your screen and still need a few adjustments before printing. Backgrounds need room for trimming. Photos need enough detail at their printed size. Small text needs to stay readable when someone holds the card in their hand.
Preparing a print-ready file brings those details together. Whether you’re ordering cards for a new business or posters for an event, start with your printer’s specifications, build the design at the right size, and check the exported PDF before approving production.
Key takeaways
- Confirm the printer’s requirements for size, bleed, margins, color, and PDF delivery before designing.
- Extend backgrounds into the bleed and keep essential content inside the safe area.
- Check image resolution at the size the image will print.
- Use the color mode and profile requested for the job; CMYK isn’t a guarantee of an exact color match.
- Include crop marks only when the printer requests them.
- Export a print PDF, inspect the finished file, and approve a proof before the full run.
What is a print-ready file?
A print-ready file is artwork prepared to match the printer’s specifications for dimensions, image quality, color, page arrangement, and trimming. PDF is a common delivery format because it can preserve the layout, fonts, and graphics in one file.
The right settings depend on the job. A business card, folded brochure, and large poster can have different production requirements. This guide to designing for print versus screen explains why preparing a physical piece involves more than checking how it looks on a monitor.
Why should small businesses care about print-ready files?
The final file affects how your design becomes something customers can hold, read, or display. A few checks before ordering can help with:
- Avoiding reprints: Finding a cropped phone number in a proof gives you time to fix it before it appears on a stack of cards.
- Keeping schedules on track: Confirming the printer’s requirements early reduces the chance of redesigning a file just before an event or launch.
- Protecting readability: Text that looks comfortable in an enlarged preview can be difficult to read at its actual printed size.
- Managing color expectations: Reviewing the chosen paper, print settings, and proof helps you judge how brand colors will appear in the finished piece.
- Making reorders easier: An approved file saved with its production details gives you a useful starting point for the next batch.
How do bleed, trim, and safe margins work?
These three boundaries serve different purposes. MOO’s guide to bleed, safe area, and trim explains the distinction:
- Trim: The intended finished edge after the piece is cut.
- Bleed: Extra background color or imagery extending beyond the trim. It gives the printer room for small cutting variations without exposing an unwanted white edge.
- Safe area: The area inside the trim where essential text, logos, and important image details should stay. A safe margin creates space between that content and the cutting edge.
Use the dimensions supplied for your specific product. For example, if a printer requests a 3.5 × 2-inch finished card with 0.125-inch bleed on every side, the artwork including bleed measures 3.75 × 2.25 inches before crop marks are added. Those are example specifications, not a standard for every business-card order.
Should print files use CMYK or RGB?
RGB describes color made with red, green, and blue light, as on a screen. CMYK describes cyan, magenta, yellow, and black inks used in process printing. Some bright screen colors can't be reproduced the same way with those inks on paper.
Follow the printer’s requested workflow. Some providers want a CMYK PDF; others accept RGB artwork and manage the conversion themselves. A color profile describes a particular color space or printing condition, so choosing any available CMYK profile isn’t the same as choosing the right one for your job.
Adobe Express offers both modes for print PDF exports. Confirm that its available settings meet the printer’s requirements.
What image resolution do print-ready files need?
For photos and other images made from pixels, check the resolution in pixels per inch (PPI) at the size you plan to print them. Printer guidance often uses “DPI” for this, although dots per inch technically describes printer output. Around 300 PPI is a common target for detailed images viewed up close; larger posters may use different targets depending on their content and viewing distance.
Adobe’s explanation ofimage size and resolution shows how the measurements relate. Divide an image’s pixel width by its printed width in inches to find its effective resolution. A 1,200-pixel-wide photo provides 300 PPI at 4 inches wide, but only 150 PPI at 8 inches.
Changing a resolution label from 72–300 doesn’t restore missing detail. Use a larger original, reduce the printed size, or choose another photo. For logos and line art, use genuine vector artwork where the workflow supports it.
When should you add crop marks?
Crop marks show where the printed sheet should be trimmed. They sit outside the finished design and serve a different purpose from bleed: marks identify the cutting position, while bleed supplies extra artwork beyond it.
Include marks when the printer requests them. Adobe’s guide to printer’s marks recommends confirming which marks your print provider expects.
Use export controls to add marks; a line drawn around your design becomes part of the artwork.
How do you prepare print-ready files?
Here are 7 essential steps
Step 1: Get the printer’s specifications
Before arranging the layout, confirm the finished width and height, paper stock, quantity, and whether the piece prints on one or both sides. Ask for the product template and its bleed and safe-area measurements.
Then confirm the accepted PDF format, color mode and profile, image resolution, crop marks, and page order. Ask about any required PDF/X standard and available proofs. Keep these specifications with your project.
Step 2: Set the page size, margins, and bleed
Start with the finished dimensions or the printer’s supplied template. Check whether a template already includes bleed before adding more around it; adding the allowance twice changes the file dimensions.
In Adobe Express, open File > Bleed and margins. Turn on Show margins and Show bleed. Use the margin controls and custom bleed settings to enter the printer’s measurements. Apply the settings to all pages when the specifications match throughout.
Check that backgrounds fill the bleed and important content stays inside the safe margins. Remove printable template instructions or guide artwork before export.
Step 3: Prepare the layout for its actual use
For a business card, give the name, contact details, and main action enough space to read comfortably. Check the front and back together, including their orientation. These business card design tips can help you balance content, white space, and materials.
For a poster, decide where people will see it and how close they will be. The event name may need to work from across a room, while the address and booking information will be read nearby. This guide to poster layout and design explains how size and visual hierarchy work together.
If the campaign also needsflyers or digitalbanners, adapt each layout and recheck text and image crops.
Step 4: Check images, text, and color choices
Use Adobe’s image-resolution calculation to check each photo at its printed size. If your printer approves 200 PPI for a 24 × 36-inch poster, an image filling that area needs 4,800 × 7,200 pixels before allowing for bleed.
Proofread names, prices, dates, phone numbers, and web addresses. Check that small text has enough contrast against its background and scan any QR code from a print at its intended size.
If a brand color is critical, discuss an appropriate printed proof with the provider. Paper, ink, and finish can change its appearance.
Step 5: Export the PDF with the agreed settings
In Adobe Express, select Download, then choose PDF Print (Best for printing) under File format. Set Show bleed and Add crop marks according to the printer’s instructions.
The color mode defaults to CMYK (let Express manage colors). Choose RGB (let printer manage color) when that is the requested workflow. In CMYK mode, Advanced settings shows profiles preselected for your region; those advanced settings are unavailable in RGB mode.
Follow Adobe’s PDF export instructions, then download the file. Include only the pages intended for the order.
Step 6: Inspect the exported file and review a proof
Open the downloaded PDF and check dimensions, page count, orientation, cropping, and line breaks. Look for missing elements or leftover template labels.
Print a business-card proof at actual size to judge the text and spacing. For a large poster, inspect a full-size sample of the smallest type and a detailed image area. A desktop print can help you check layout, but color approval should use a proof appropriate to the production process.
If the printer requires technical validation, use its preflight service or Acrobat Pro’s preflight profiles. Preflight checks the file against defined criteria; you still need to confirm that the content is correct.
Step 7: Send a clear production package
Give the final PDF a recognizable filename, such as Bakery_Business_Card_v04_2026-10-24.pdf. Include a short job note with the finished size, quantity, stock, finish, number of printed sides, and agreed color requirements. Identify which page or file is the front and which is the back.
Review the printer’s final proof and any changes before approving the run. Save the approved PDF, editable design, production notes, and proof together so future updates start from the right version.
Print-ready file best practices
- Keep a separate editable original and clearly name each production version.
- Use the selected printer’s template and exact measurements for every product.
- Allow extra breathing room around small text and important details.
- Avoid thin borders close to the trim, where small cutting shifts become obvious.
- Review colors on the intended stock when an accurate match matters.
- Check the exported PDF again after every correction, including a small text edit.
- Keep a record of the approved proof and the specifications used for the order.
Quick print-ready file checklist
✅ Confirm the finished size, orientation, and page order.
✅ Match the printer’s bleed and safe-area measurements.
✅ Extend edge-to-edge backgrounds through the bleed.
✅ Check image resolution at the final printed size.
✅ Use the agreed color mode and profile.
✅ Export the requested PDF format with the correct marks.
✅ Review text, contact details, and QR codes in the exported file.
✅ Approve the proof and save the final production version.
A dependable print workflow starts with clear specifications and ends with a careful proof. Give backgrounds room to trim, check the details at their printed size, and save the settings that worked. Adobe Express can help you prepare the layout and export a PDF for your next print project.


